

You can directly add Appointments and services by clicking the button located in the top right of the screen.
Select the customer, and you will see:
All their information
Their animals
If they have pending invoices to pay
If they have previously canceled appointments
Appointment details: date, pickup/delivery service, ...
You can schedule automatic reminders so that the software reminds them of their appointment and much more.
You can add automatic reminders so that, on the selected day, the customer receives an email reminder of their booking. These reminders are sent automatically; you don't have to send them manually.
You can add as many reminders as you want by clicking the ADD button.
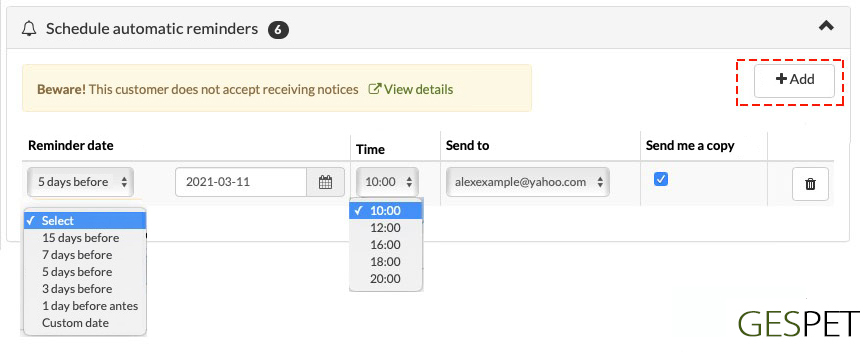
You can choose the day you want the notice to arrive by writing a custom
date or using the date calculator.
For example, if you select 15 days
before, the software calculates 15 days before the appointment date and
writes it in the date field.
If you select, for example, to send the automatic reminder 7 days before, but there are 5 days left for the booking, logically, it can only be scheduled to be sent 4 days before the booking.
You can also select the time you want it to be sent from the Time dropdown. If the customer has multiple email addresses, you can choose which one to send it to.
If you select the "Send me a copy" option, you will receive a copy in your email.
When you Save, these reminders will be scheduled to be sent on the selected
date/time. They will appear here and in the View > Automatic
Reminders.
Reminders cannot be modified, but you can cancel the reminder and create a new one.
If you modify the service date, the reminders will not be automatically deleted. You can keep the reminders you had scheduled or cancel them and create new reminders, as you see fit.
|
For example:
If you want, you can delete that reminder and schedule a new one. |
Read more about the automatic sending of reminders for upcoming booking:
How to configure your Hotel services efficiently?:
Keep readingIt displays the documents or contracts that you have configured so that you can print them and/or deliver them to the client. For example, cancellation terms for appointments, important pre-appointment information, ...
You can specify the type of each document: Privacy, Appointment, Consultation, ... and for greater convenience, they will appear right at that moment so that you can print them, deliver them to the client, or whatever you need.

To add new documents or contracts associated with the appointment, go to
the Tools > Documents option and select the type Booking or
Appointment
Clicking the Save button records the reservation or appointment in the
software, and new buttons appear for:
You can Save again if you have made any changes
To exit without taking any action, simply click the Cancel button.
You can Print the appointment summary document or download it in .pdf format
Or print the appointment summary in ticket format to give to the client
You can Send the appointment confirmation by email to the client
A popup window will open for you to see the email that will be sent to the client, with the date/time and animals. You can also include additional information.
If the client does not have an email address, a warning message
appears. Add their email address to the client's profile, and then
you can send them emails.

A notice also appears if the client does not accept notifications
from you. By clicking View details, you can view/edit
this information in the client's profile, which will open in a new
tab.
If you wish, you can attach the appointment summary with all the details to the reservation confirmation.
You can also send a copy to your own email.
More information about email usage (limits on email sending)
Keep readingYou can mark this appointment as In the waiting room to indicate that the client/animal is already waiting to be attended
You can start the consultation or veterinary service
And you can also Delete or Cancel the appointment. For more information on canceled appointments, see this same section: View Appointments > Information about Canceled Appointments
You can directly add Appointments and services by clicking the button located at the top right of the screen
Select the client, and you will see:
All their information
Their animals.
Select the animal for which you are going to start the consultation and click the
If there is an unfinished consultation for that animal, the software will provide a notice asking if you want to continue with the previous consultation or start a new one

The consultation screen has been specifically designed by usability experts to allow you to view all the information you need quickly and efficiently. You'll be amazed.
This is the structure of the consultation screen:
Right side: Current consultation and the ability to quickly access the previous recent consultations without leaving the current screen.
Top area: Information about the consultation and related details.
Central area: Relevant information that you may need to consult without leaving this screen.
Bottom area: Add the fees or services applied in this consultation (examination, diagnostic, treatment, ...)
You can navigate between consultations if you want to review information from a previous consultation without leaving the current screen.
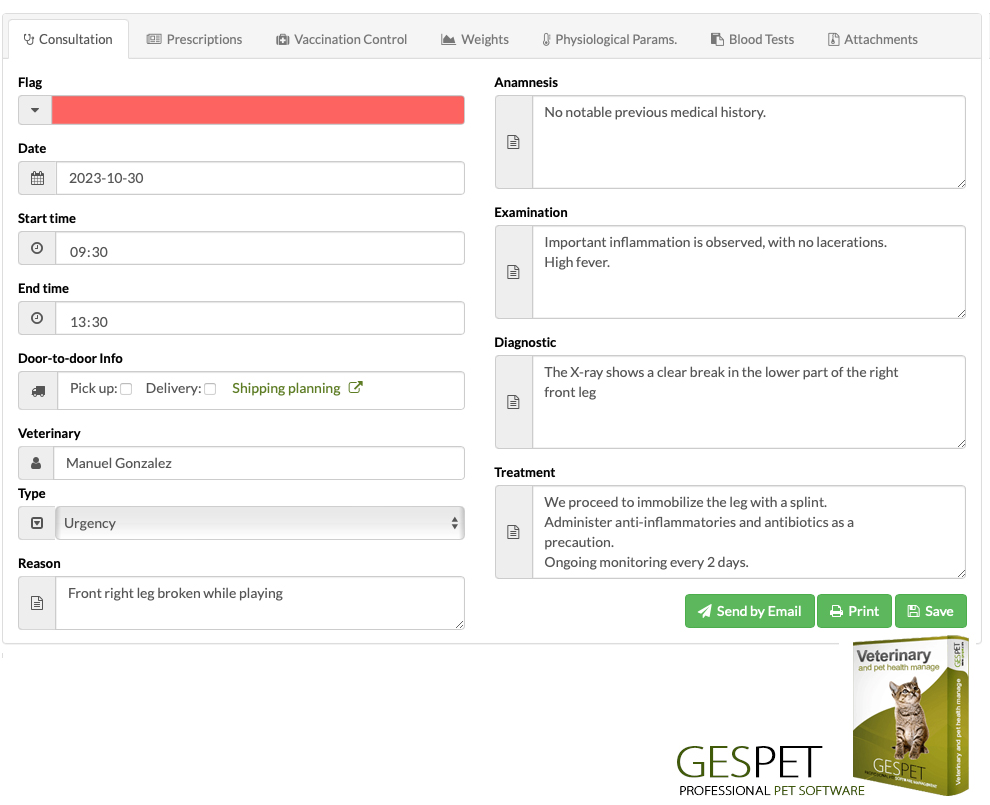
You can identify consultations with a color label for quick identification.
Record the start and end date and times for more precise time tracking and better resource management.
You can check if it has Transportation Service: Pickup/Delivery
You can assign the veterinarian who will handle the consultation, and then you can check their work statistics and time per consultation.
Use the Type field to specify if it's a regular consultation, an emergency, surgery, etc.
You can include a brief reason when scheduling an appointment, which can help with resource organization.
Finally, there are several fields to record all the consultation information: anamnesis, examination, diagnosis, and treatment.
You can print a summary document of the consultation with all this information, and you can also send it by email.
In the animal's profile > right menu > Consultations, you can see all their consultations.
You can add prescriptions or recipes for that animal by specifying the medication name, format, quantity, frequency, treatment duration, and any additional instructions for the owner.
Entering data is very quick, and the software helps you make it even faster and easier. When you start typing, it will check all previous data and show you matches. If you have prescribed this medication/treatment before, you can click it, and it will automatically fill it in for you (you can modify as needed).
You can send it by email to the customer and print it. In the Tools > Documents and Contracts option, you can configure prescription documents with the format you need. If you need different types of prescriptions, you can configure them all, and when printing/sending by email, you can select the one you need.
In the configuration of the document type Prescription, use
template texts to replace the medication name, frecuency, etc
How to set up documents and data auto-fill:
Keep readingIn the animal's profile > right menu > Prescriptions, you can see all their prescriptions.
You can quickly record and edit vaccinations from within the consultation itself, and you will see the vaccination history for that animal:
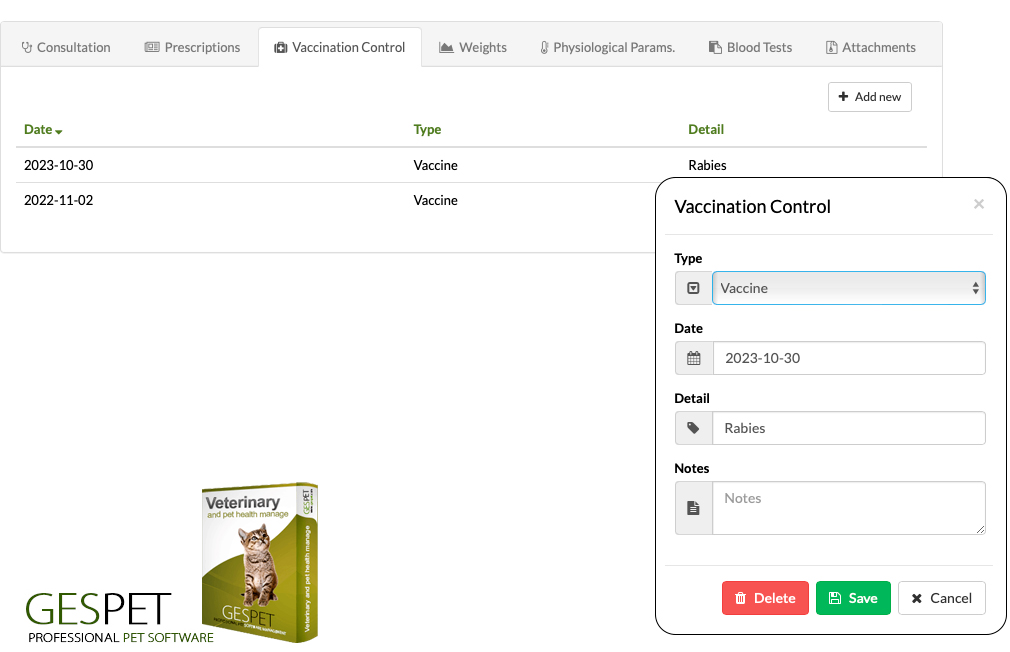
In the animal's profile > right menu > Vaccination Control, you can view their vaccination history.
You can quickly record and edit the animal's weights right from the consultation, and you can quickly see the weight history of that animal in a chart:
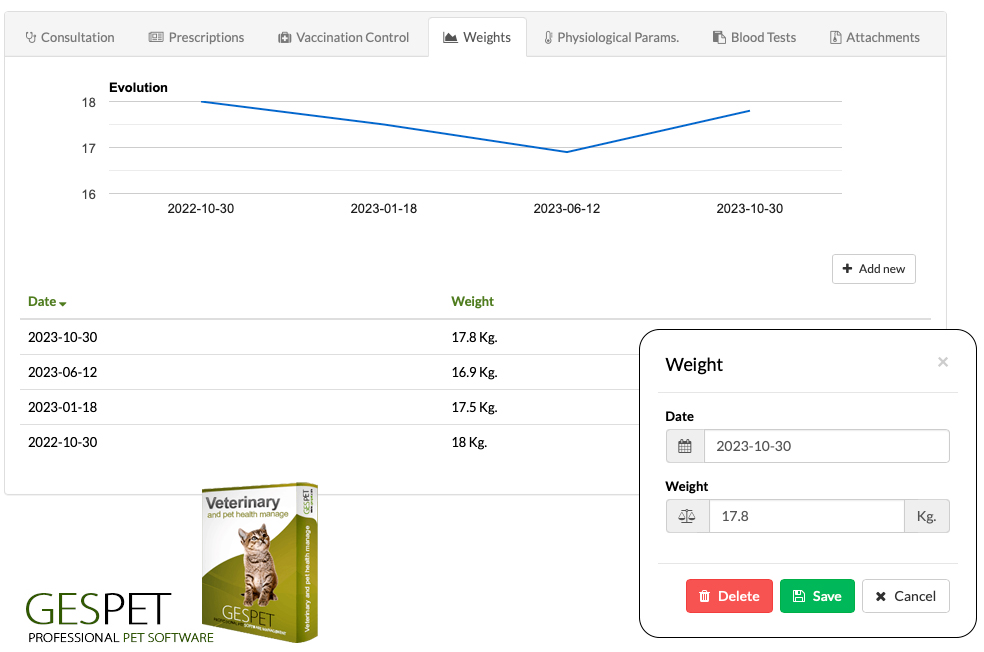
In the animal's record > right menu > Weights, you can see the weight history
You can quickly note and edit the animal's physiological parameters:
Respiratory Rate
Heart Rate
Temperature
Systolic Blood Pressure
Mean Arterial Pressure
Diastolic Blood Pressure
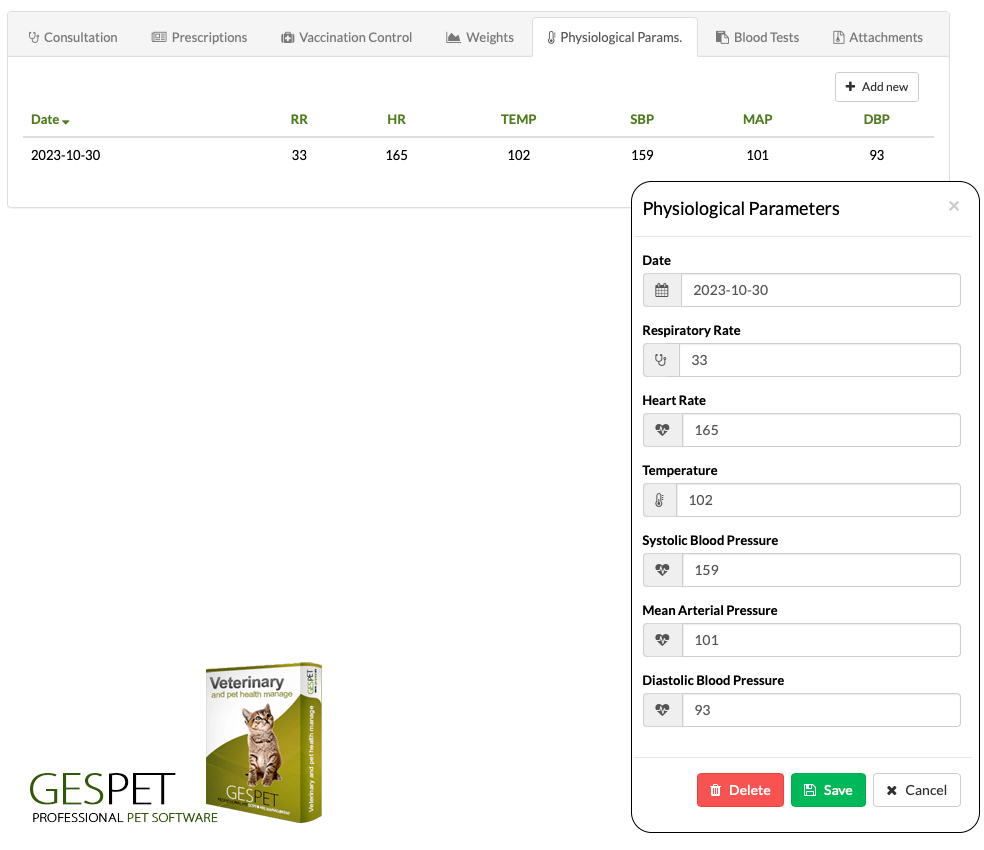
In the animal's record > right menu > Physiological Parameters, you can see the history of physiological parameter measurements.
You can add the results of the blood tests. Including all the analyzed parameters, value, and reference range.
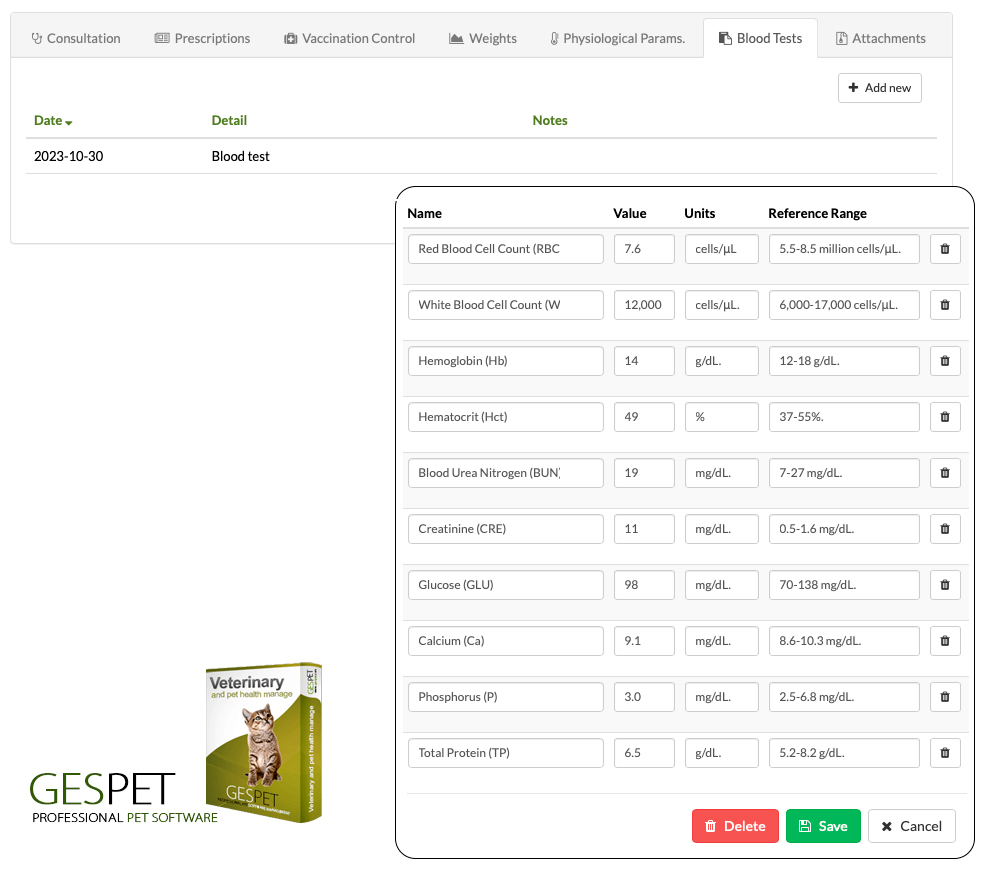
Entering data is very fast, and the software helps you make it even quicker and simpler. When you start typing, it checks all previous data and shows you matches. If you've entered this parameter before, including the units of measurement and reference parameters, you can click on it, and it will automatically fill it in for you. You can make any necessary modifications as needed.

In the animal's profile > right menu > Analytics, you can see all of its analytics.
You can save and review attached files, documents, and anything you need for each animal. You'll be able to quickly access them without leaving the consultation.
In the animal's profile > right menu > Documents and Contracts, you can view all their documents and attached files.
The most basic information about the animal and its photo or avatar is displayed. You will always have in view the fields for Important Information and Allergies/Intolerances.
You can quickly access its profile by clicking on the button
The most basic client information appears so that you can quickly contact them if needed, along with a button to access their profile.
If you have configured documents, contracts, authorizations, ... of type Consultation,
they will appear here so you can print and send them by email to the
client: Authorizations, informative documents about care, contracts, ... and
everything you need.
If you want the client's information, animal details, veterinarian, and your business data to be automatically filled in the documents, you can do it in a very simple way.
How to set up documents and data auto-fill:
Keep reading
Add the services that correspond: tests, treatments, ... and the price will appear. These services or fees are configured in advance in the Configuration > Veterinary Services option.
How to configure your services efficiently?
Keep readingTo configure products, the products are configured in the software for PetShop > New product.
You can control the batch and expiration date of the products, and the software will notify you when a product is close to expiration. You can also check the price purchase/sale history, place orders with suppliers, and much more.
How to configure the products?:
Keep readingOnce you've completed the consultation and added the services or fees, you can:
the consultation now
Or you can the consultation, leaving it pending for payment by the customer later.
As you know, you can sell the consultation together with products very quickly and easily:
By clicking the button, a popup window will appear to confirm the operation.
The veterinary service is ready to be charged, and you can add products before finalizing the sale.
The total amount appears at the bottom. Once you've added everything, simply click the Pay button to complete the sale.
The charge will be processed jointly, but internally, the software will record the amount corresponding to each business area (Veterinary and Pet Shop) for your sales statistics and reports.
There may be cases where a customer does not pay the full invoice because:
They will pay, for example, 50% now and the rest when the treatment, surgery, etc., is completed.
Or they are short of money and will pay that amount later.
Or they will pay using different payment methods,
Or any other situation...
How is the payment handled in these cases?
At the end of the sale, select the amount the customer is paying and the payment method.
You will see the pending amount.
You can finalize the sale. Until it is fully paid, it will have a Pending Payment status.
When the customer is going to pay a new amount, go to View > Sales and select that sale
In the Advances option, enter the amount the customer is paying and the payment method and click Save
Status:
If it is already fully paid, the status has now automatically changed to Paid.
If not, the status remains Pending Payment.
Remember that in the PetShop > View > Cash option, advances are not recorded, but if you want, you can record them manually by making a Manual Income entry.
The button allows you to delete the appointment.
And a time-saving option is to quickly schedule a new appointment for this customer/animal using the button
The customer and animal data are already filled in, and you only need to provide the appointment information (date, time...) and Save.
For more information about appointments, please refer to the New > Appointment section in the help guide.
If it hasn't been fully paid (for example, the total is 80€ and you've received 60€), the invoice will have a "pending" status and will appear in the Report > Unpaid Invoices, specifying the amount still pending.
You can configure all your payment methods in the Settings > Payment Methods option.
REPORTSWhen you create a Sale, a corresponding invoice is generated. However, in the meantime, you can see the money that has yet to be collected and will be invoiced when the Sale is completed in the Reports > Pending Invoices option. |
List of all veterinary contacts. If you have multiple business areas, suppliers data is accessible from all of them, but contacts are categorized by business area. You can consult them all or by business area (for example, only the vet contacts for hotel).
A small indicator displays the total number of suppliers.

At the top of the screen, there is a search bar. If you enter customer information and press enter or click on the magnifying glass, all matches will be displayed
You can sort the list of customers as you need:
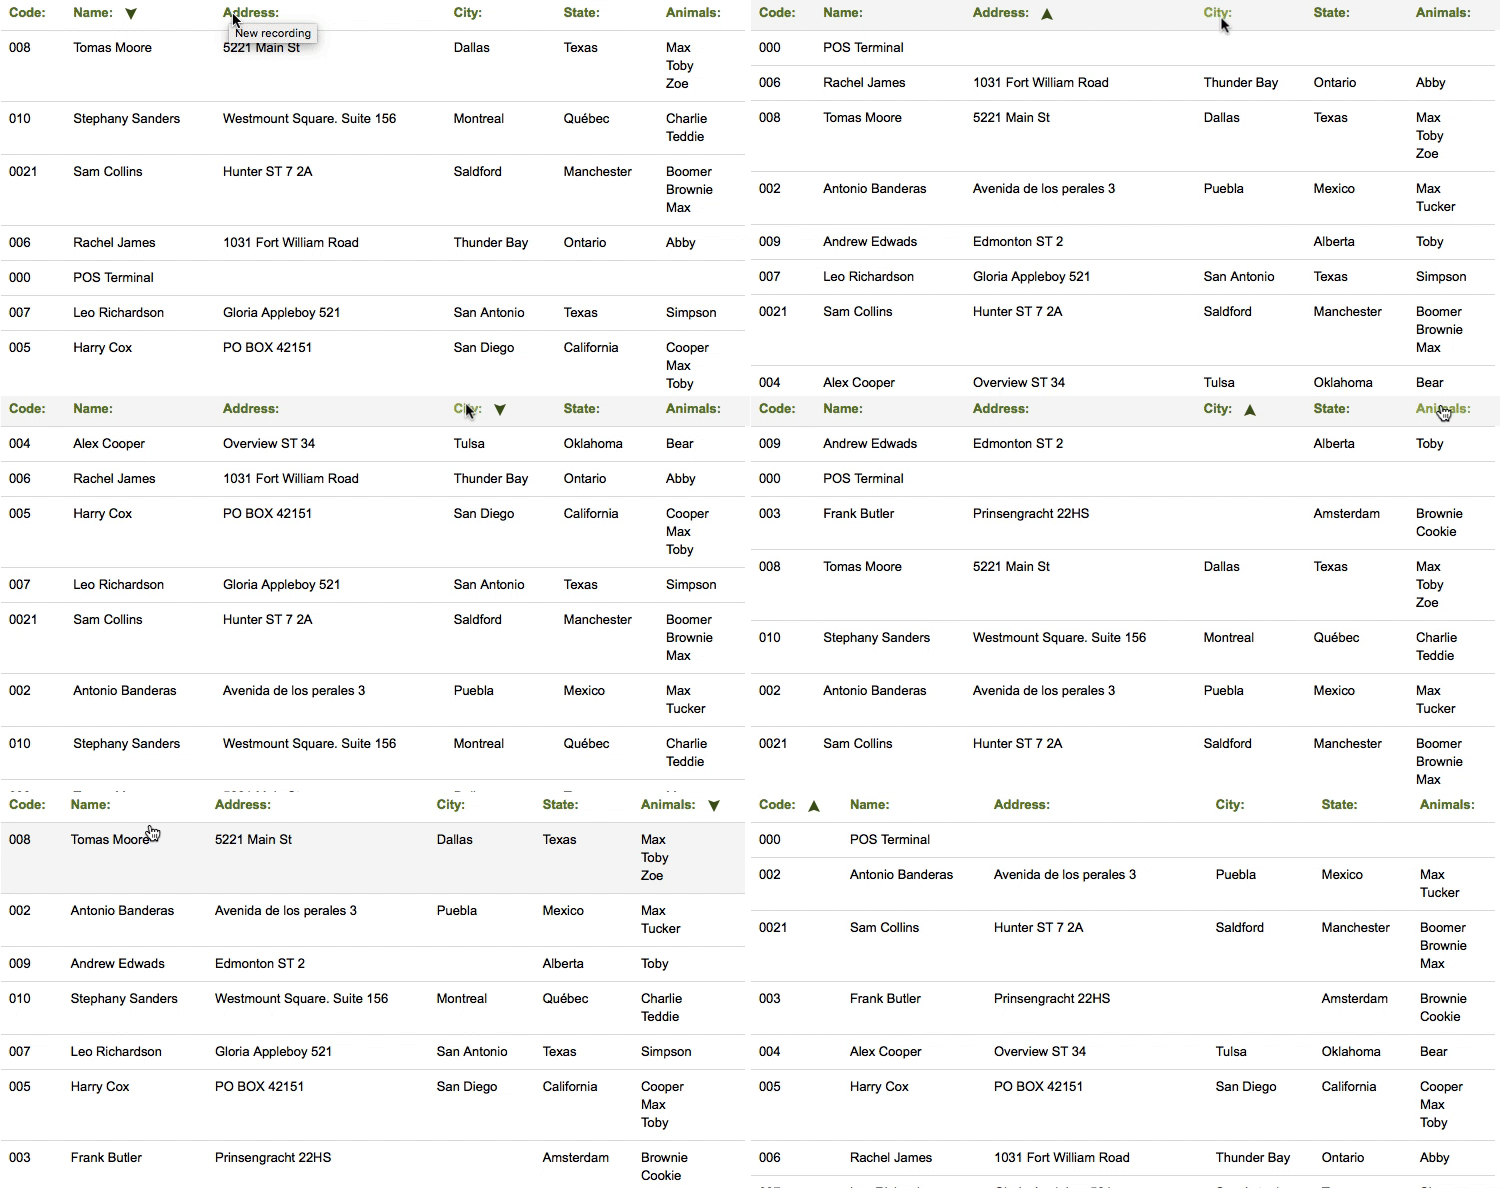
More information on ordering and search engines:
Clic hereTo add customers, you have two options:
Add them individually (one by one) using the Add option.
Or add multiple contacts at the same time using the Import option.
To add them, use the buttons at the top:
Click the Add Customer button, fill in the information, and click Save.
(Refer to the New > Customer section for more information)
Or click the Import button and follow the instructions.
How to import customers in bulk in the software
Clic here How to import customers in bulk in the softwareList of all suppliers. If you have multiple business areas, suppliers data is accessible from all of them, but suppliers are categorized by business area. You can consult them all or by business area (for example, only the Grooming suppliers).
A small indicator displays the total number of suppliers.

At the top of the screen, there is a search bar. If you enter supplier information and press enter or click on the magnifying glass, all matches will be displayed
You can sort the list of suppliers as you need:

More information on ordering and search engines:
Clic hereTo add suppliers, you have two options:
Add them individually (one by one) using the Add option.
Or add multiple contacts at the same time using the Import option.
To add them, use the buttons at the top:
Click the Add New button, fill in the information, and click Save.
(Refer to the New > Customer section for more information)
Or click the Import button and follow the instructions.
How to import suppliers in bulk in the software
Clic here How to import suppliers in bulk in the softwareList of all animals. If you have multiple business areas, customer data is accessible from all of them, but animals are categorized by business area. You can consult them all or by business area (for example, only the Grooming animals).
A small indicator displays the total number of animals.

At the top of the screen, there is a search bar. If you enter supplier information and press enter or click on the magnifying glass, all matches will be displayed
You can sort the list of suppliers as you need:

More information on ordering and search engines:
Clic hereTo add animals, you have two options:
Add them individually (one by one) using the Add option.
Or add multiple animals at the same time using the Import option.
To add them, use the buttons at the top:
Click the Add New button, fill in the information, and click Save.
(Refer to the New > Customer section for more
information)
Or click the Import button and follow the instructions.
How to import animals in bulk in the software
Clic hereTerminology used in the software
Breed and variety: Some breeds have varieties. For example Breed: Poodle | Variety: Miniature
Fur: Smooth coat, double coat, wire coat, long coat, curly coat, ...
Size: mini, small, medium, ...
Spayed: If the animal is Spayed or Sterilized
Microchip: It's a small device that provides your pet with permanent identification.
Veterinary book or pet passport: It's a document that officially records information about an animal and its vaccinations.
Breeder: select yourself (if you are the breeder) or select another breeder from the list. (You can add breeders in the New > breeder option)
Tattoo: in some countries,the tattoo is a valid ID for every dog with a pedigree
Book of origins: In some countries, the book of origins is used to track genealogy and preserve the breed purity by stimulating its conservation and genetic improvements. You can include the number, date and country of inscription in the book.
List of all expenses or purchases you have recorded. If you have multiple business areas, expenses or purchases are accessible from all of them, but you can view them collectively or independently (for example, only the Hotel expenses).
A small indicator with the total number of expenses is displayed.

At the top of the screen, there is a search bar. If you enter expense information and press enter or click on the magnifying glass, all matches will be displayed
You can sort the list of expenses as you need:

More information on ordering and search engines:
Clic hereTo add a new expense, click on the 'Add New' button icon, fill in the
details, and click 'Save'.
(Refer to the 'New > Expenses' section
if you want to see more information)
How to record expenses in the software:
Clic aquiTAGS:
dog grooming appointment | pet grooming appointment | mobile grooming reservations | animal travel software | how to organize animals data | animal supplier software | animal software | grooming software | grooming expenses program | manage animal expenses
