You can configure the most important regional settings for your country
or area:
Select the country from the list.
Select the time zone from the list.
Check that you have correctly configured the time on your device (computer, mobile phone, tablet) because the software will use that time for appointments, schedule, appointments and reminders.
Select the language in which you want to use the software.
Set the currency for your country. You can use symbols (for example €, $, ...) or currency codes (for example EUR, USD, etc.).
Set the applicable tax name and percentage for your country. This tax will be used by default for your services and rates.
Note: In countries where multiple taxes apply, you can set up a general tax name or a combined tax name and add both taxes together. For example, for Quebec, you can configure the tax with the name TPS-TVQ, TAX or similar and set the percentage as the sum of both taxes (TPS and TVQ).
It is very important to configure the general tax rate before creating your services or rates, because new services will use the tax rate defined here.
If this option has the general tax configured as 0%
Then you create a new grooming, boarding, daycare or veterinary service. That service will also have 0% tax
If later you change the general tax rate to, for example, 7%, this change will not be applied to services or rates that were already configured
New services or rates you add afterward will use the 7% tax rate
If you have mistakenly configured your services or rates, contact us so we can help you correct it.
If until now the tax rate was, for example, 10% and now it has changed to 12%, keep reading and we will show you how to update it.
Important:
Previous records will not be modified (the appointments/bookings you already had planned, the check-in, check-out, services, sales, ...). That is, sales or invoices that you had previously generated, for example, will not be modified.
It will not affect previous sales, billing reports or statistics either.
Previous data will remain unchanged. Only new data entered from that moment onward will use the new tax rate.
How to update the tax rate in your business:
Configure the new tax rate:
Go to the
Configuration > Language and Currency, enter the new tax
rate and click Save.
Deactivate the old rates:
Go to the Configuration option > Services
Click on the services or rates you had configured
Set Inactive = Yes and click Save
Configure the new rates:
In the same Configuration option > Services
Click Add new to create the new rates. Fill in
the details and click Save.
You will see that they already include the new tax
rate
Date format: you can choose the format you prefer, such as 06/02/2026,
2026-06-02, or 02/06/2026, among others.
Time format: 24-hour clock or 12-hour format with AM/PM.
First day of the week for calendars: you can choose whether you want
the week to start on Monday, Sunday, or another day.
Weight units: kilograms, pounds, and smaller units such as grams or
ounces when applicable.
Distance units: kilometers or miles.
Temperature units: Celsius or Fahrenheit.
Currency format: you can configure the number of decimal places,
thousand and decimal separators,
whether the currency symbol (€ , $, etc.) appears before or after the amount, and
whether a space should be included between the symbol and the value.
You can configure:
The schedule for each area of your business
Non-working days
The display schedule for the Planner
If you do not want to set a specific schedule, simply select Any time.
If you select Custom schedule, you can configure your business hours as a
continuous
schedule or as a split schedule, depending on how your business works.
If you have several business areas (hotel, grooming, store, etc.) and they all follow the
same
hours, you can enable Use the same schedule for all business areas.
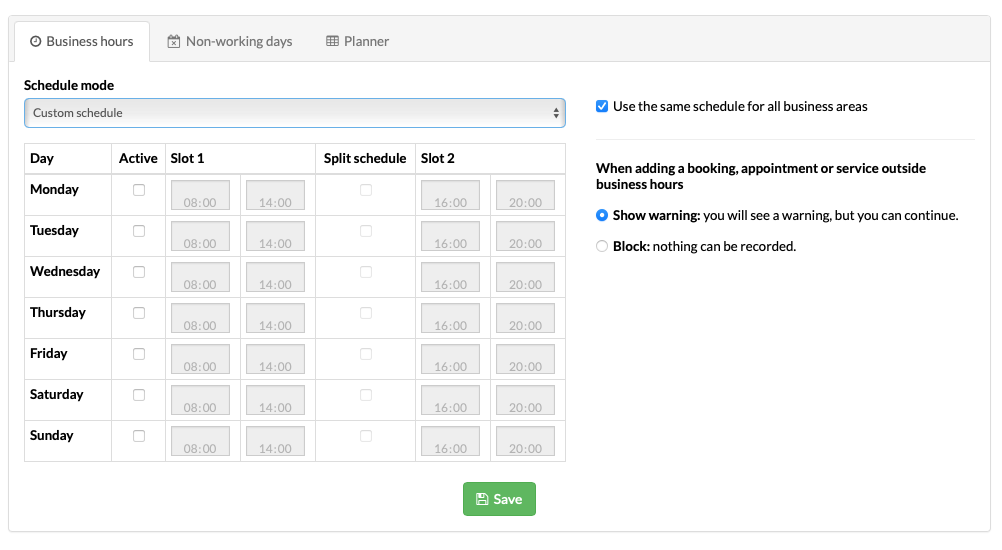

the software informs you but lets you continue

when it is outside the allowed schedule
For example, if you add or edit an appointment, booking, check-in, check-out, service or delivery outside the schedule you configured, the system can either show a warning or prevent that booking, transport delivery, hotel check-in or service from being saved.
There is no single best option for every business. Each company works in a different way, so Gespet gives you the flexibility to choose the configuration that best fits your day-to-day workflow.
We provide the tools, but you decide how you want to use them in your business.
Warning option: The warning option is ideal for businesses that need more flexibility. For example:
Pet hotels that usually do not accept check-ins or check-outs on Sundays, but make exceptions during high season.
Veterinary clinics that do not normally work outside business hours, except in specific cases such as emergencies, follow-ups or post-surgery checks.
Pet grooming salons that may accept an occasional service outside their usual schedule during busy periods.
In these cases, Gespet warns you but lets you continue.
Blocking option:
This option is best for businesses with a strict schedule that do not want to allow bookings, appointments or services outside the configured days and hours.
It helps prevent mistakes such as scheduling an appointment on a non-working day, accepting a check-in outside business hours or booking a service when the business is closed.
You can choose the option that best fits your business and change it whenever you need to.
Gespet also adds visual help. In the Planner you will see working hours highlighted, and both in the Planner and in calendars, the days you configured as non-working days will be clearly marked.
You can also configure non-working days for each business area. For example:
You can mark August 1 as a non-working day for your grooming salon because you will not provide grooming services that day.
However, you may still provide veterinary services or allow check-ins and check-outs at your pet hotel.
This way, each area can have its own configuration based on how it actually operates.
If non-working days are shared by all areas, you do not need to configure them one by one. You can configure them in just one area and copy them to the rest easily.
Examples of non-working days:



The configuration is very advanced: you can define exact dates, dates that repeat every year or date ranges. For example:
December 25, every year.
August 15, every year.
September 1 to 15 for vacation.
A specific day for facility maintenance.
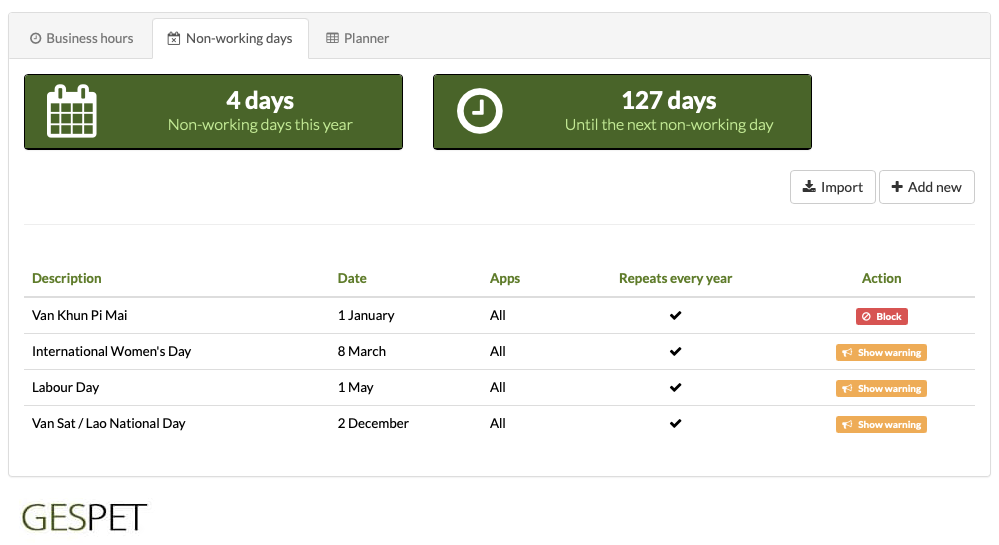
You can also decide whether a non-working day applies to every area of your business or only to specific areas. For example, you could close grooming for one day while keeping the hotel active, or block store deliveries on a specific date while continuing to provide other services.
What happens with pet hotel stays?
In pet hotels, stays can be long. That means the check-in day, the check-out day or an intermediate day during the stay may be a non-working day or a public holiday.
For example:
A stay runs from July 1 to July 30.
You configured July 7 as a non-working day.
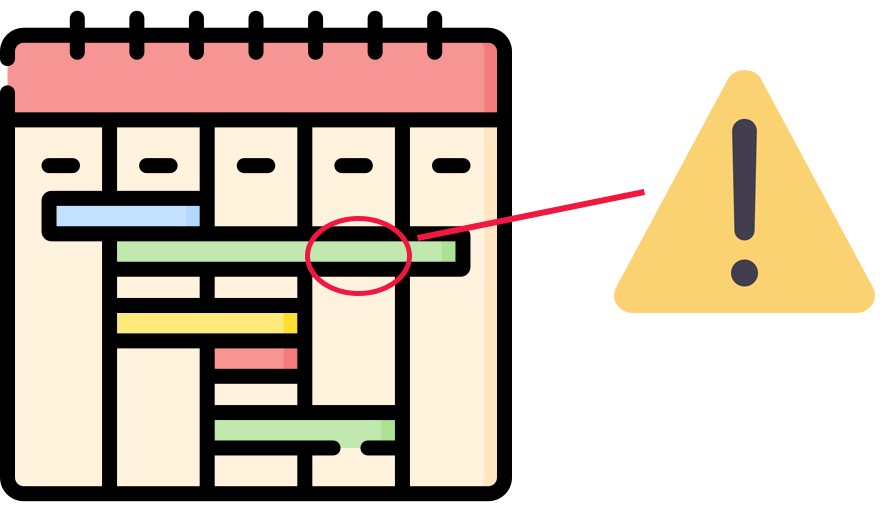
In this case, Gespet will show a warning indicating that the stay includes a day you defined as non-working.
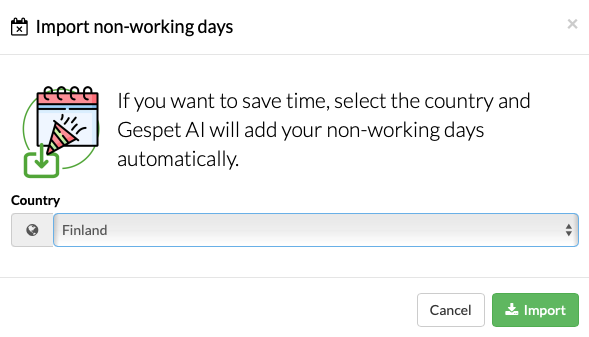
To save time, simply select the country and Gespet will automatically add the fixed public holidays for that country.
when creating appointments, services, deliveries and bookings
in the Planner and calendars
for business hours, holidays and closed days

especially for online bookings

because the system follows your rules

for the team, because they can rely on the schedule
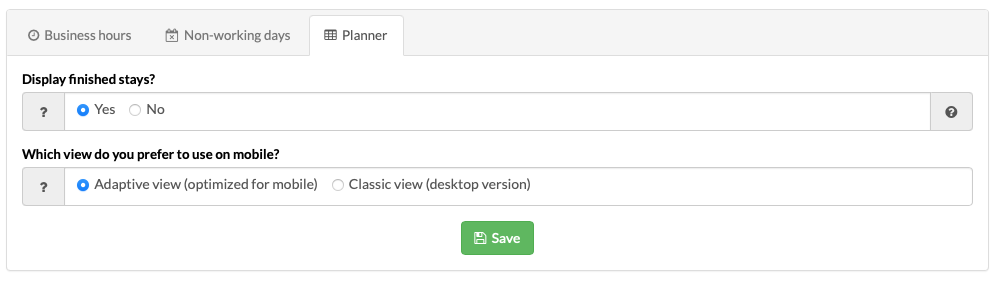
This option lets you configure whether completed stays (hotel and daycare), services (grooming, training, veterinary services, etc.) and other finished activities should appear in the Planner, as well as the display style you want for the mobile version.
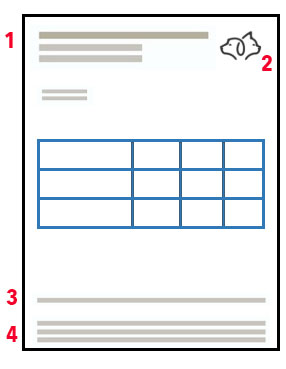
In this option, you can configure your business details and contact information that will appear on documents, invoices, and messages you send.
In the Data section, you can configure the details of your
business, and in the
Invoice data section, the information that will appear
exclusively on invoices.
Logo. You can upload 2 different logos: a main one that will
appear in the online booking request system, in the emails you send, etc.,
and a different logo for printed documents. (for example, you may use a
black-and-white logo to save ink).
Supported image formats for the logo are: jpeg, jpg, gif, and png
The maximum allowed image size is: 1024 x 1024 pixels (width x height)
The maximum file size is 1 MB
If the software does not allow you to upload an image, you can use any image converter to meet these requirements and then upload it successfully.
Footer for printed documents. You can include text that will
appear on invoices, on appointment/booking summary documents,
check-in/service, check-out, etc. This is useful for adding legal
information, additional details, etc.
To maintain the correct document layout, it is not possible to include more
than
1,000 characters in the footer.
If you need to add a large amount of information, for example in the
invoice footer
you hand to the client, and want to include extensive return policies or
legal/privacy information, you can:
Create a specific document with that information:
Go to Tools > Documents and contracts
Create the documents you need, for example “Return Policy” or “Privacy Policy”
Select the type Sale
When making a sale, these documents will appear so you can send or print them and deliver them to the client along with the invoice
Optionally, in the Invoice footer field you can
reference
these documents. For example: “See all details in the attached
document
‘Return Policy’.”
Text on tax-exempt invoices. If in your country/business
activity there are situations where invoices are exempt from taxes, you can
add an additional text that will only appear on tax-exempt invoices.
Logo. You can upload 2 different logos: a main one that will
appear in the online booking request system, in the emails you send, etc.,
and a different logo for printed documents. (for example, you may use
another one just for documents).
Supported image formats for the logo are: jpeg, jpg, gif, and png
The maximum allowed image size is: 1024 x 1024 pixels (width x height)
The maximum file size is 1 MB
If the software does not allow you to upload an image, you can use any image converter to meet these requirements and then upload it successfully.
Email footer: from the software you can send emails to
confirm/cancel
an appointment/booking, an online booking, send a ticket/invoice, etc. In
this section,
you can set up a text that will appear in those emails. For example,
you can include your business details or other useful information.
Limit: The maximum is 65,535 characters.
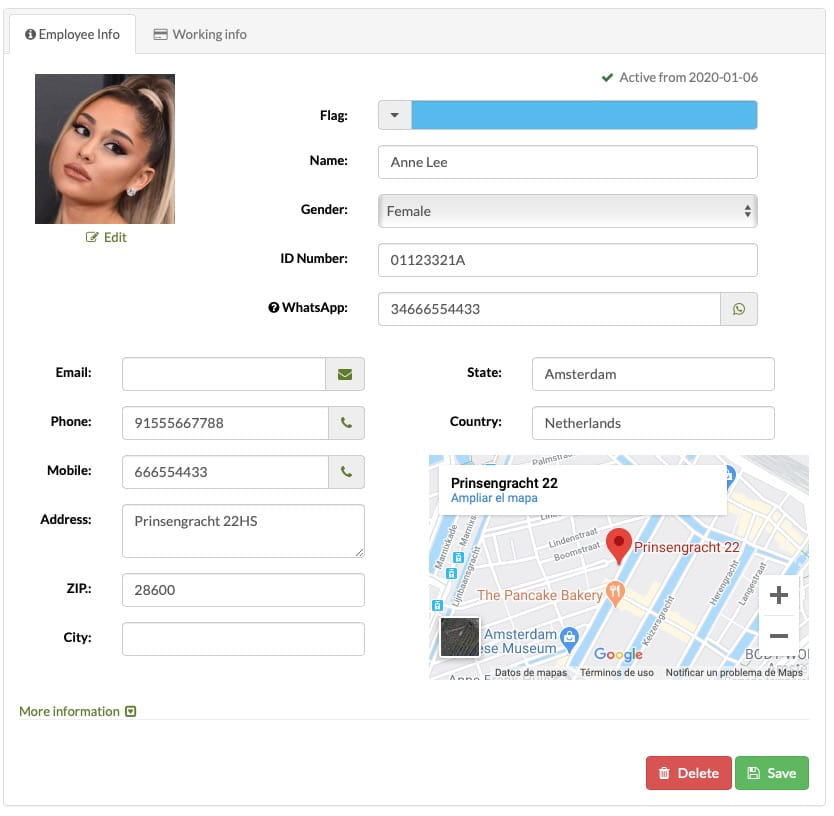
You can manage your employees with all the necessary contact and work information.

You can deactivate employees who are no longer active. This way, they won't appear in the employee selectors when assigning a service, session, etc., but since they're not deleted, you'll retain the historical data with their information.
When you click on an employee in the list, all the information appears:
At the top there are 2 buttons:
Quick actions or "shortcuts": add a new animal for that client, make an appointment, print the information, ...
show or hide the right-side menu to expand the workspace
Using the quick access buttons, you can send an email, make a call or open WhatsApp to contact the employee. Click the corresponding icon (envelope, phone or WhatsApp).
You can add more phone numbers and email addresses for an employee. By clicking the "more information" icon, new fields appear so you can record those details.
When you enter the address and click Save, a Google Maps map with that address will appear. You can zoom using the map controls.
In the Working information section, you can write down the information related to the employee's training, salary or payment conditions, payment details, and other work information.
If your grooming salon or training center pays employees a percentage of the services they perform, for example 30%, you can record that percentage here so you do not need to remember it manually.
To see the services performed by an employee in your pet training center or pet grooming salon, open the Services and billing by employee report. Select a date range to view the number of services and their total amount. This makes it easy to calculate the amount owed for those services.
You can also see the average time spent on those services and the last service performed by that employee.
If you also have the advanved security and control module, you can link a user account to an employee and configure additional settings.
In addition to the access hours that determine when they can log in to the system, you can define their working hours for appointments and services. For example, an employee may start their workday at 8:30 AM, while their first appointments begin at 9:00 AM because they spend 30 minutes preparing their work area.
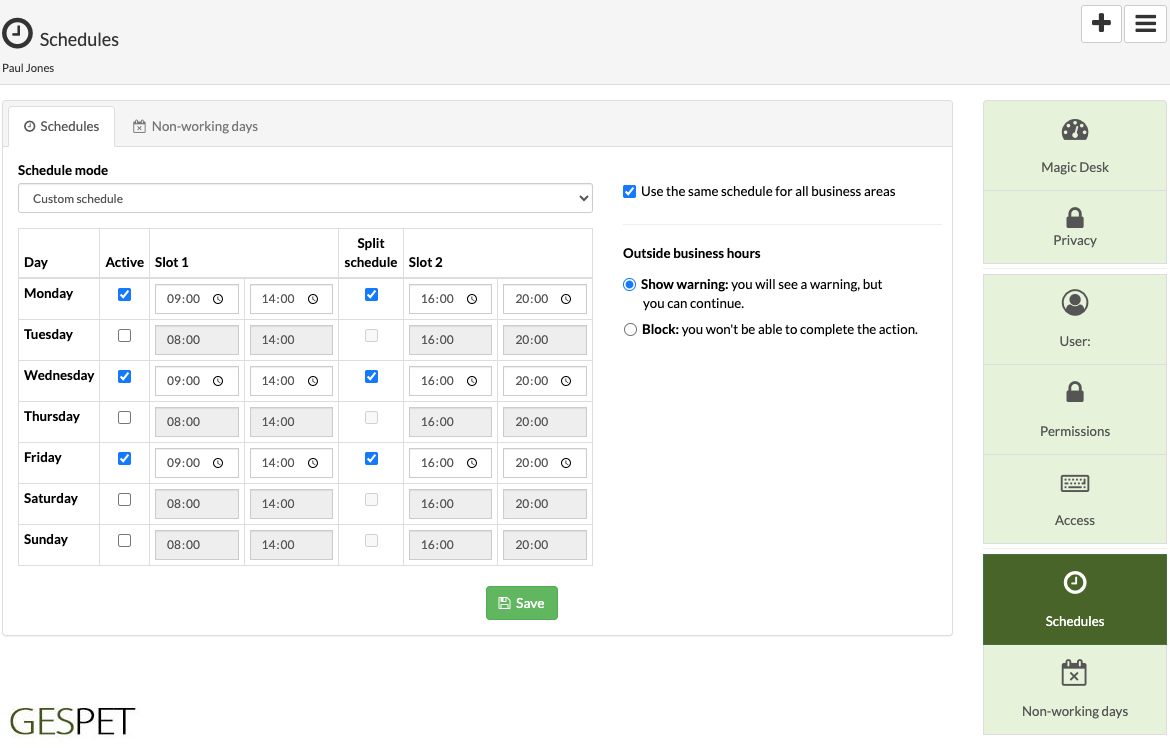
If you try to add an appointment or service for an employee outside their working hours, you decide how you want the system to handle it:
Show a warning, but still allow you to add the appointment or service
Or block it, so the appointment or service cannot be added
Which option is best for your business?
There is no single option that works best for every business. Every company operates differently, which is why we give you the flexibility to choose the settings that best fit the way your business works.
We provide the tools, but you decide how you want to use them in your business.
The warning option: is perfect for businesses or employees that need more flexibility.
The blocking option: is ideal for businesses and employees with stricter schedules.
You can choose the option that best fits your needs and change it whenever you need to.
If you also have the advanved security and control module, you can create user accounts. Each user will have their own login credentials.
In addition to your business's non-working days, you can configure non-working days for each employee individually. For example:


This way, you no longer have to remember those non-working days or check them in another tool before scheduling a new appointment, for example.
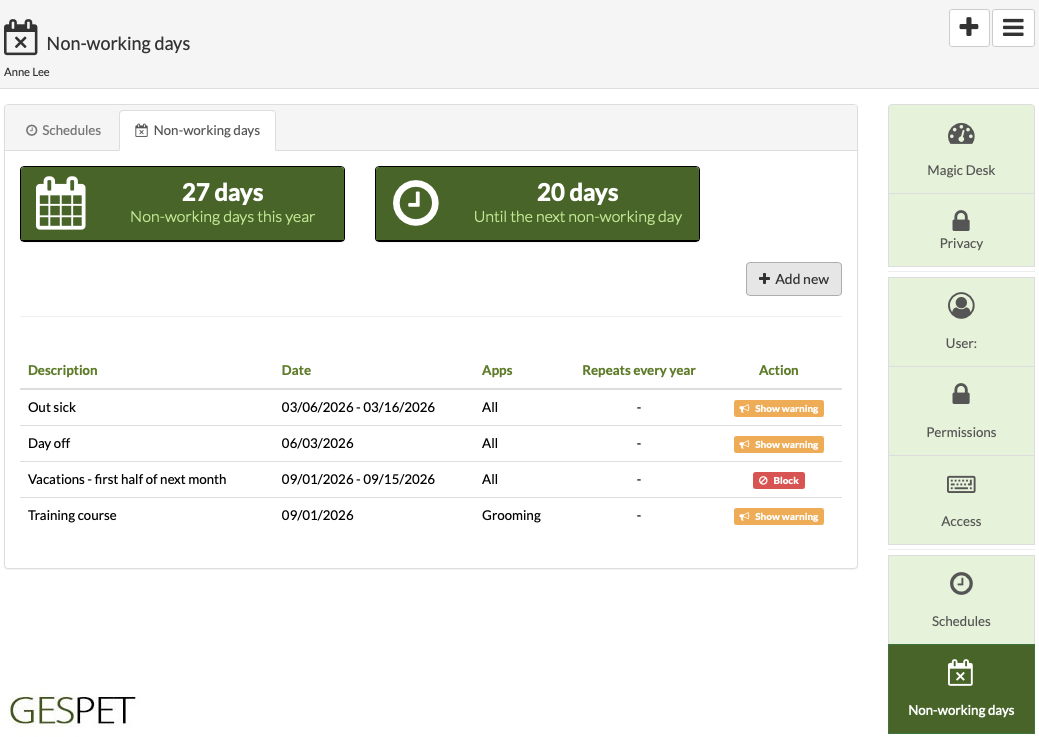
You can configure a single day or a date range, for example, from August 1 to August 15.
The business's non-working days take priority over the employee's non-working days.
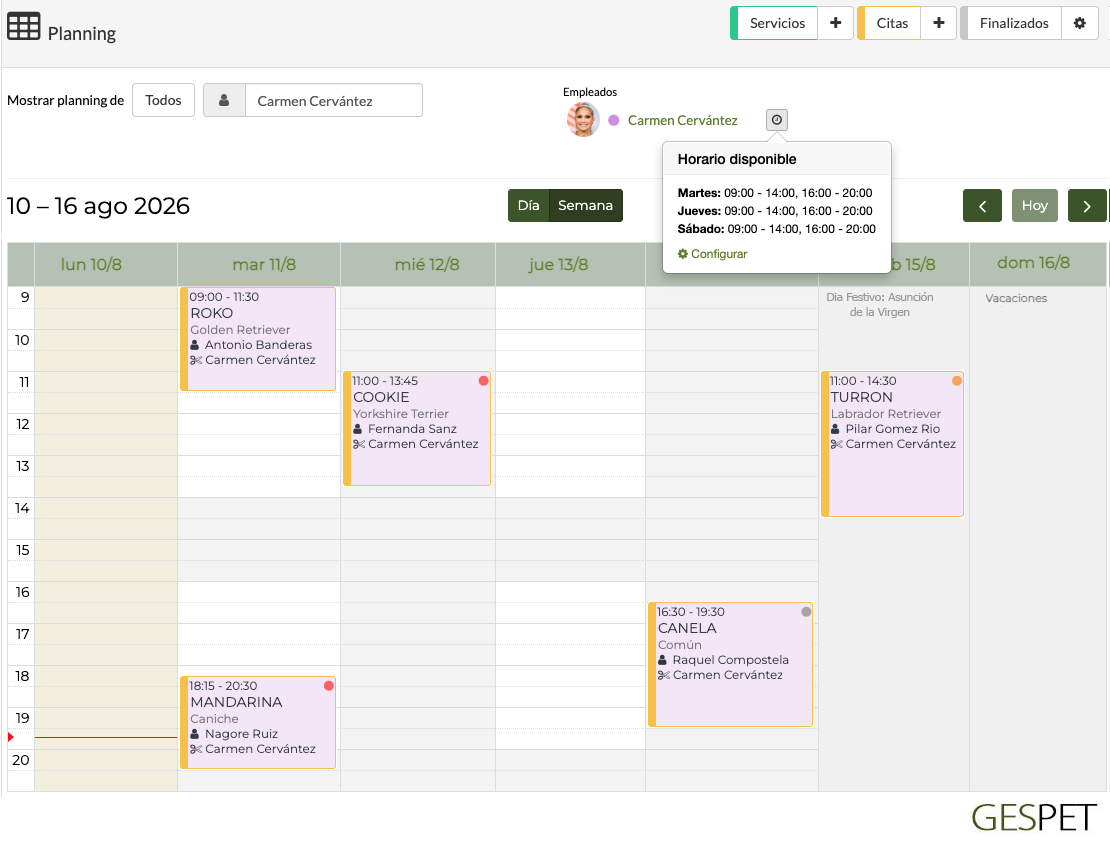
The grooming and training modules let you view the full schedule or a schedule for a specific employee. When you select an employee, you'll see:
Their work schedule, with a shortcut to quickly make changes
The schedule clearly shows if you have configured any non-working days for that week:
For the business.
And for that employee.
Their working hours are also clearly marked, so when adding an appointment you can quickly decide which day and time to choose based on the employee's availability.
As you can see, you can review their schedule, move services, find open slots, accommodate last-minute appointments and reorganize the schedule more efficiently.
When you add or edit an appointment or service with an assigned employee (Groomer or Trainer), the system checks:
The employee's availability:
Working days and hours
Non-working days
And the work already assigned to them.
This helps prevent you from assigning appointments or services outside their working hours, on a day they are not working, or scheduling overlapping appointments or services.
If you also have the advanved security and control module, you can create more users, each user accesses an independent account and you can control:
You can specify the days and hours in which a user can access
You can indicate the visible options for a user
See when the users log-in and log-out session
You can control the access of your employees to improve the security of your business.
If you want to add, edit or delete breeds, you can do it from this option. Then, when you add a new animal, you only need to search for the breed in the advanced selector instead of typing it every time.
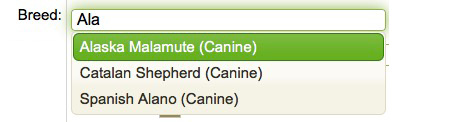
For mixed-breed dogs or animals without a specific breed, we have created the "Common" breed. If you prefer to create another breed, you can do it from this option.
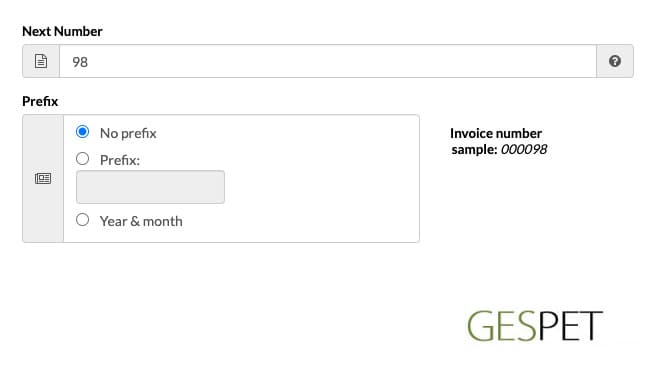
You can configure the next invoice number to be issued, and the software assigns that number to the following ones, this way the invoices are correctly numbered.
For example, if you start using the software now and this year you have already generated 25 invoices, if you want the next one to be number 26 (to be correlated), then write 26.
This numbering does not reset at the end of the month or the year. It will always continue with the numbering of the last invoice.
You can configure whether invoice and credit note numbers should include a prefix. You can choose whether the invoice number should:
Have no prefix. For example, the invoice number will be 000042.
Use the prefix you choose. For example, with the prefix INV, the invoice number will be INV.000042.
* The maximum prefix size is 10 characters
Automatically include the Year.Month prefix: In April 2021, the next number could be 2021.04.000042.
As you can see, on the right side of the screen, there is a preview, which allows you to see how the next invoice number and credit note number will look, depending on the configuration you choose.
You can configure different numbering sequences for the different types of invoices:
Invoice
This number will be used to issue full invoices.
Credit Note
This number will be used to issue a Credit Note (Corrective Invoice).
If you don’t configure one, the number you have set for Invoice will be used.
Simplified Invoice
This number will be used to issue Simplified Invoices.
If you don’t configure one, the number you have set for Invoice (full) will be used.
Credit Note for a Simplified Invoice
A credit note for a simplified invoice (or simplified credit note) is automatically generated whenever you choose to create a corrective invoice from a simplified invoice.
This number will be used to issue credit notes for simplified invoices (or simplified credit notes).
If you don’t configure one, the following will apply:
The number you have set in Credit Note, if configured.
If not, the number you have set in Invoice will be used.
This section includes important information/actions. If your business has multiple users, we recommend that you restrict access.
From this option, you can perform a complete export of the data in .xls (Excel) format. If you decide to stop using the software and want to export the information stored in your account, you can do it yourself using this option.
To proceed, simply click the Export button. An .xls file will be saved in the download folder configured in your web browser.
If your business has multiple users, we recommend using the security and access control module to restrict this option to unauthorized personnel. Otherwise, they could extract all the information from the system.
For performance and security reasons, a full data export can only be performed once a day. After 24 hours from the last download, if necessary, you can request a new complete export.
As you
know, it is not possible to delete records partially (for example, deleting all invoices).
However, most users use their accounts with fictional data for a while to test and
familiarize themselves with the system.
After the testing period, when they start
working with real data, they need to delete the fictional data to proceed with the
configuration of the real data, client and animal registration, invoice generation, etc.
This option is specifically designed for that. It allows you to wipe your account
completely (all data and configurations will be deleted, and your account will be restored
to the default settings).
The deletion is final, meaning that the data will be
completely erased and cannot be recovered.
To prevent accidental deletion, the system
will inform you of the total and permanent deletion process, and will require several
confirmations.
After these confirmations, the total data wipe will be executed, and
you will receive an informational email at the primary email address (this is the access
address of the administrator user).
If you have doubts, do not proceed. Contact
us first, and we will be happy to help you with any questions you may have.
Remember
that the process is irreversible. If the data is deleted, it cannot be recovered later.
This option will be available exclusively to the Administrator user, so if your
business has multiple users configured, only you, as the Administrator, will see this
option. The rest of the users, who access using their own login credentials (username and
password), will not be able to execute it.
We remind you again that if your business has multiple users, you should use the security and access control module to create individual user accounts, so that each person has their own login credentials.
Keep in mind that if everyone uses the Administrator's login credentials, they will all have administrator permissions, and therefore, anyone could execute this action and completely delete the data. The data will not be recoverable afterward.
If you have multiple users and need to limit their access, the security and access control module is available. Each user will have their own login credentials, and you will be able to control:
The days and times users can access the software.
The options they can use or view.
A log of all access attempts (time, IP address, operating system used).
You will control your employees' access for greater business security. See more information:
More informationIf you want to add it to your account, it's very simple:
You can request it from us, and we will add it to your current subscription.
Or if you prefer to do it yourself, you just need to:
Log in to your account (using your username and password).
On the first screen that appears, click to purchase the security and access control module for users.
Fill in the payment details, and it will be activated immediately on your account.
You can modify the passwords to access the software. You just have to type the current password and the new one.
Additionally, for security reasons:
You will have to type the new password twice. In this way, we avoid typing errors.
The software will show if that password has a low, medium or high security level. To make this easier to identify, the level is shown with red, orange or green colors.
New password: Type the new password you want to use
Old password: If you have used the "Remember password" option, write the password you received by email
Must be at least 10 characters
Must contain at least one UPPERCASE and one LOWERCASE character
Must include at least one number
Must include at least one symbol
For your security and the security of your data, it is very important that you have good habits with the passwords of the different accounts/services that you use:
Change passwords frequently
Never use the same password on multiple sites or services
Do not share passwords with others or write them down, especially near the device
Change default passwords for devices and online services.
We have collected security recommendations and created a short help guide with useful tips. We recommend reading it.
Security recommendations Security recommendationsFrom time to time, the password will expire. That is, you will have to
change it to a new password.
If the software displays the message that
the password has expired, you just have to change it to a new password and
you will be able to continue working normally.
We know that this can be
annoying, but our goal is to keep you and your data safe.
Information about the storage capacity used by external files (when you include a scanned document or a photo of a customer, animal, ...) in the software.
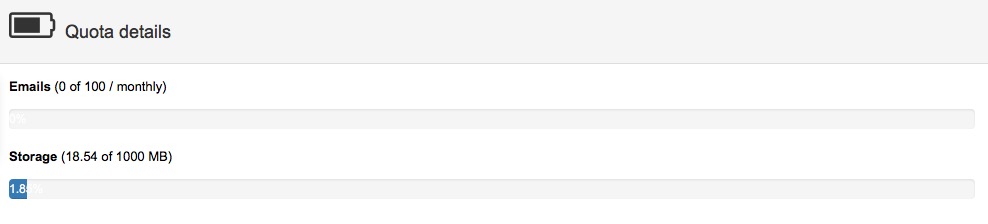
You can also view the number of emails sent and the number of emails still available to send.
This amount is limited monthly to encourage responsible email sending and prevent mass mailing or spam. On the 1st day of each month, this counter returns to 0.
You will receive a notice when you are close to the available email credit limit. You can buy extra credit to send more emails. To do so, access the software and click the icon to buy additional email credit.
Email consumption: Every time you send an email from the software (online booking confirmation or cancellation, booking confirmation, invoice, ticket, automatic reminder, etc.), 1 unit is added to the emails consumed.
If you also want to send a copy to your own email address by checking "send a copy", another email will be sent to that address and another unit will be added to the emails consumed.
As you know, commercial communications must have been requested or expressly
accepted by the recipient, unless there is a previous commercial relationship
or
the data comes from publicly available sources.
Any other use, including massive and systematic email sending, may be
considered
spam and may be subject to penalties.
Before sending emails to users or
customers, make sure you have their consent and use email responsibly.
Sending an appointment reminder, invoice, ticket or service-related message is
not
the same as sending newsletters or advertising emails. Even if a user has
agreed
to receive advertising emails, avoid sending too many messages or irrelevant
information.
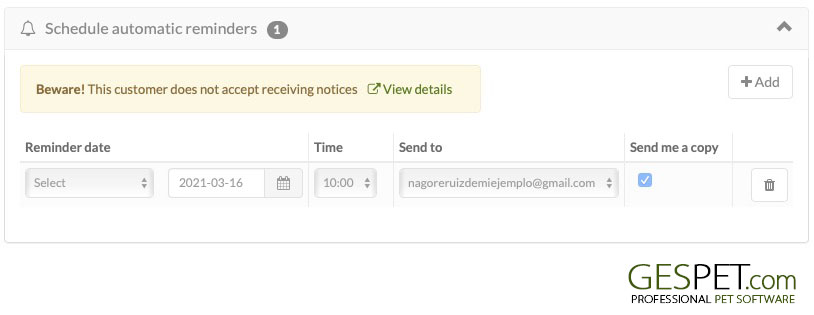
When you send an email from the software, Gespet checks the GDPR section of the customer record to verify whether that customer has accepted communications or notices. If consent has not been expressly accepted, the software will show a warning.
More information about data protection and GDPR:
Click hereYou can configure the payment methods accepted in your business. This way, when a sale is made, you can select the payment method. By default, you will find:
Card payment
Cash (money)
Mixed payment: choose at least 2 payment methods, for example, part by card and the rest in cash.
You can also configure as many payment methods as you need: check, discount coupon, PayPal, Multibanco, Bizum, etc.
Show overdue items: Lets you choose whether the software should show overdue bookings, appointments, services, check-ins and check-outs.
TAGS:
payment methods petshop software | payment methods pet store software | petshop employees software | pet shop employees software | animal store employees software | taxes configuration petshop app | taxes configuration petstore software
Related Posts:
GPRD. Privacy and security