If the Cash is open, you can make a new sale
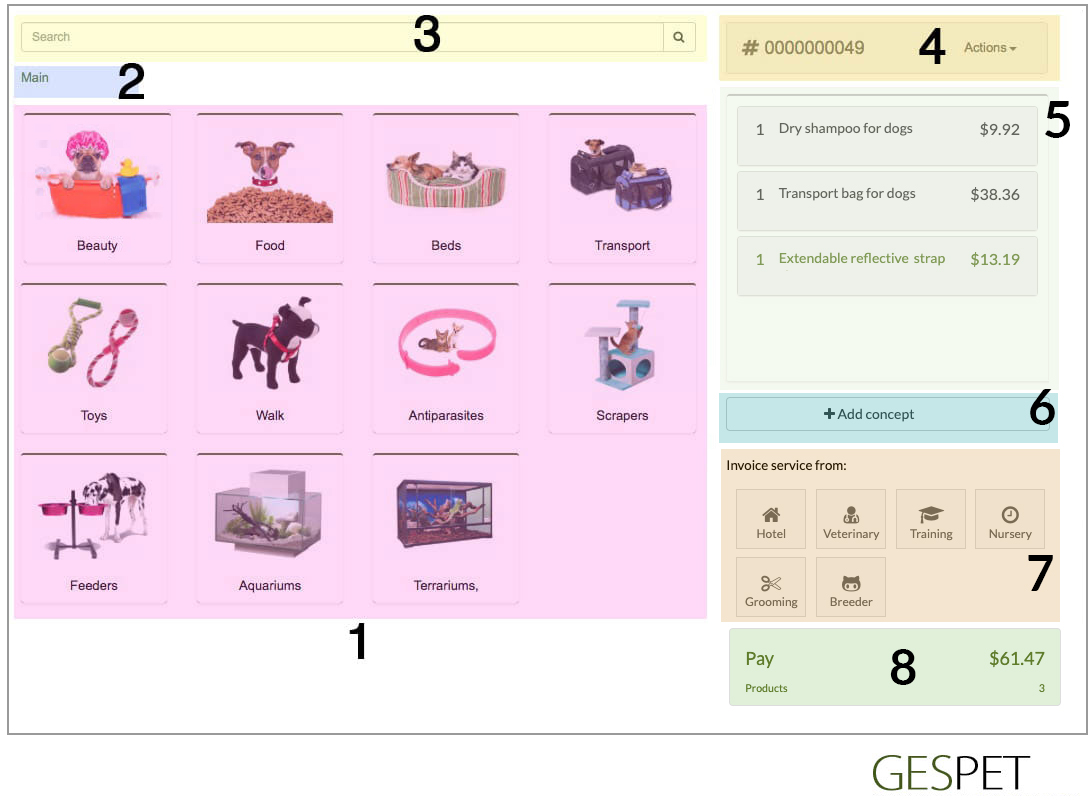
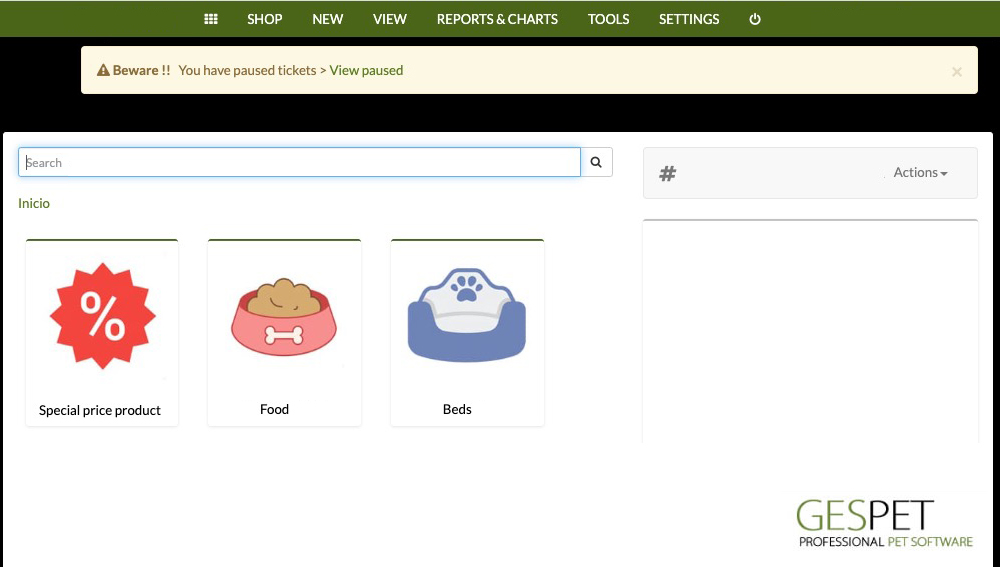
The screen is divided into two areas:
Right: Ticket/Receip area and sales options
Left: Products area
By clicking on a category, its subcategories, if any, and the products included within them will be displayed.
EMPTY CATEGORIES WILL NOT APPEAR, meaning those without products, nor will inactive categories.
Note: On the View > Categories/Subcategories screen, you can see which ones are active/inactive and the number of products each one has.
ON SALE PRODUCTS: There is a special "category" that allows you to view all products that are on sale.
If you specify a discounted price for a product, it will appear in this "category," and removing the special price will exclude it from the sale items.
HOW TO ADD PRODUCTS TO THE TICKET/RECEIP
If you click on a product, one unit of that product is added to the ticket/receip. Clicking again adds another unit, and so on (5 times = 5 units added to the ticket/receip).
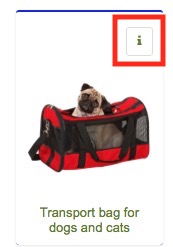
Products have a button with an "i" icon for more information. Clicking it will display detailed information about that product:
The name: Clicking on it opens the product's profile in a new tab.
The photo
The barcode
The current price, and if it's a discounted product, the original price will also be crossed out.
The code/reference and brand
A quick access button to its profile
The description:
The number of units in stock: For example, we have 19 units of this product.
Important information and notes: Clicking on them reveals this information.

It displays the various categories/subcategories so you know exactly where you are, for example: in the category Food > subcategory Rabbits:

Clicking on the category name takes you back to it.
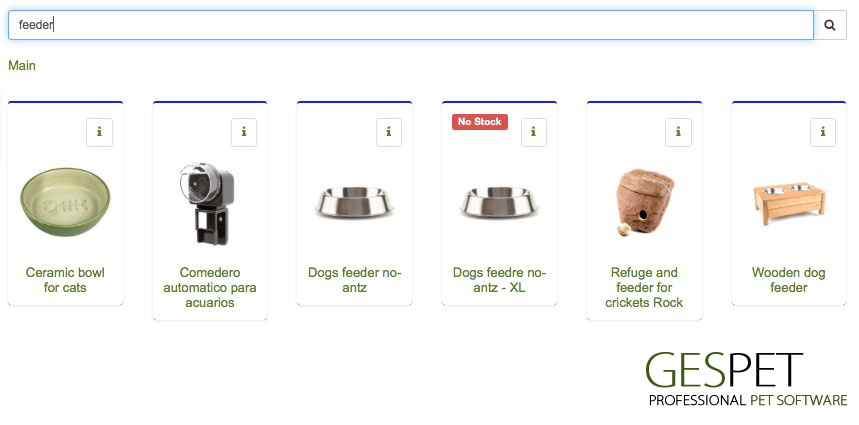
If you don't want to navigate through categories, you can search for the product.
You can scan the product's code with the reader or scanner.
Or you can type the name of the product, the brand, etc.:
As you already know, the search engine auto-completes, so just by typing "comed," you will see that it displays all results that include those letters, such as "feeder," for example.
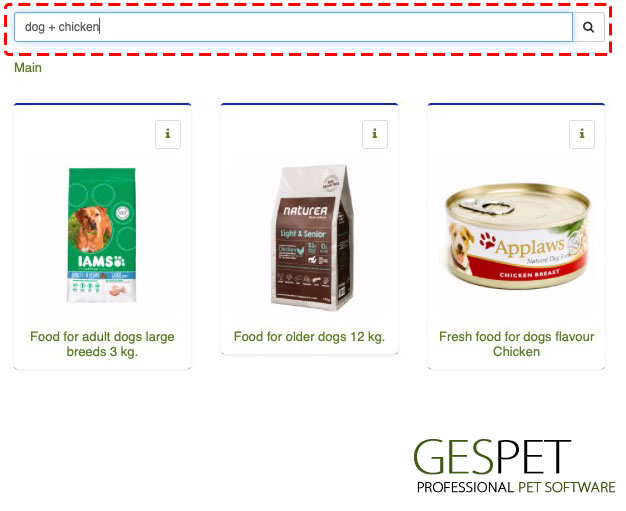
You can also make combined searches, for example: Dog + chicken
The Ticket/receip number increments automatically.
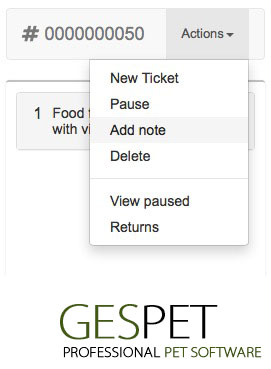
Available actions includes:
New ticket: Clears the current ticket and creates a new empty one.
Pause ticket: Allows saving the ticket to resume and complete the transaction later.
Add note to ticket: Enables adding a note or comment to the ticket for internal reference.
Delete ticket: Deletes the ticket, and it cannot be recovered later.
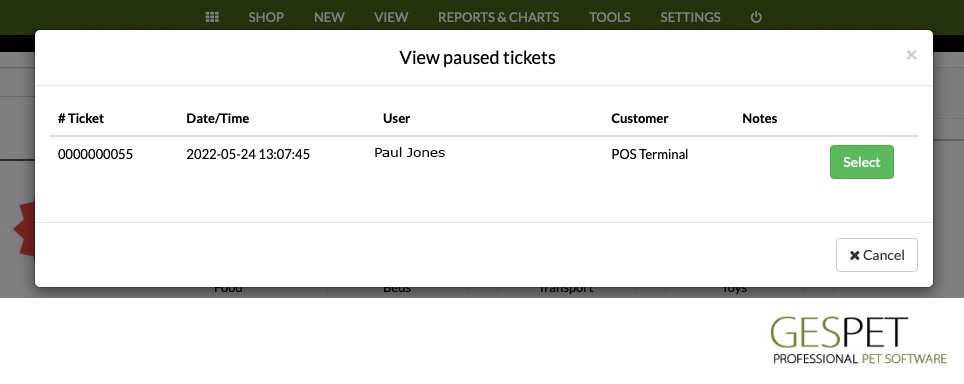
View paused tickets: Allows viewing saved tickets for later retrieval.
For example, if we include a note that the customer will return later for additional purchases, we can pause the ticket. Meanwhile, we can create new tickets for other customers, and when the customer returns, we can retrieve this ticket.
View returns/make a new return: Access to the option for processing product returns.
If you want to learn more about how to handle returns or refunds, refer to the section New > Return.
[In area 1] Clicking on a product adds one unit of that product to the ticket. Clicking more times adds more units of the same product.
If you click on a product already added to the ticket, you can:
View and modify the number of units by clicking on the unit count
Delete it from the ticket by clicking the Delete icon
Apply a discount by clicking on the discount. You can choose to apply it as a percentage (e.g., 10%) or as a specific amount (e.g., -3 $).
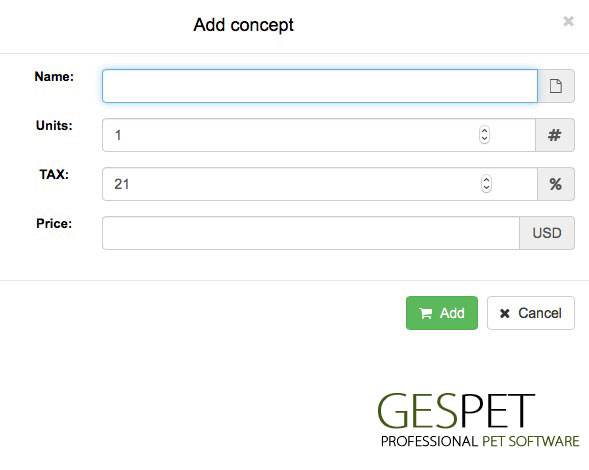
You can add items or products manually because, for example, they are not included in your product database.
If you have other Gespet solutions, you can also charge services on the same ticket/receip for:
Hotel stay
Grooming services
Nursery/Pet daycare
Training/obedience services or sessions
Veterinary consultations
Sale of animals from your breeding: Puppies or breeding animals
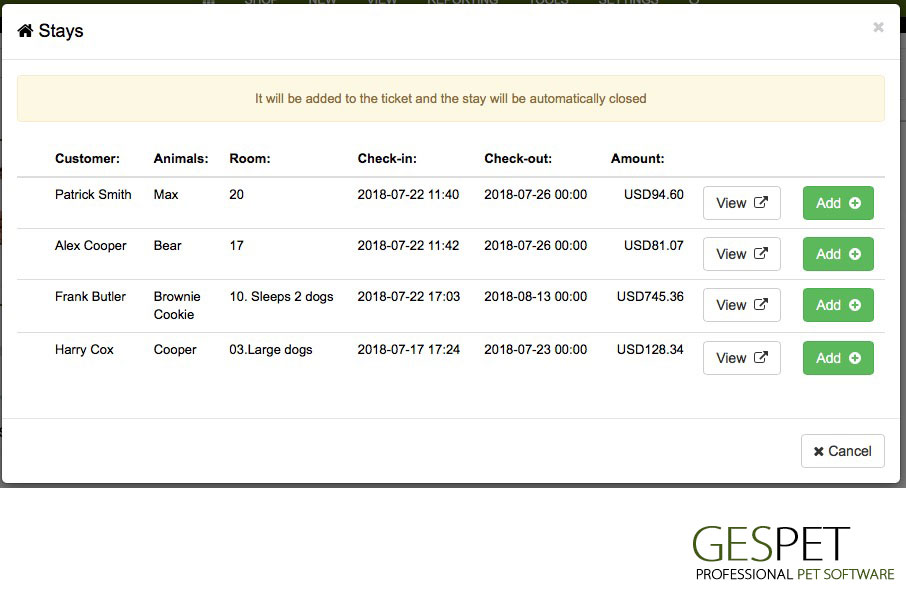
If you have pending services to charge in your other business areas, simply select the grooming/hotel/training/daycare service or the animal you want to add to the ticket to charge both the selected products and services/animals together.
Note: Remember that only services pending payment will appear. If it's already paid, you cannot charge it again, so you cannot add it to the ticket/receip.
For example, if the sale includes the following items:
PETSHOP
Fresh dog food - $2
Dog toothbrush - $3
Retractable dog leash - $20
GROOMING
Bath + hygienization - $30
TRAINING
Behavior correction session - $18
The total sale amount is $73, but the products/services are "accounted for" in their respective areas:
$25 in PetShop products
$30 in Grooming services
$18 in Training services

The total appears on the ticket/receip, but on the invoice, it will be separated. You will have an invoice for the sale of petshop products ($25), another for Grooming services ($30), and another for training services ($18).
The pop-up that opens to view/print the invoice will have 3 pages, each corresponding to the petshop sales, Grooming, and training.
We understand that detailed management of income and expenses is a fundamental part of your business. Therefore, with this system, you can track the money you've earned in each of your business areas.
If you want to know the total revenue, for example, for the last month, you can see how much you've earned in all your business areas. However, if you prefer, you can also check how much you've earned exclusively from your Grooming services.
Note: Remember that the Cash option is exclusively available for the petshop. Therefore, only petshop product sales will logically appear in the cash register.
If you want to see sales from all business areas for today, use the Reports > Billing > Where you can view ALL sales by selecting all Apps and the date you want to check (for example, sales for today or the last 7 days, etc.).
Note: when you add a service (for example, Grooming) to the petshop ticket and charge it, in its corresponding app, the service "closes," meaning it is already noted as paid or invoiced.
As we've seen before, you can manually save or pause tickets whenever you want. Additionally, the software includes an automatic auto-saving system. So, if you're in the middle of a sale but leave that screen or even accidentally close the software, that ticket won't be lost. It has been automatically saved or paused, allowing you to recover it later if needed.
When you access the New > Sale screen again, a notification will appear to remind you that you have paused tickets in case you want to recover them. If you wish, simply select the corresponding ticket, and you'll retrieve the ticket/receip to continue the sale.
Clicking on the "Pay" button brings up the screen to finalize the payment.
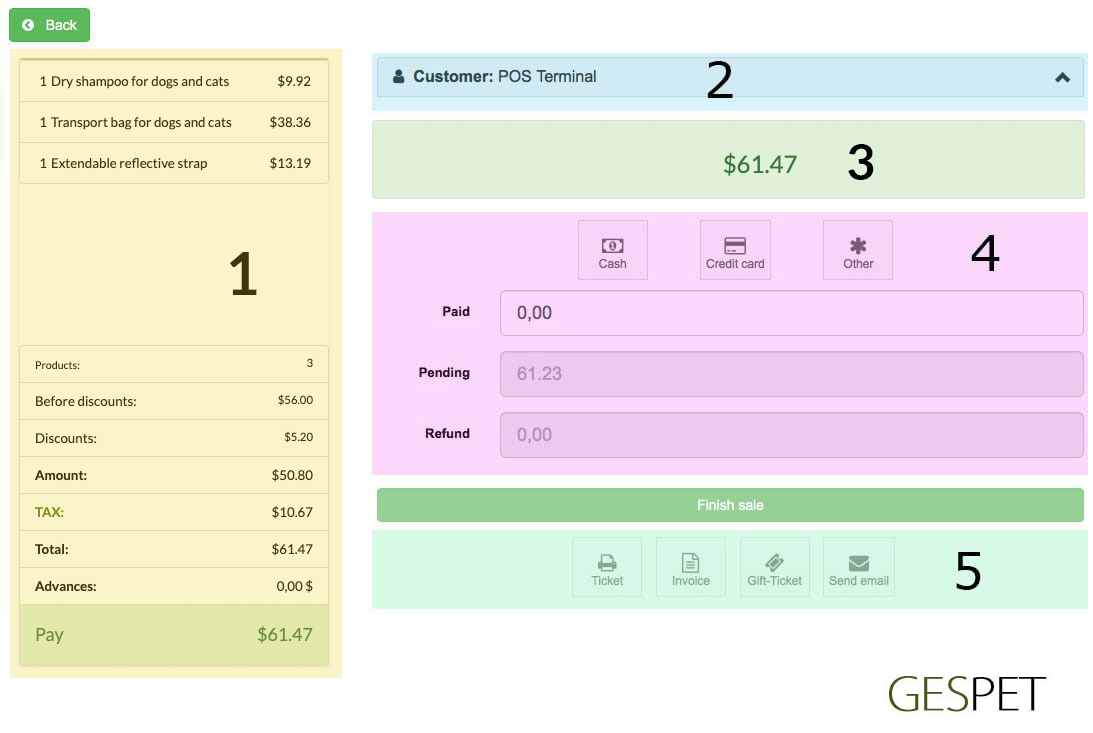
All products and services from the ticket are displayed along with details of discounts, taxes, etc.
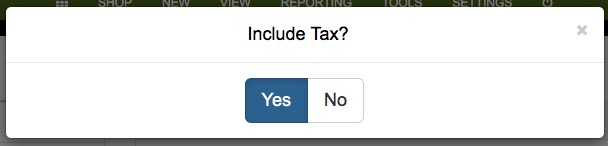
If you click on the tax name, you can select whether it includes taxes or if the sale is tax-exempt, excluding taxes accordingly.
By default, the generic customer or "cash customer" is selected.
If you want to choose a customer from your database or add a new one, you can do so by simply searching for their name or clicking on the "New Customer" button.
If the customer already exists, when you start typing their name, all customers with that name and their details are displayed:
Their contact details
Important information about them
Pickup/delivery information
The number of sales made to them
The money they have spent in the business
If they have outstanding invoices
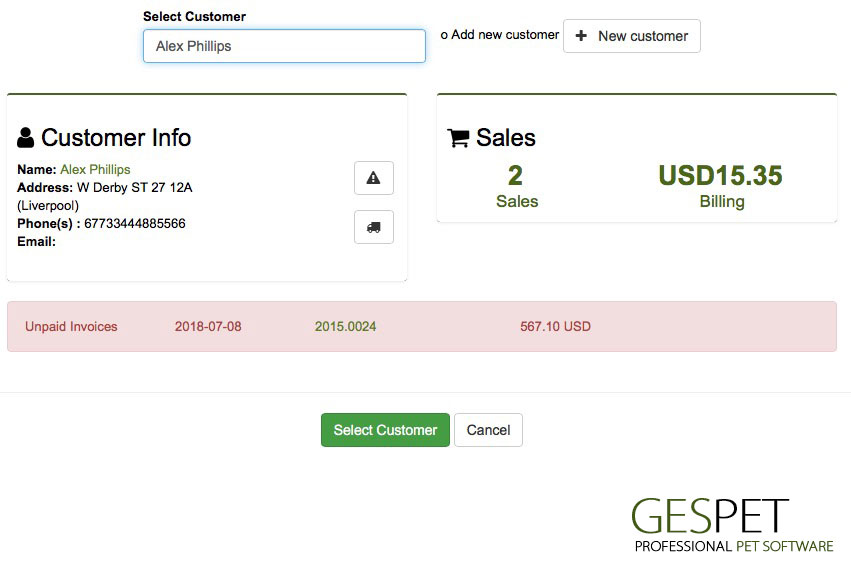
If this is the customer you want to select, simply by clicking "select customer," they will appear as the customer for that ticket. If they require an invoice, their details will already be automatically filled in.
If this is not the customer you were looking for, you can type again in the search bar to see other results and choose the correct one.
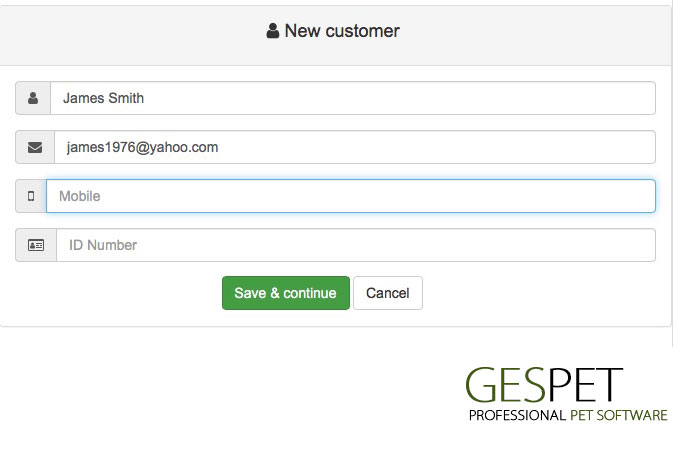
If the customer is new (not in our database), click on the "new customer" button to add them.
Important: Once the sale is completed, you won't be able to change the selected customer. Make sure it is the correct customer before finalizing the sale.
If you offer transport or home delivery service, you can indicate that the sale includes home delivery and specify the delivery date.
By clicking on "Transport Planning," the schedule opens in a new browser tab.
If you haven't selected any customer, i.e., you've left the default or "POS Terminal" customer, the delivery information will not appear.

This option corresponds to the Transport Software. In case you don't have this software, the Transport option will appear inactive.
See more information about the transport software:
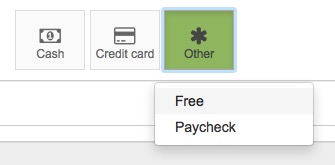
Select the payment method (Cash, card, etc.). If you click on "Other," the rest of your payment methods will appear, allowing you to select the appropriate one.
If the customer will be using multiple payment methods, select the Mixed Payment option to add 2 or more payments, for example, paying 20€ using a card and 30€ using cash (money).
You can configure other payment methods in the Settings > Payment Methods option.
By entering the amount the customer gives us, the pending amount to pay or the surplus amount (money to be returned) is automatically calculated.
It's possible to sell "on credit," meaning to charge only a part of the money and leave part of the money "pending to collect." For example, in a sale of $150, we collect only $30 and leave the remaining $120 pending to collect.
The sale will have the status "Pending" (payment). In the cash register, only the money actually collected will be recorded (in this example, $30), and in the sales view option, we will see that sale with the money already paid and the amount pending.
When the customer pays the remainder, it is only necessary to access the option View > Sales > select that sale > and enter the amount paid and select ç the payment method. When it is fully paid, the software will automatically mark that sale as Status = Paid.
You have a specific report to quickly view the invoices or sales that are pending payment. It's the "Unpaid Invoices" report, which shows the total amount, the amount already paid, and the pending amount.
Select whether you want to issue a Simplified or Full invoice. To issue a full invoice, you must have a client selected.
You can print:
The simplified invoice or ticket (No customer is associated, so it doesn't include customer details)
The regular invoice (A customer is associated, so it includes customer details)
The "gift receipt or gift ticket" (does not show the price)
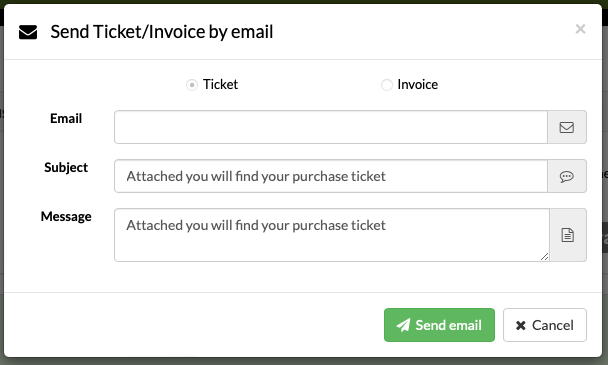
You can also email them to the customer. This is a very useful feature that helps you reduce paper/ink consumption and contribute to environmental conservation.
Customers often prefer to receive their purchase receipts via email because it’s more convenient for them.
By clicking on "Send email," you can select the format you want to send.
More information about tickets/receips: ticket details, how to print and send tickets by email, gift receipts, invoices, etc.
Clic aquíThis is how the summary of products is displayed on the screen and how it will appear on the ticket at the end of the sale:
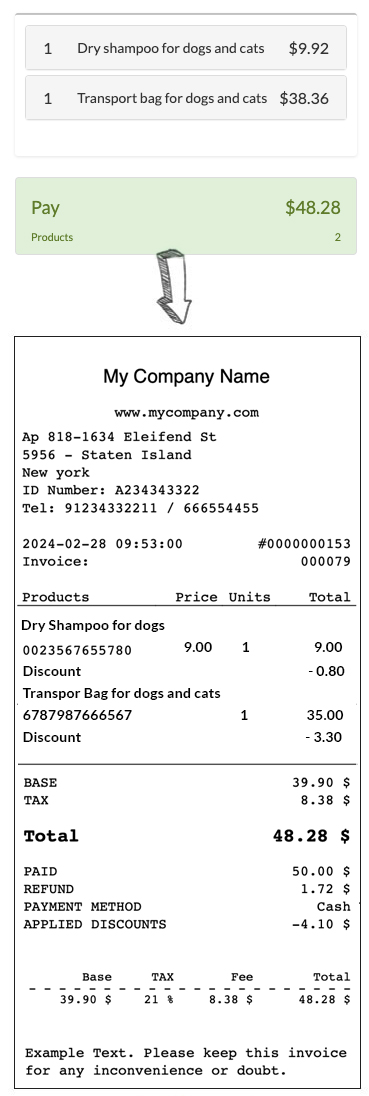
The ticket does not include information about the purchase price at which you bought the products or your profit (the difference between the purchase and sale prices).
It only includes information related to the selling price:
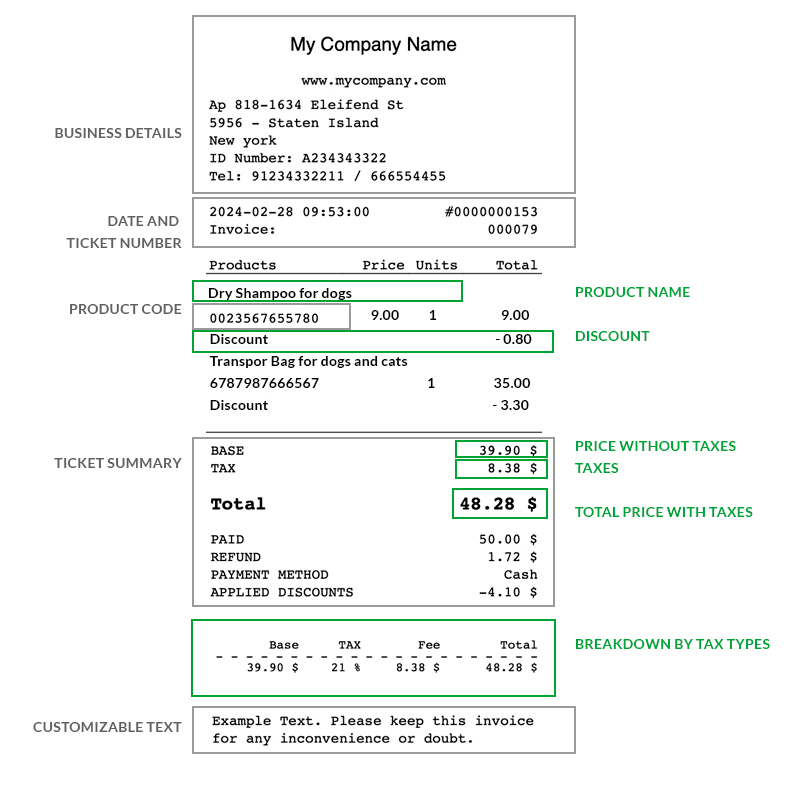
To configure your business information and the details that appear at the bottom of the ticket, go to the Configuration > Company Data option.
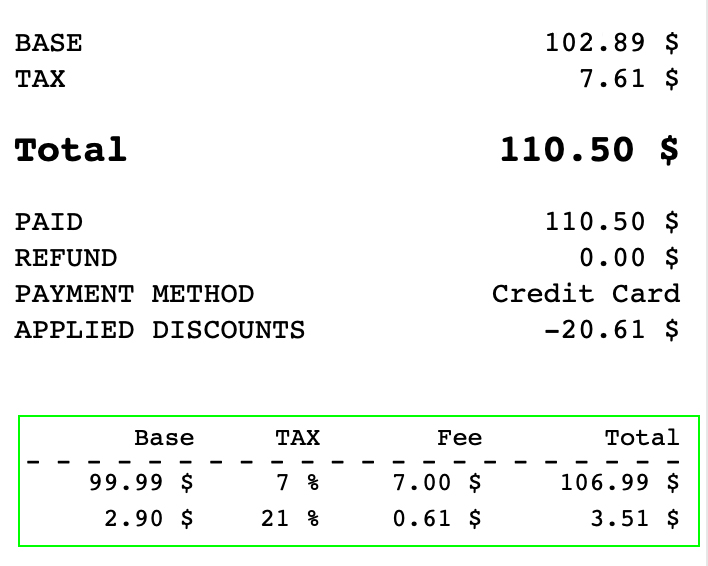
If you sell products with different tax percentages, for example, medications have 7%, food has 10%, and other products have 20%, each of the taxes will be detailed in the "ticket summary" section.
There may be a case where a customer does not pay the full amount of the invoice because:
They will pay, for example, 50% now and the rest when they receive the product
Or because they lack money and will pay that amount later
Or because they will pay using different payment methods,
Or any other situation...
How is the payment handled in these cases?
At the end of the sale, select the amount the customer is paying and the payment method.
You will see the outstanding amount.
You can finalize the sale. Until it is fully paid, it will have a Pending Payment status.
When the customer is going to pay a new amount, go to the View > Sales option and select that sale
In the Advances option, enter the amount the customer
is paying and the payment method, then click Save
Status:
If it is already fully paid, the status has now automatically changed to Paid
If not, the status remains Pending Payment
Remember that advances are not recorded in the Cash option, but if you want, you can manually record them by making a Manual Deposit.
Issued invoices cannot be deleted or modified, as tax law strictly prohibits doing so.
What can you do if you’ve made a mistake?
If you issued an invoice and, for instance, selected the wrong customer, you can’t just delete it and create a new one, nor can you edit it to change the customer. But don’t worry — there’s a proper way to fix it.
To correct it, you simply need to issue a corrective invoice (also known as a credit note). This special type of invoice is used to rectify any errors made in a regular invoice.
The credit note (or corrective invoice) cancels the original one. Credit notes can have their own numbering sequence, separate from regular invoices. You can configure the numbering format you prefer for both invoices and credit notes, and Gespet will automatically increase the numbering by one each time a new one is created, ensuring all are consecutive.
Neither invoices nor credit notes can be deleted. Once an invoice has been canceled through a credit note, that credit note cannot be deleted or undone.
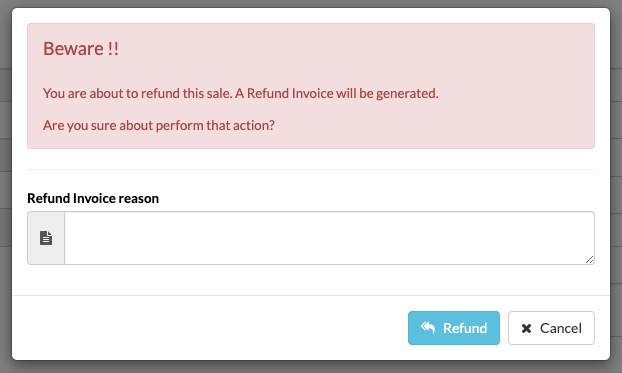
This process is irreversible. That’s why, when you click the Cancel button, the system doesn’t immediately proceed — instead, a red pop-up warning appears to confirm your action. You must confirm once again that you want to continue. In other words, there’s a double confirmation step to avoid issuing a credit note by mistake.
The correction (credit note or corrective invoice) is done in two steps:
Cancel the original invoice and generate the corrective invoice or credit note with negative amounts.
Create the new invoice, which now contains the correct information.
If the customer’s information is incorrect and you need to issue a corrective invoice to fix it, you can do it in two ways:
Option 1: If you need to correct the details before generating the corrective invoice:
First, go to the customer’s profile, update the information, and click Save.
Now you can issue the corrective invoice or credit note, which will include the new details you just updated in the customer’s profile. In the “reason for cancellation” field, if you wish, you can explain the reason — in this case, the correction of incorrect data.
When you generate the new invoice, it will include the updated information.
Option 2: If you don’t need to correct the details before generating the corrective invoice:
Generate the corrective invoice. It will contain the same customer information as the original. In the “reason for cancellation” field, if you wish, you can indicate the reason — in this case, the incorrect data.
Then go to the customer’s profile, update the necessary details, and click Save.
When you generate the new invoice, it will include the corrected details.
When a corrective invoice or credit note is issued, it automatically cancels the original invoice, payment, and the associated stay/service/sale. To register that stay/service/sale again, you’ll need to re-enter it and complete it. Once it’s finalized, you can issue the new payment/invoice.
Re-entering the stay/service/sale won’t create duplicates — the previous one was already canceled when the credit note was generated.
Let’s look at an example:
Let’s say you accidentally selected Michael Johnson as the customer, but the correct one was Michael Jackson, and you already issued the invoice. How can you fix it?
If you notice the mistake while invoicing, or later by going to View > Sales, select the invoice in question and click on it.
Click the Cancel button to issue a credit note.
You can write down the reason for the credit note — for example, “wrong customer information.”
In compliance with current legislation, this corrective invoice will include references to the original invoice being corrected (its number and date), and you can specify the reason for issuing it.
It will follow the numbering format you’ve configured.
You can print or email it if you wish.
Now you can register the stay/service/sale again, making sure you select the correct information. Once it’s completed, you can generate the payment/invoice with all the correct data.
An invoice will always show the date on which it was issued, as the issue date is legally fixed and cannot be altered.
This means it’s not legally allowed to issue an invoice with an earlier or later date, nor to change the date afterward. For example, if you create it today, it will show today’s date.
When searching for a ticket number, all the information about the sale appears:
The invoice number
The ticket number
The employee who made that sale
The payment method the customer used for that purchase
The customer
The date on which the customer made that purchase
The number of days that have passed since the customer made that purchase
The screen is "divided" into 3 areas:
LEFT: Purchase ticket
RIGHT: Return ticket
BOTTOM: Process the return and print the return ticket
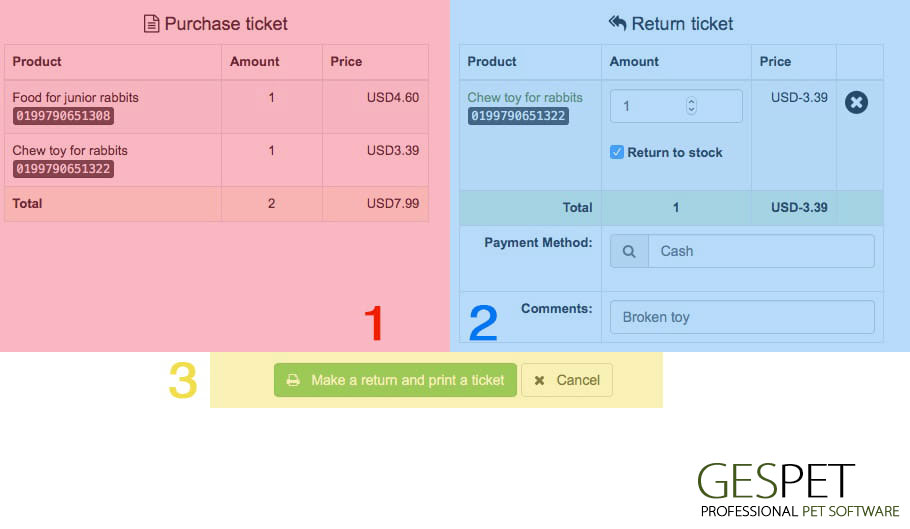
In the purchase ticket: Click on the products to return
They are added to the return ticket
Select the number of units to return
Mark if you want to return them to inventory (or stock)
Show the money to be returned
Select the payment method for the return (cash, card, ...)
You can write a comment: for example, the reason for the return, etc.
Finally, click the Make return and print the return ticket button
You will see the returns in:
the returns report
the Invoicing report, as they are "sales with negative amount"
the Result report
the View option > Cash
You can record orders for the products you need and send this order sheet directly to your suppliers by email.
This way, you can see that for "product x," you don't have units in stock, but you have already placed an order with the supplier, and it is expected to be received on day x.
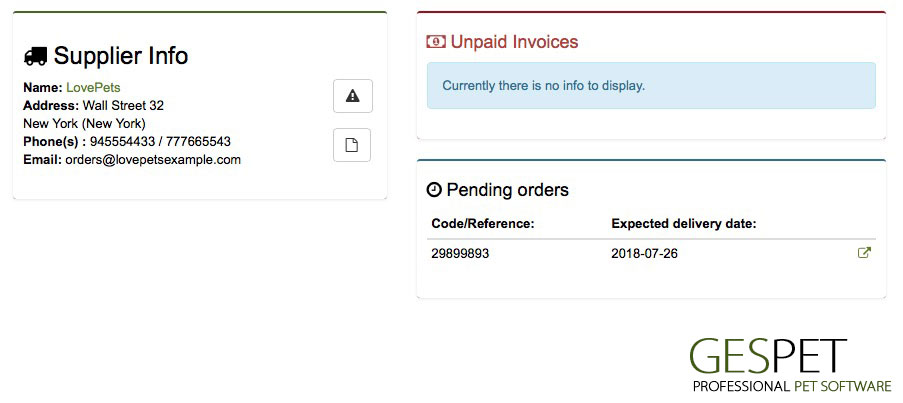
Search for the supplier or add them directly, and the following information will appear:
Their contact information
If you have pending invoices to pay them
If you have pending orders to receive from them
Tips:
In the supplier information area: If you click on the supplier's name, you can directly access their profile or Magic Desk
In the supplier information area: If you click on the small notes and important information buttons, you can see that specific supplier's information
In the invoices and orders pending area: If you click on the pending invoice, you will see the details
In the pending orders area: If you click on the arrow icon, you will see the order details
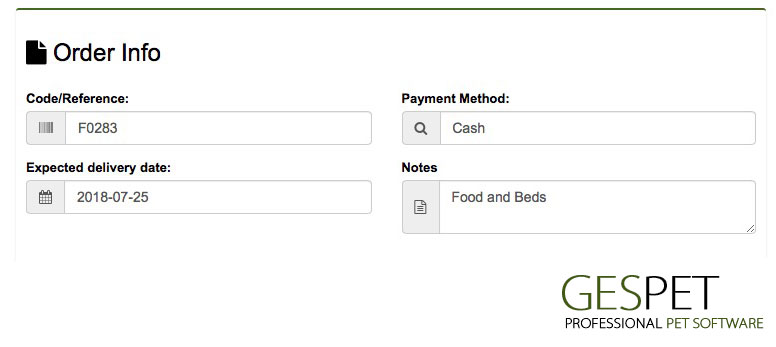
You can indicate a code or reference for yourself, i.e., for you to identify the order
The payment method for that order
The expected delivery date. On the main screen, the software will notify you on that day
Notes or comments for yourself
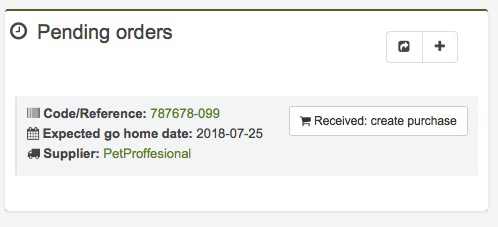
On the main screen, you will see the notice that today you are expected to receive these orders, and you can record them directly as soon as you receive them to include the products in your inventory or stock:
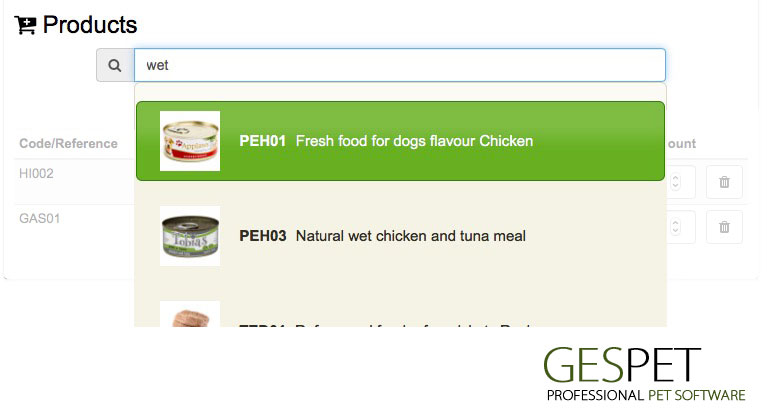
Search in the product search, and all the matches will appear
Click to add it
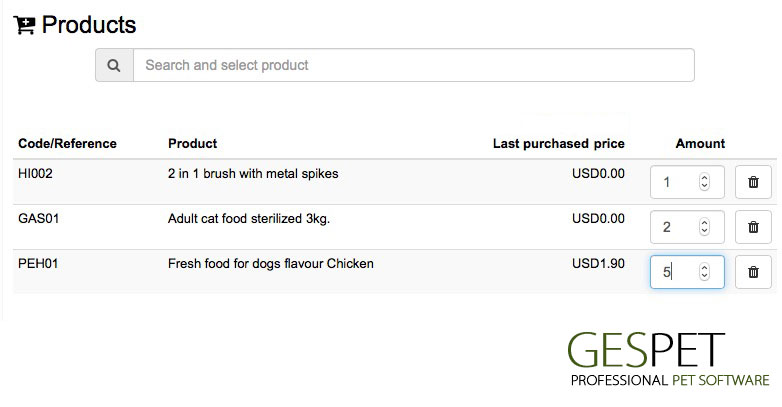
You can change the number of units
You can delete it by clicking on the trash can icon
The last price at which that product was purchased appears
When you have finished adding all the products, click the save button to record the order
You will see the orders you have made, the expected delivery date, and their status. Later, when you receive the order, from the main screen or from the View > Orders option, you can convert that order into a purchase, and the products will be included in your inventory or stock.

You can add a new purchase:
Having placed a previous order
Without having placed an order
Search for the supplier or add them directly, and the following information will appear:
Their contact information
If you have pending invoices to pay them
If you have pending orders to receive from them
Notes:
In the supplier information area: If you click on the supplier's name, you can directly access their profile or Magic Desk
In the supplier information area: If you click on the small notes and important information buttons, you can see that specific supplier's information
In the invoices and orders pending area: If you click on the pending invoice, you will see the details
In the pending orders area: If you click on the arrow icon, you will see the order details
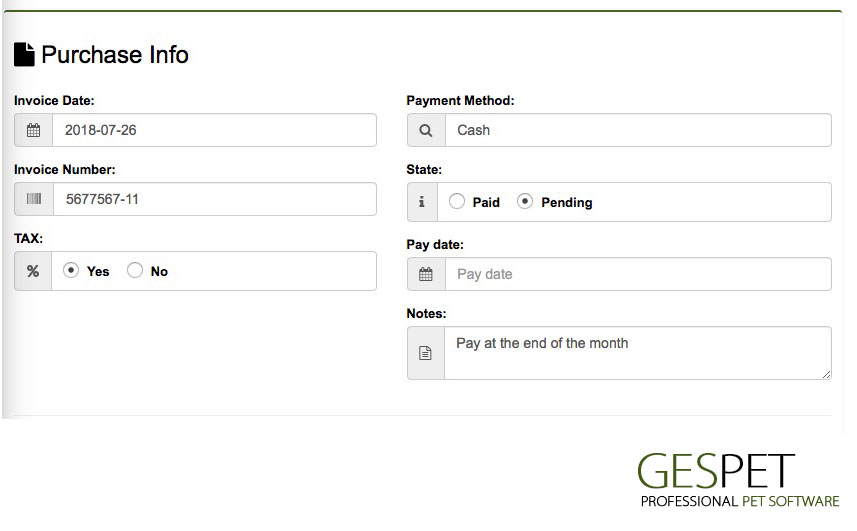
Shows the date and invoice number
Indicates whether it includes taxes (based on your system's configured tax)
Selects the payment method and status (paid or pending)
If it is paid, you can include the payment date, and if not, leave it blank*
You can include notes or comments for your information
* You can change this later. If the invoice is currently pending, it won't have an invoice date. On the day you pay the invoice, go to View > Purchases > select that invoice and:
Change the status to "paid"
Specify the payment date
The purchase will be automatically recorded in the "cash register," and you will see that if you paid today, the money for that purchase has been withdrawn today (even if the purchase was made a month ago, for example)
Search in the product search and all the matches will appear
Click to add it
You can change the number of units
You can delete it by clicking on the trash can icon
The last price at which that product was purchased appears
When you have finished adding all the products, click the save button to record the order
Select the products, and they will be added to the purchase.
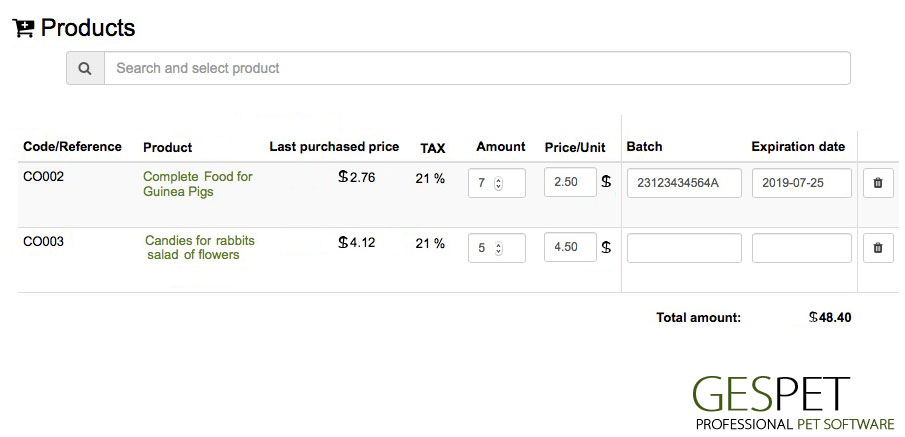
Its code or reference, name, and the last price at which it was purchased appear
Note: By clicking on the name, its profile or Magic Desk is displayed for you to see all the information about that product
Now select:
The number of units of that product you are purchasing
At what price you are buying them (for example, $10 each)
If it is a perishable product, we recommend that you also include the batch and expiration date information. This way, the software will automatically alert you when a batch of products is about to expire
You won't be able to enter this data manually later; it is necessary to enter it at the time of purchase to associate it with this specific product.
To remove that product from the purchase, click on the trash can icon
Click on the Save button to record the purchase, and the software will automatically:
Add those products to your stock (for example, +4 balls or +2 kennels)
Change the "last purchase price" of that product, and it will now be the new one you just entered
Note: In the Magic Desk or product profile (View > Products), you can see a history with all the prices at which you have purchased that product and the details. This way, you can see which suppliers offer you better prices or the price variations that a product has undergone.
Show a notice on the main screen when that batch is about to expire
If the invoice is paid, record the expense in the cash register on the date you selected as the payment date (for example, today -30€ for the purchase of these products)
In the View > Purchases option, you can see all the purchases you have recorded and record when payments are made for "pending payment" purchases.
You can delete a purchase, but we do not recommend it if the purchase includes products. We recommend that if you have made a mistake (for example, invoice number, date, status, payment method, ...), you modify it instead of deleting it. This is because we remind you that the stock will not be automatically readjusted. You will have to adjust it manually.
You can adjust the stock of a product in its profile or Magic Desk (View > Products > Search or select the product > Right sidebar menu > Stock Adjustment) or you can also do it in the New > Stock Adjustment option where all the products will appear > Modify the stock of the product you want and click on the green Save icon.
All products are listed, and it is possible to quickly change their price and tax percentage.
Simply by entering the new base price (or price without taxes), the new selling price (or final price with included taxes) is calculated.
To save this new price, you need to click on the green Save button next to the product.
If instead of changing the regular price, you prefer to make a "temporary" change, i.e., a promotional or offer price for a specific period, in the View > products > product > Magic desk > Sale Price > It is possible to set a special price for that product.
All products are listed, and it is possible to change their stock (or the number of available units).
Simply enter the new number of units and click on the green Save button next to the product.
In this option, you can add your products.
You can do it in two ways:
1. IMPORT
You can import multiple products at the same time. Just click the Import button and follow the process, or if you prefer, you can learn more about importation by clicking the following link.
How to Import Products2. ADD INDIVIDUALLY
Click the Add button, enter all the details, and click Save.
For faster addition, the product is recorded, and the form is cleared for you to add a new product.
From this option, you add basic options, and later from the View > Products > product selection > you can add much more information: photo, stock, important information, notes, etc.
Important: Before adding a new product, perform a search to see if it is already recorded in your database.
More information about searches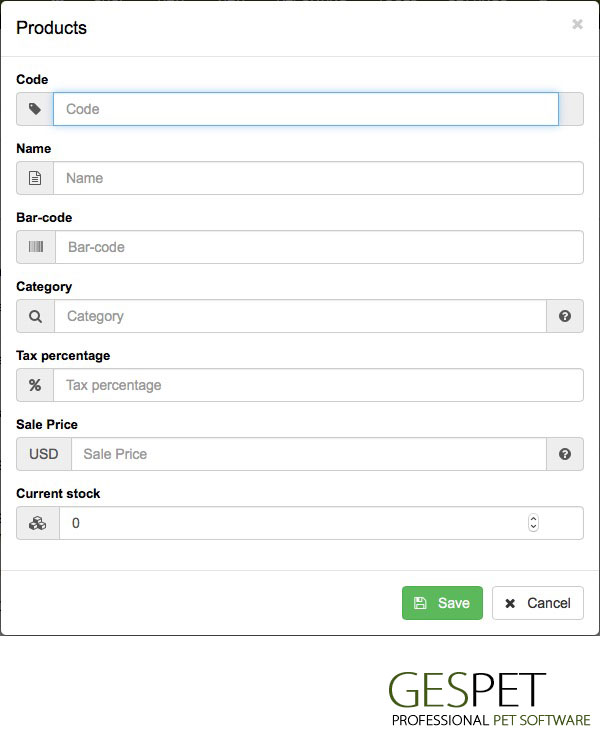
Code: Enter the code you want to assign to the product. You can simply put a number or use different types of codes, whatever is easiest for you to identify your products (bath01, CM0002, ...)
Name: Enter the name of the product. Later, you can add a description if you want to add additional information.
Barcode: You can enter the code manually or use a barcode scanner. It is straightforward to use the scanner; no additional configuration is needed.
Place the mouse cursor or click on the field where you want to insert the code (the search bar or the barcode field when adding a new product)
It becomes enabled for typing
Scan the product code
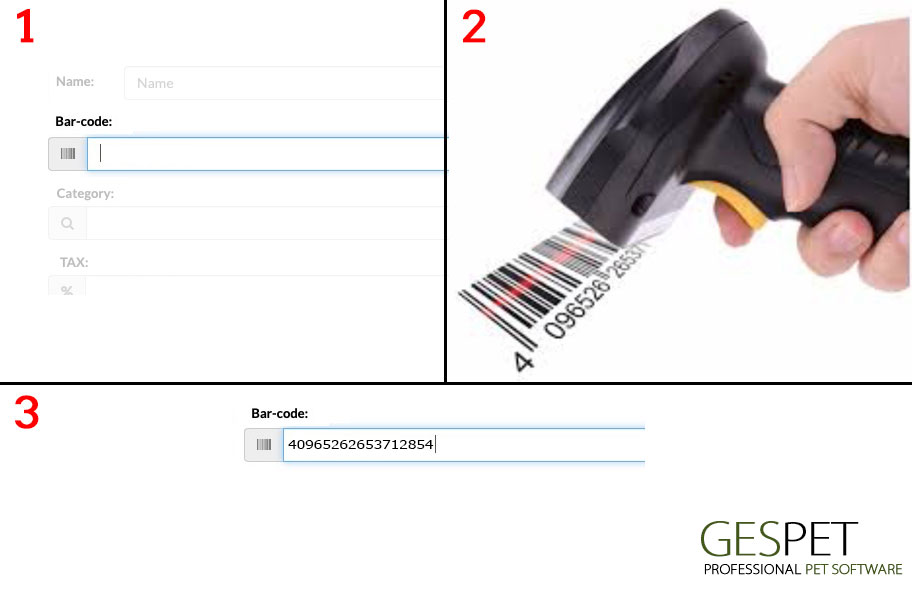
How to use the barcode scanner for a product:
Tax Percentage: The percentage of tax to apply.
For example, if the tax to be applied to that product is, for instance, 21% VAT, you would enter 21 in this field.
Selling Price: Base price, i.e., without taxes. Later, the base price, tax, and final or total price will be itemized on the receipt.
If you have products that you no longer sell, you can delete them. But if you have purchases/sales/returns, etc., recorded that include that product, for example, "Bird Food," you cannot delete that product from the list because it would also be deleted from those purchases/sales.
In this case, you will see a message informing you why it is not possible to delete the product.
Remember: You can modify it but cannot delete it. If you do not want to use or sell that product, you can deactivate it by selecting the option Low = Yes. This way, it will no longer appear when you make a new sale, but it will not have been permanently deleted from your database.
Categories allow you to organize products. You can add as many categories and subcategories as you need. Properly organizing your products will make it much easier to work with them.
You can do it in two ways:
1. IMPORT
You can import multiple categories at the same time. Just click the Import button and follow the process, or if you prefer, you can learn more about importation by clicking the following link.
How to Import categories2. ADD INDIVIDUALLY
If you prefer, you can add them individually.
Go to New >
Category/Subcategory or View > Categories/Subcategories
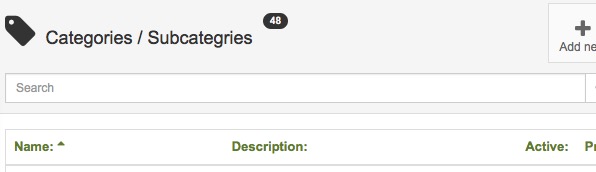
Important: Before adding a new category, perform a search to see if it is already recorded in your database.
You can use the search bar at the top, and you can also alphabetically sort in ascending or descending order by clicking on the name or description.
You can add main categories or "Parent categories" and secondary or subcategories. Here's how to do it, it's very simple:
For example, to organize your products like this:
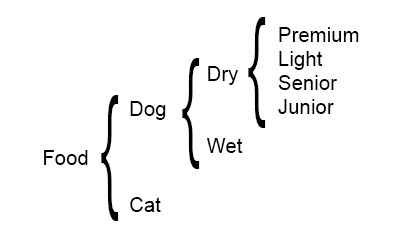
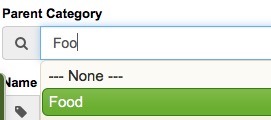
1. Add the first category of our example: FEED
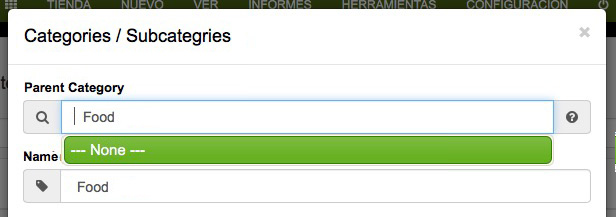
In the Parent or Previous category search, type "Feed"
Since that category does not exist, click on NONE
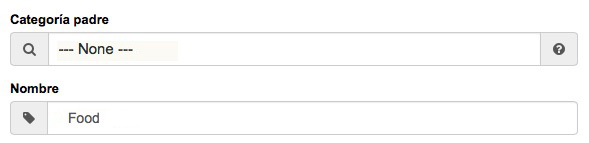
Now in the search bar, it says Parent Category (or Previous): NONE
Type the name you want to give to that category, in our example: FEED
If you want, add a description and a photo for that category.
Click on Save
Tip: It is recommended that you use a photo or icon as it will help you later to quickly visualize the categories on the sales or POS screen (New > Sale). Keep reading and we'll explain how to do it.
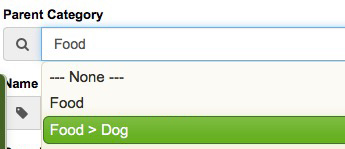
2. Add the second category of our example: DOGS
Search for the "Parent" category FEED and as soon as it appears (highlighted in green), select it by clicking on it
Type the name of the second category, which in our example is DOGS
Add the description and photo and click Save
3. Repeat the same process to add the third category: Dry
Search for the "Parent" or previous categories, in this case "Feed > Dogs" and as soon as it appears (highlighted in green), select it by clicking on it.
Tip: As you can see, it's very simple, just by typing the first letters, different results already appear.
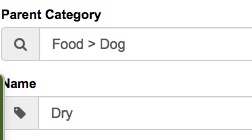
Type the name of the new category "Dry", if you want a description and a photo/icon, and click Save
4.Repeat the same process to add the fourth category: Wet
Search for the "Parent" or previous categories, in this case the same as in the previous case "Feed > Dogs" and as soon as it appears (highlighted in green), select it by clicking on it.
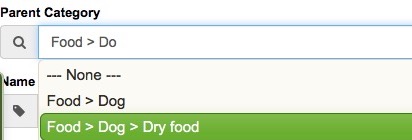
Type the name of the new category "Wet", if you want a description and a photo/icon, and click Save
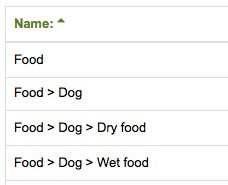
You already have added the categories:
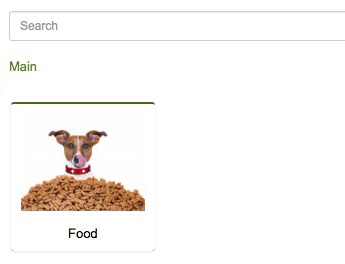
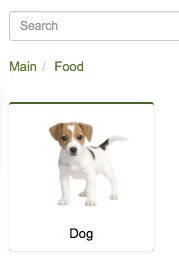
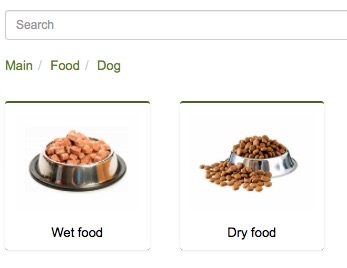
As we mentioned earlier, it is recommended to add a photo, as it will help you later to quickly visualize the categories on the sales or POS screen (New > Sale)
You can upload the photo you want for that category (for example, a photo of an aquarium or a cat) or if you prefer, you can choose an icon from our database of icons.
This way, you will easily achieve that your sales or POS screen has a nice appearance with a unified design that will allow you to locate the category you are looking for "at a glance." We have included 120 icons for you to choose from.
View of the categories we just added
![]()
You can include the brands of the products. This will be very useful for filtering or searching by brands.
You can do it in two ways:
1. IMPORT
You can import multiple brands at the same time. Just click the Import button and follow the process, or if you prefer, you can learn more about importation by clicking the following link.
How to Import Brands2. ADD INDIVIDUALLY
Add the new brand first
When you go to add a new product, you can select one of the brands you added before
Important: Before adding a new brand, perform a search to see if it is already recorded in your database.
You can use the search bar at the top, and you can also alphabetically sort in ascending or descending order by clicking on the name or description.

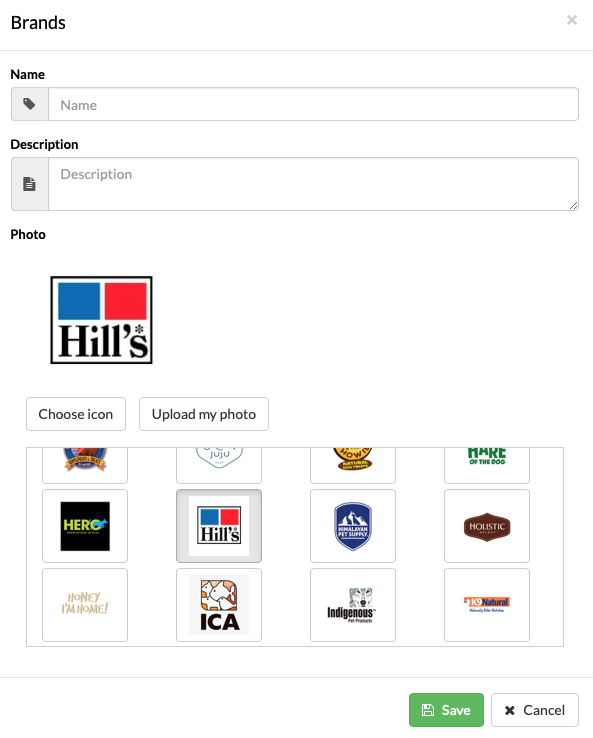
You can configure the name, description, and include an icon or logo of the brand. You can add any image you want, and to help you, we have already included icons or logos of a large number of pet supply brands. This way, you don't need to upload the image, just select it from the list, and it's much faster.
List of all veterinary contacts. If you have multiple business areas, suppliers data is accessible from all of them, but contacts are categorized by business area. You can consult them all or by business area (for example, only the vet contacts for hotel).
A small indicator displays the total number of suppliers.
At the top of the screen, there is a search bar. If you enter customer information and press enter or click on the magnifying glass, all matches will be displayed
You can sort the list of customers as you need:
More information on ordering and search engines:
Click hereTo add customers, you have two options:
Add them individually (one by one) using the Add option.
Or add multiple contacts at the same time using the Import option.
To add them, use the buttons at the top:
Click the Add Customer button, fill in the information, and click Save.
(Refer to the New > Customer section for more information)
Or click the Import button and follow the instructions.
How to import customers in bulk in the software
Click here How to import customers in bulk in the softwareList of all suppliers. If you have multiple business areas, suppliers data is accessible from all of them, but suppliers are categorized by business area. You can consult them all or by business area (for example, only the Grooming suppliers).
A small indicator displays the total number of suppliers.
At the top of the screen, there is a search bar. If you enter supplier information and press enter or click on the magnifying glass, all matches will be displayed
You can sort the list of suppliers as you need:
More information on ordering and search engines:
Click hereTo add suppliers, you have two options:
Add them individually (one by one) using the Add option.
Or add multiple contacts at the same time using the Import option.
To add them, use the buttons at the top:
Click the Add New button, fill in the information, and click Save.
(Refer to the New > Customer section for more information)
Or click the Import button and follow the instructions.
How to import suppliers in bulk in the software
Click here How to import suppliers in bulk in the softwareTAGS:
petshop software | pet shop software | pet store software | petshop products petshop categories | petshop online order | petshop purchase software pet store purchase software | petshop orders suppliers software | petshop app | pet store app