

List of all invoices you have recorded. If you have multiple business areas, invoices are accessible from all of them, but you can view them collectively or independently (for example, only the Hotel invoices).
A small indicator with the total number of invoices is displayed.
At the top of the screen, there is a search bar. If you enter invoices information and press enter or click on the magnifying glass, all matches will be displayed
You can sort the list of invoices as you need:
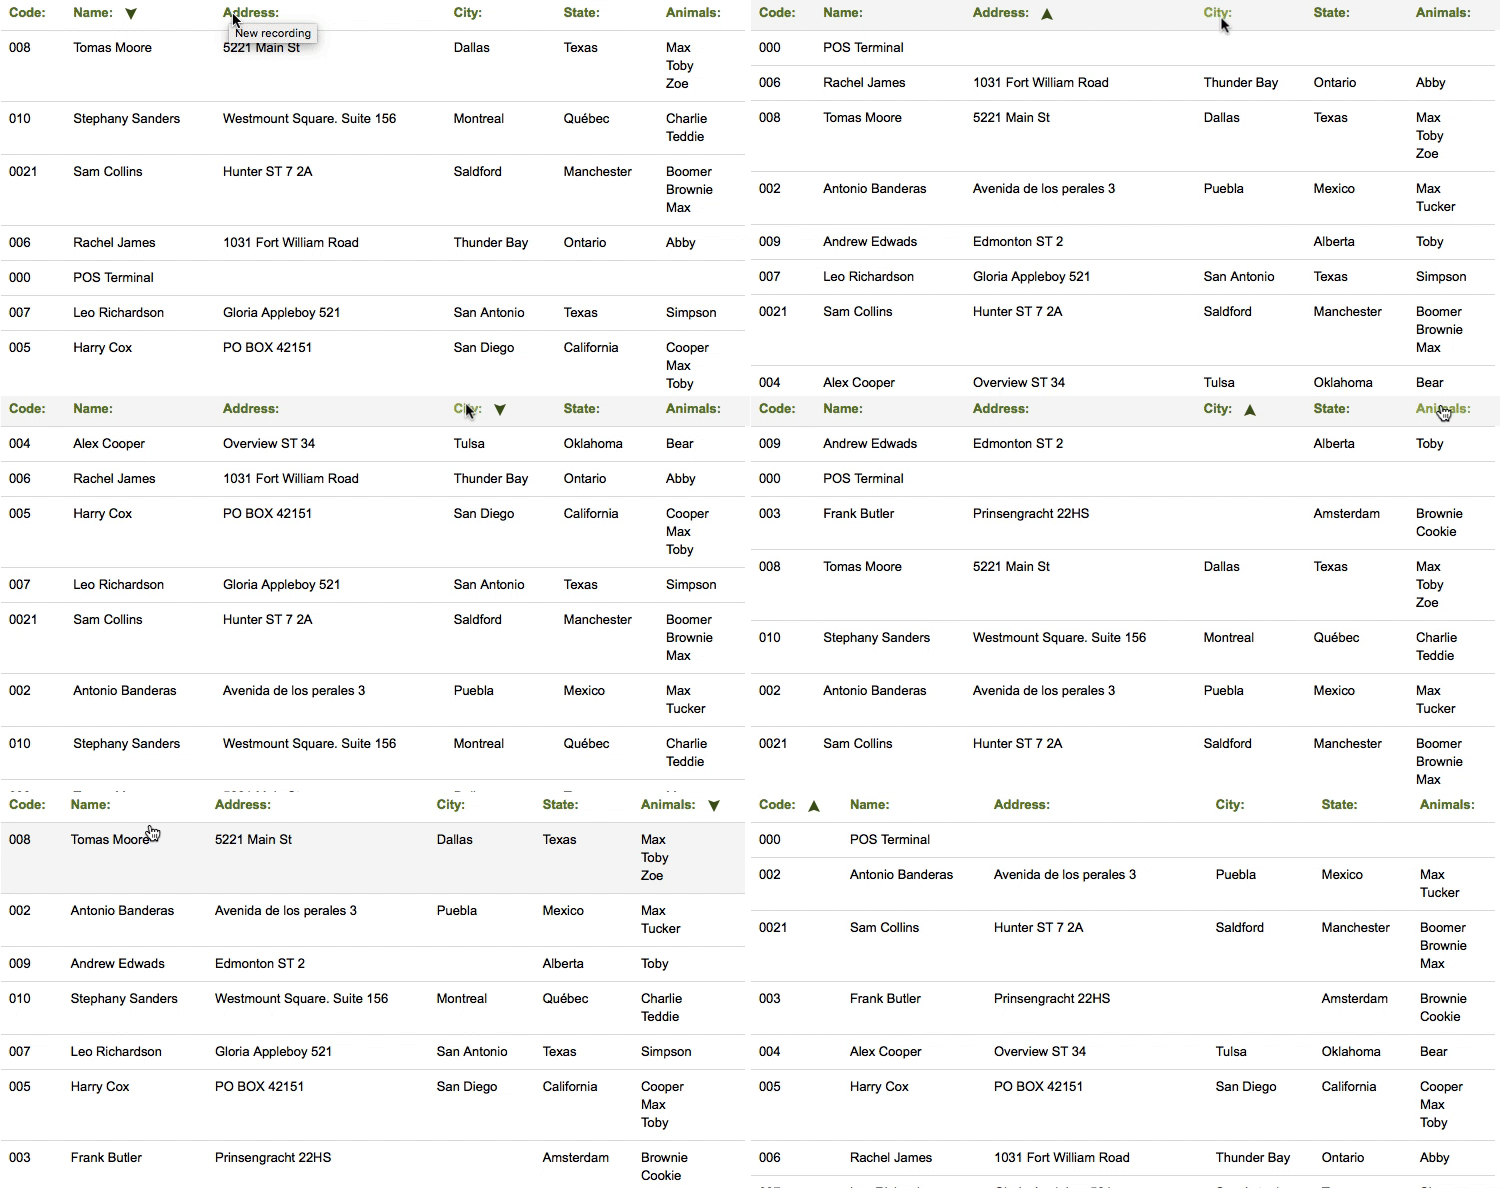
More information on ordering and search engines:
Clic hereSales or invoices can have 2 statuses:
Paid: If it's fully paid
Pending: If it's totally or partially unpaid
By clicking on a sale from the list, the details will appear, and you can do additional actions: print it, send it via email, or cancel it.
If you have made a mistake, and you need to "correct" that invoice:
Keep readingReports > Billing
Reports > Invoice pending
Reports > Unpaid invoices
Billling
Listado con todas las devoluciones que has hecho.
At the top of the screen, there is a search bar. If you enter invoices information and press enter or click on the magnifying glass, all matches will be displayed
You can sort the list of invoices as you need:

By clicking on a return, you can view the details and print the return receipt or ticket.
In this screen, you can also create a new return.
When searching for the ticket/receipt number, all information about the sale appears: invoice number, ticket number, customer, purchase date, and days elapsed since the purchase.
|
LEFT |
RIGHT |
On the left side are all the purchased products, and by clicking on a product, it will appear on the right side in the return ticket/receipt.
Select the number of units and whether you want to return those products to your stock.
For example, if the product is not damaged, I add it to the product stock to be able to sell it again.
The refund amount appears. Select the payment method for the return and you can write a comment, such as the reason for the return.
Finally, click on the button
The returns report
The Invoicing report, as they are sales with a negative amount
The Results report
The option View > Cash Register
To start selling, it is necessary to open the cash register.
In the Cash register, the accounting actions performed by a user in the Pet Shop software are recorded:
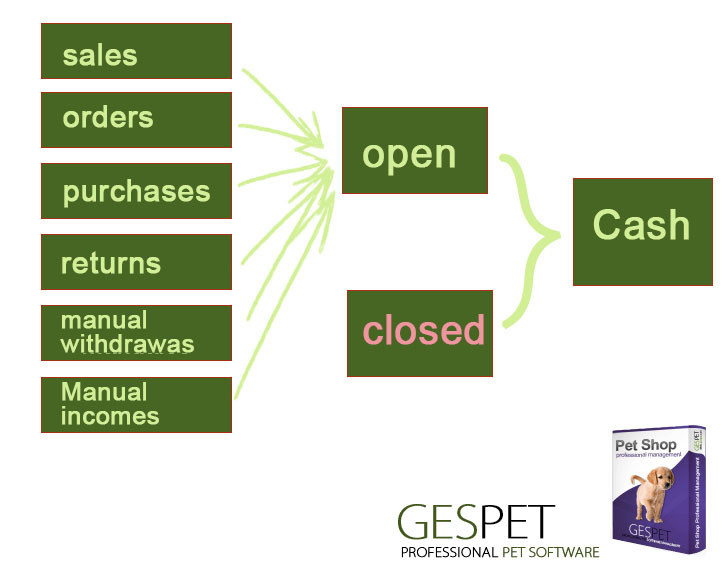
Sales
Manual cash withdrawals (taking out money)
Cash income or deposits (adding money)
Expenses or purchases from suppliers
Returns (when a customer returns a product and the money is refunded)
If you have other Gespet solutions to manage various areas of your business
(Hotel, Daycare, Veterinary, Grooming, Breeding, Training), you can use the
Pet Shop software to also charge for services from those business areas
independently or along with products.
If you charge, for example, for a hotel stay or a grooming service, this
sale will also be recorded in the Cash Register because it was charged from
the Pet Shop area.
We have included the new Mixed Payment option that allows selecting multiple payment methods when making a sale.
For example, John wants to pay part of his purchase in cash (money), another part with his credit card, and the rest using PayPal.
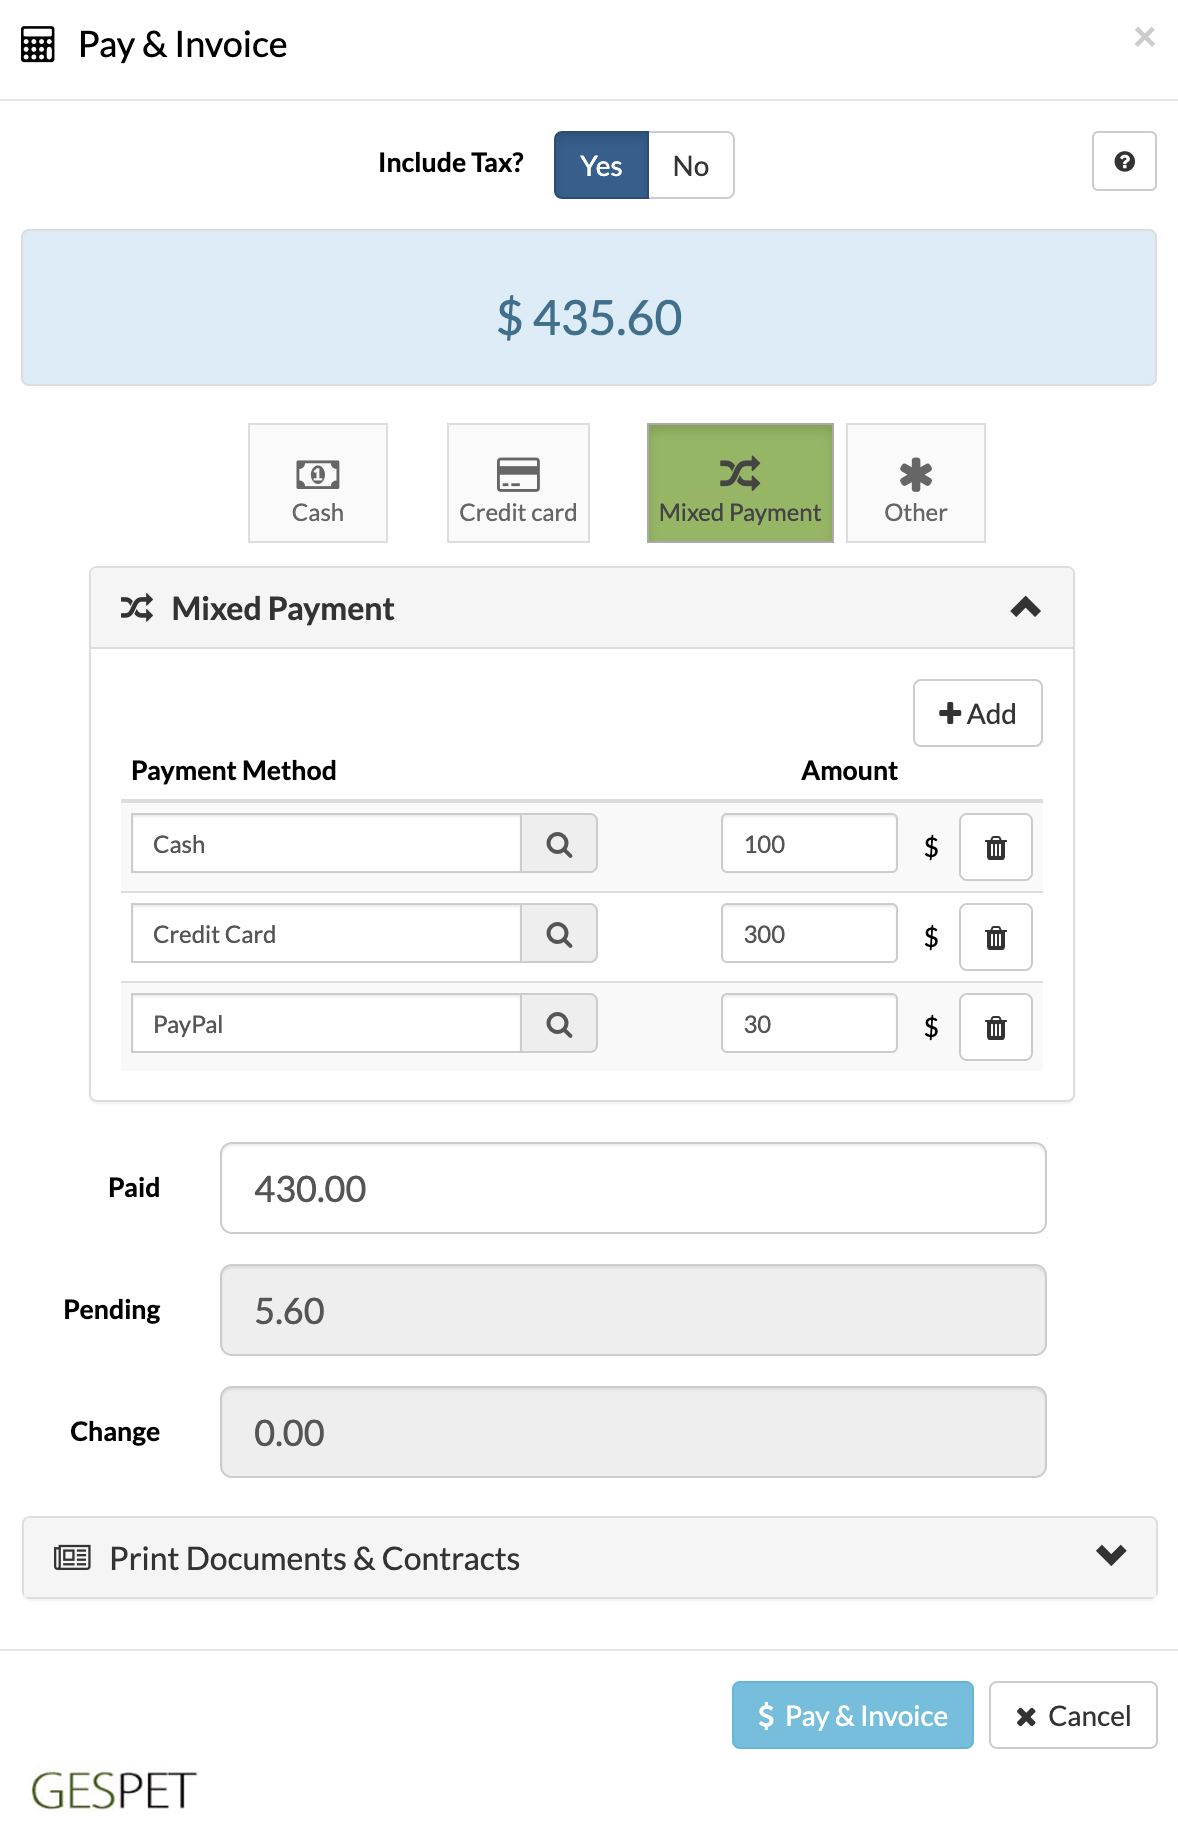
We have thought of everything to make payment management as easy as possible. That’s why each payment will be recorded in the register independently so you can properly track and simplify reconciliation, balance, or closing.
If in John's product purchase of €80, he paid €40 in cash (money) and the remaining $40 using his card, you will see the breakdown of payments.
SUBSEQUENT PAYMENTS, THE CUSTOMER PAYS THE REMAINING AMOUNT
In the case that, for example, $20 remains pending payment and within 3 days, John makes the payment of that remaining amount, don’t worry, you can manage it as well.
You can now add those $20 that John paid, for example, through PayPal or Bizum, and you will see it correctly recorded in the register today (the day the payment was made).
When the sale or invoice is fully paid, the status of the invoice automatically changes, so you don't have to do it manually.
When closing the cash register, a balance is performed to review the accounted money (which should be in the cash register) and the actual money in the Cash register.
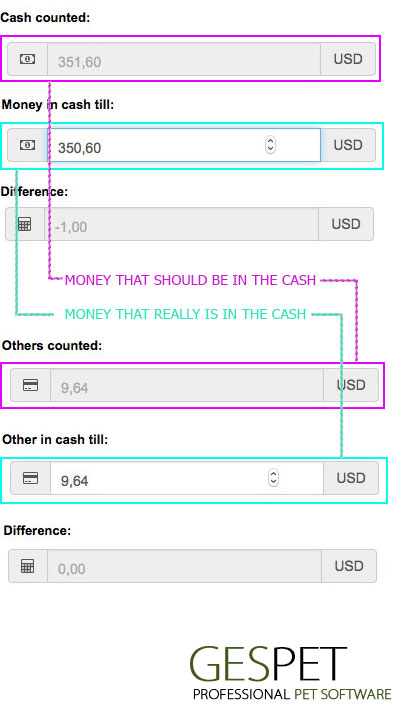
The difference between the accounted and the actual money in the cash register is automatically calculated (the surplus or shortage of money in the cash register compared to the accounted).
You will see if the cash register is open or closed and the balance. If you have sold $100 and spent $50, the balance will be positive at $50.
You can add manual transactions if, for example, you deposit or withdraw money (to have change, for some adjustment, a loan, etc.)
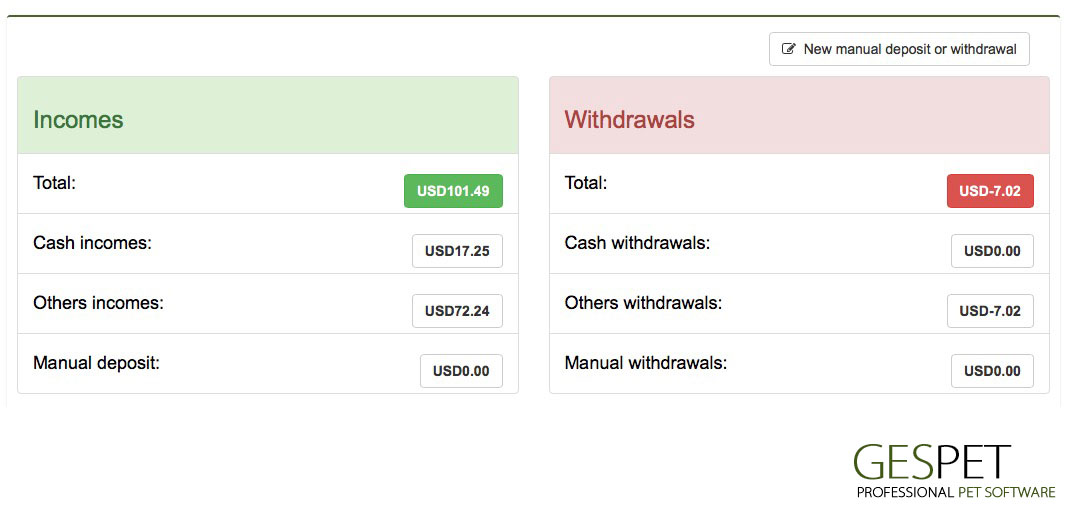
In the left area (green color), entries or income appear (positive amount of money)
CASH INCOME: Sales made in cash or cash equivalents
OTHER INCOME: Sales made in other forms of payment
MANUAL INCOME: Manually recorded income (not from sales)
Total
In the right area (red color), withdrawals or outflows appear (negative amount of money)
CASH WITHDRAWALS: Purchases made from suppliers in cash or cash equivalents + returns made in cash or cash equivalents
OTHER WITHDRAWALS: Purchases made from suppliers in other forms of payment (credit card, etc.) + returns made in other forms of payment (credit card, etc.)
MANUAL WITHDRAWALS: Manually recorded withdrawals (not from purchases or returns)
Total
At the bottom, there is a list of all transactions made on the selected day:
Using the day selector, you can view at the bottom of the screen the list of MOVEMENTS or actions performed on that day (opening and closing of the cash register, deposits, sales, withdrawals, and manual deposits, etc.) and also the Balances (checks or audits) performed when closing the cash register.
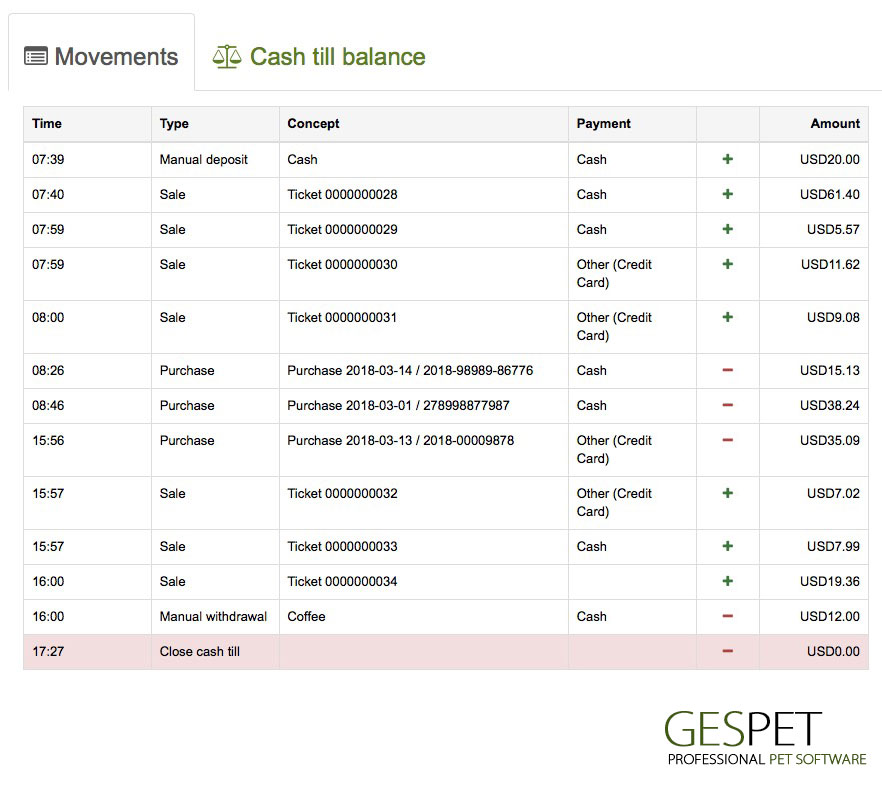
It is not possible to delete transactions because the register keeps a record of all the operations that have been performed.
If you have recorded a manual deposit of $100 by mistake, you can make a withdrawal of $100 and indicate in the description that it is a correction if you wish.
In this way, the balance remains the same (it would be as if it had been deleted), but it is not actually deleted, so a record of both transactions remains.
In the case of Mixed Payments, where the customer has paid using multiple payment methods, if you delete one of the payments from that sale, a negative transaction will be made in the register to record that the payment has been deleted.
For example:
When making the sale, you select that from the total ($100), the customer paid:
$30 in cash
and $70 by card
But you made a mistake, the customer did not pay those $70 by card, but with a check.
Don't worry, you can correct this mistake:
In View > Sales, select that sale
Delete the incorrect payment. It will be automatically recorded in the register that this payment has been deleted
Add the payment again, in this case, $70 paid by check. The payment will be automatically recorded in the register.
In this way, you do not need to access the register option to make these entries, nor will there be any discrepancies in the register if you add/delete payments in a sale, because the software takes care of adding/deleting those payments in the register.
List of all the purchases you have recorded. You can search and sort the list of purchases, and by clicking on a purchase, you can also edit it, change the payment status (Paid-Pending), and print the purchase document.
At the top of the screen, there is a search bar. If you enter purchase information and press enter or click on the magnifying glass, all matches will be displayed
You can sort the list of invoices as you need:

More information on ordering and search engines:
Clic hereYou can delete a purchase, but we do not recommend doing so if the purchase includes products. We recommend that if you have made a mistake (for example, invoice number, date, status, payment method, ...) , you modify it instead of deleting it. This is because we remind you that the stock will not be automatically readjusted. You will have to adjust it manually.
You can adjust the stock of a product in its profile or Magic Desk
(View > Products > Search or select the product > Right
sidebar menu >
Stock Adjustment) or you can also do it in the option New > Stock
Adjustment
where all the products will appear > Modify the stock of the product you
want
and click the save button
On this screen, you can also record a new purchase:
Having placed a previous order
Without having placed an order
Search for the supplier or add them directly, and the following information will appear:
Their contact information
If you have pending invoices to pay them
If you have pending orders to receive from them
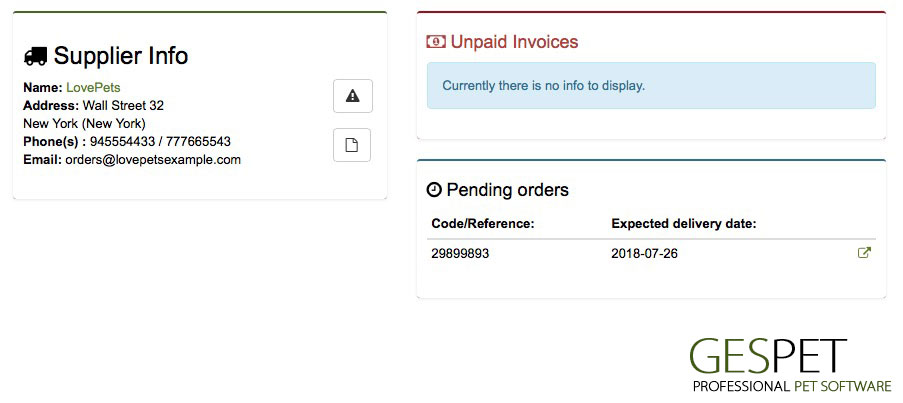
Notes:
In the supplier information area: If you click on the supplier's name, you can directly access their profile or Magic Desk
In the supplier information area: If you click on the small notes and important information buttons, you can see that specific supplier's information
In the invoices and orders pending area: If you click on the pending invoice, you will see the details
In the pending orders area: If you click on the arrow icon, you will see the order details
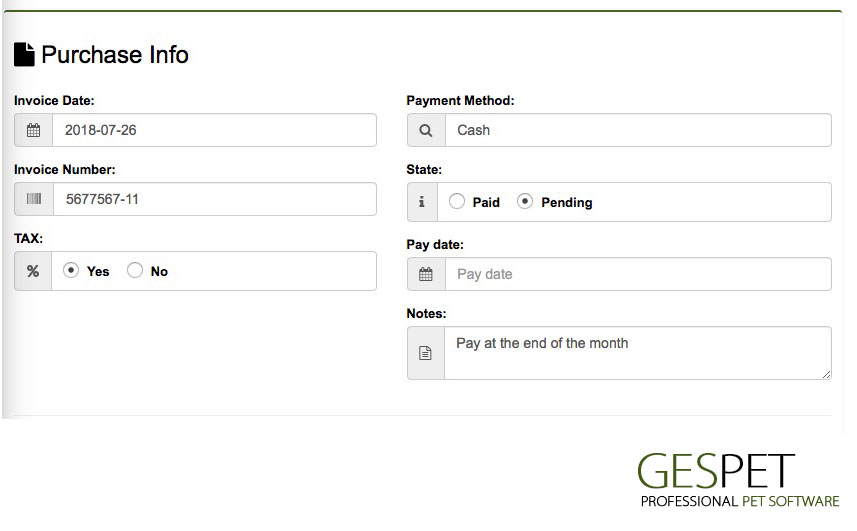
Shows the date and invoice number
Indicates whether it includes taxes (based on your system's configured tax)
Selects the payment method and status (paid or pending)
If it is paid, you can include the payment date, and if not, leave it blank*
You can include notes or comments for your information
* You can change this later. If the invoice is currently pending, it won't have an invoice date. On the day you pay the invoice, go to View > Purchases > select that invoice and:
Change the status to "paid"
Specify the payment date
The purchase will be automatically recorded in the "cash register," and you will see that if you paid today, the money for that purchase has been withdrawn today (even if the purchase was made a month ago, for example)
Search in the product search and all the matches will appear
Click to add it
You can change the number of units
You can delete it by clicking on the trash can icon
The last price at which that product was purchased appears
When you have finished adding all the products, click the save button to record the order
Select the products, and they will be added to the purchase.
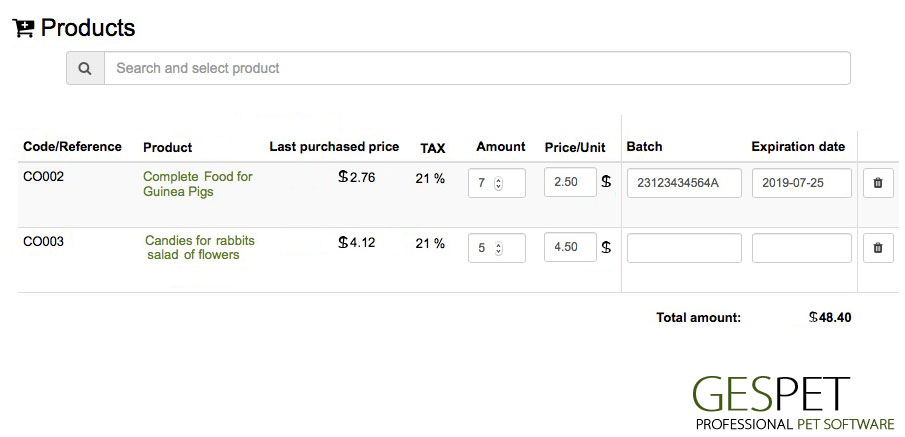
Its code or reference, name, and the last price at which it was purchased appear
Note: By clicking on the name, its profile or Magic Desk is displayed for you to see all the information about that product
Now select:
The number of units of that product you are purchasing
At what price you are buying them (for example, $10 each)
If it is a perishable product, we recommend that you also include the batch and expiration date information. This way, the software will automatically alert you when a batch of products is about to expire
You won't be able to enter this data manually later; it is necessary to enter it at the time of purchase to associate it with this specific product.
To remove that product from the purchase, click on the trash can icon
Click on the Save button to record the purchase, and the software will automatically:
Add those products to your stock (for example, +4 balls or +2 kennels)
Change the "last purchase price" of that product, and it will now be the new one you just entered
Note: In the Magic Desk or product profile (View > Products), you can see a history with all the prices at which you have purchased that product and the details. This way, you can see which suppliers offer you better prices or the price variations that a product has undergone.
Show a notice on the main screen when that batch is about to expire
If the invoice is paid, record the expense in the cash register on the date you selected as the payment date (for example, today -30€ for the purchase of these products)
PURCHASE PRICE HISTORY
In the product file (View > Products), you can see a history of all the prices
at which you have purchased that product. This allows you to identify the supplier offering
better prices or track price variations for a product.
PURCHASES AND STOCK ADJUSTMENT
In the View > Purchases option, you can review all the purchases you have
recorded and add information when payment is made for purchases pending payment.
You can adjust the stock of a product in its file > Right-hand side menu > Stock Adjustment,
or you can also do it in the New > Stock Adjustment option.
Muestra un listado con todos los pedidos que has hecho, la fecha prevista de entrega y su estado.
At the top of the screen, there is a search bar. If you enter invoices information and press enter or click on the magnifying glass, all matches will be displayed
You can sort the list of invoices as you need:

More information on ordering and search engines:
Clic hereLater, when you receive the order, from the dashboard or the View > Orders option, you can convert that order into a purchase, and the products will be included in your inventory or stock.
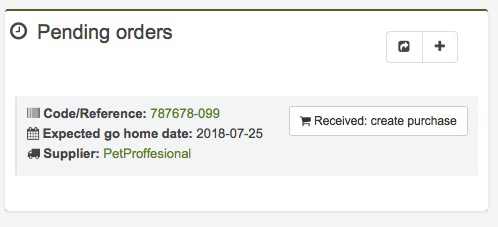
By clicking the Received: Create
Purchase button,
the order is added as a purchase.
For more information, check
the New > Purchase option.
With this option, you can also record orders for the products you need and send this order sheet directly to your suppliers via email.
This way, you can see that for "product x," you have no units in stock, but you have already placed an order with the supplier, and it is expected to be received on day "D".
Search for the supplier or add them directly, and the following information will appear:
Their contact information
If you have pending invoices to pay them
If you have pending orders to receive from them

Notes:
In the supplier information area: If you click on the supplier's name, you can directly access their profile or Magic Desk
In the supplier information area: If you click on the small notes and important information buttons, you can see that specific supplier's information
In the invoices and orders pending area: If you click on the pending invoice, you will see the details
In the pending orders area: If you click on the arrow icon, you will see the order details

Shows the date and invoice number
Indicates whether it includes taxes (based on your system's configured tax)
Selects the payment method and status (paid or pending)
If it is paid, you can include the payment date, and if not, leave it blank*
You can include notes or comments for your information
* You can change this later. If the invoice is currently pending, it won't have an invoice date. On the day you pay the invoice, go to View > Purchases > select that invoice and:
Change the status to "paid"
Specify the payment date
The purchase will be automatically recorded in the "cash register," and you will see that if you paid today, the money for that purchase has been withdrawn today (even if the purchase was made a month ago, for example)
Search in the product search and all the matches will appear
Click to add it
You can change the number of units
You can delete it by clicking on the trash can icon
The last price at which that product was purchased appears
When you have finished adding all the products, click the save button to record the order
Select the products, and they will be added to the purchase.

Its code or reference, name, and the last price at which it was purchased appear
Note: By clicking on the name, its profile or Magic Desk is displayed for you to see all the information about that product
Now select:
The number of units of that product you are purchasing
At what price you are buying them (for example, $10 each)
If it is a perishable product, we recommend that you also include the batch and expiration date information. This way, the software will automatically alert you when a batch of products is about to expire
You won't be able to enter this data manually later; it is necessary to enter it at the time of purchase to associate it with this specific product.
To remove that product from the purchase, click on the trash can icon
Click on the Save button to record the purchase, and the software will automatically:
Add those products to your stock (for example, +4 balls or +2 kennels)
Change the "last purchase price" of that product, and it will now be the new one you just entered
Note: In the Magic Desk or product profile (View > Products), you can see a history with all the prices at which you have purchased that product and the details. This way, you can see which suppliers offer you better prices or the price variations that a product has undergone.
Show a notice on the main screen when that batch is about to expire
If the invoice is paid, record the expense in the cash register on the date you selected as the payment date (for example, today -30€ for the purchase of these products)
If you click on an order, all the information appears, and you can:
Edit it
Print it
Delete it
Send it to the supplier by email
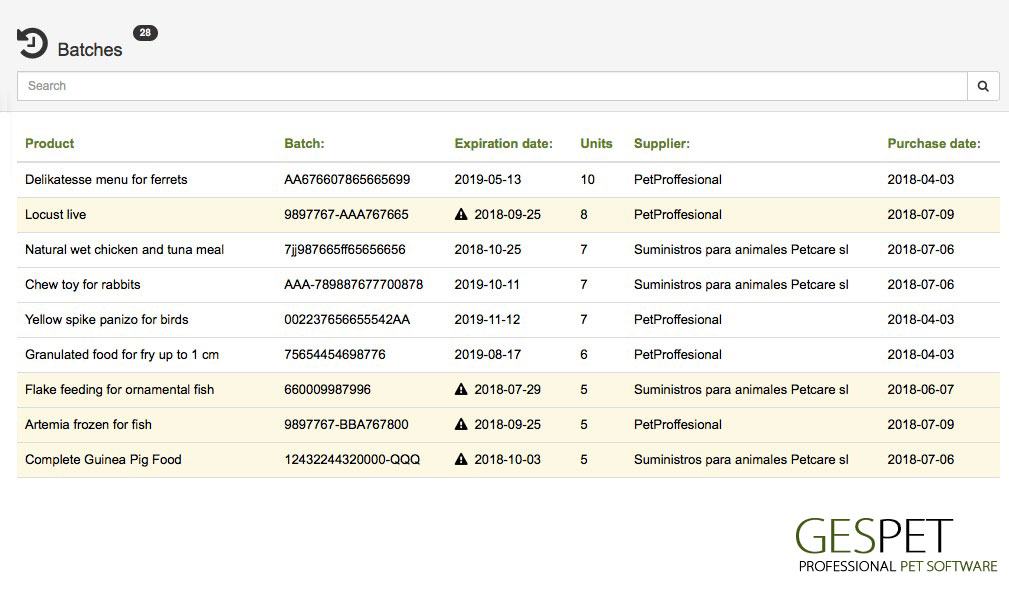
Display a list with all the product batches recorded, including details such as purchase date, supplier, batch number, etc.
As you already know, you can sort the results by clicking on the title. For example, you can arrange them by expiration date to identify those closest to expiration.
Products nearing expiration will be highlighted.
By clicking on a product, you can modify the batch, expiration date, and the number of available units.
List of all products. You can sort by name, brand, price, active/inactive, category, etc.
When clicking on a product, its profile or Magic Desk appears with all the information.
At the top, there are 2 buttons:

The first includes quick actions or "shortcuts": add for that product, print its profile, ...
The second allows you to show/hide the right sidebar to expand the workspace
Smart statistics display interesting data about the product:

Number of available units or current stock
Number of units sold for that product
Last time it was sold
Selling price. If a promotional price or offer price is configured, the regular price will be crossed out, and the special offer price will be displayed.
You can view and edit the product information directly from this screen:
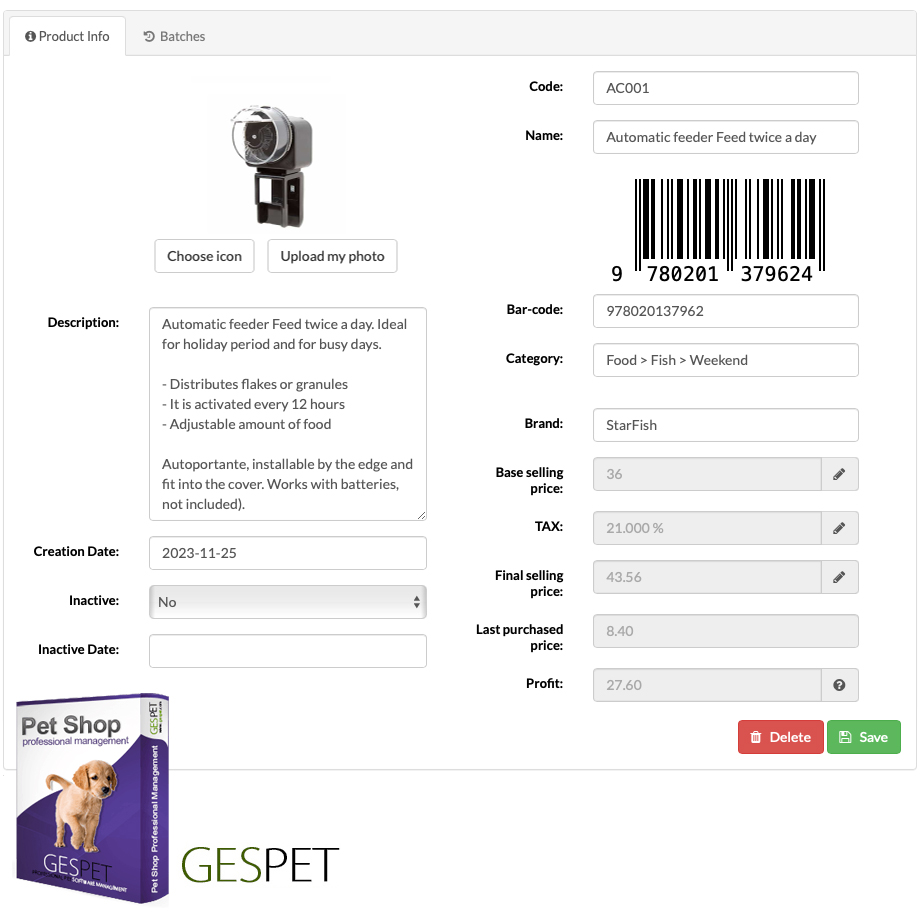
You can upload an image or choose a representative icon.
If you want to add descriptive information about the product, it can be useful to provide better advice to your customers.
Tips or advice: If you drag from the bottom right corner (marked with two small lines), the writing area expands or reduces)
It is the date when the product is added to the system. It fills in automatically, but you can modify it.
You can assign an internal code to identify the product in the format you want.
Write the name of the product.
When typing the number or scanning it, the number and the graphical representation of the barcode are displayed.
Brands are added in the New > Brand. option. Then
from the selector, you just have to start typing, and
all the matches will appear for you to select the
one that corresponds.
Categories and Subcategories are added in the New
> Category/Subcategory option. If you add categories before
products, it will be easier.
Now in this option, if you want to modify the category: in the field Category start typing, and all the matches of the categories you added will appear, so you can select the one you want.
When you click, a popup or a pop-up window appears where you can modify the selling price of the product.
A product has 2 prices: the base price (tax-free) and the final price or selling price (with taxes), although they can be the same if no taxes apply or it is 0%.
If you configure the applicable tax percentage: when entering the base price, it will automatically calculate the final price or vice versa, so you don't have to calculate it.
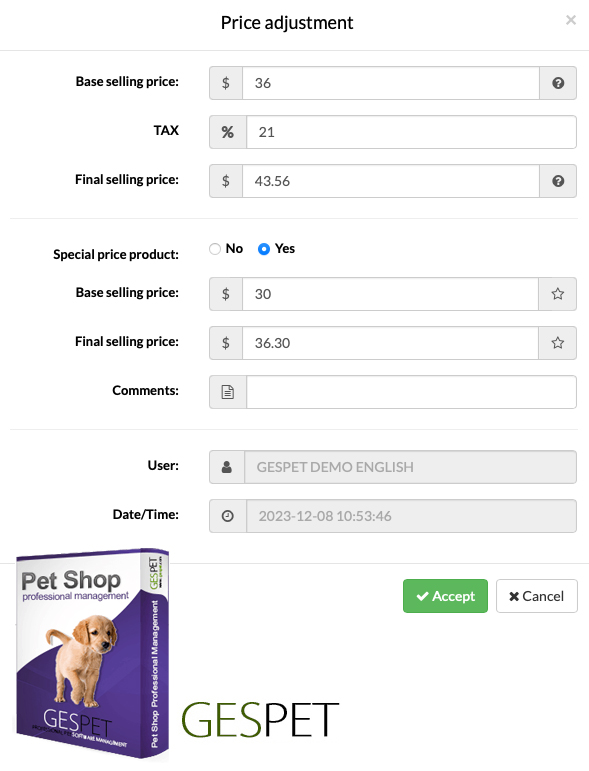
You can temporarily modify the selling price of a product by putting that product "on sale." At the top, you will see the regular price crossed out and the price because it is on sale.
When making a new sale, there is a default category where all products on sale are listed.
When adding a product on sale to the sales ticket, its price will appear usual, and the discount applied for being on sale will be displayed. If you need to, you can modify it.
When adding a new purchase of products, the purchase price will be automatically recorded, and it will be added to the purchase price history of that product.
You can check it in the product profile > right menu >
Purchase Price History and you will also see, in addition to the
price, the supplier;
This way, you can know which supplier offers you a better price.
In the chart, you can see the different prices and if it is a product with a large price variation.
The profile shows the last price at which you bought it.
In the Profit field, the difference between the selling price and the purchase price is shown (for example, if you bought it for $20 and sell it for $40, the profit is $20)
To add a new purchase, go to the New >
Purchase.
If you stop selling a product, you can deactivate it or mark it as "Discontinued". You will keep all historical data on that product, but it will no longer appear when making new purchases, sales, etc.
To mark a product as Discontinued, it is only necessary
in its profile > select Discontinued = Yes. Additionally, you
can
indicate the
discontinuation date, if you want.
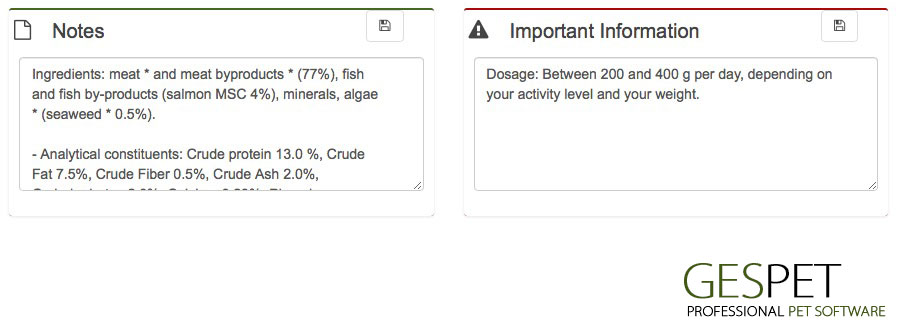
You can add notes or comments and important information that you will see when checking more information about that product.
If you have entered a lot number and expiration date when adding a new purchase of this product, this information will appear at the bottom.
It is not possible to manually enter it now on its profile; it must be entered at the time of recording the purchase so that it is associated with that product.

In the sidebar, there are more options that allow you to:
Adjust the price
Adjust the stock
Check a history with charts that includes all the prices at which that product has been SOLD
Check a history with charts that includes all the prices at which that product has been PURCHASED, and in this way, you can see which supplier offers you the best prices or if the price has increased since the last time you bought it.
List with all the categories and subcategories, including the number of products corresponding to each category.
From this screen, you can also add new categories and subcategories.
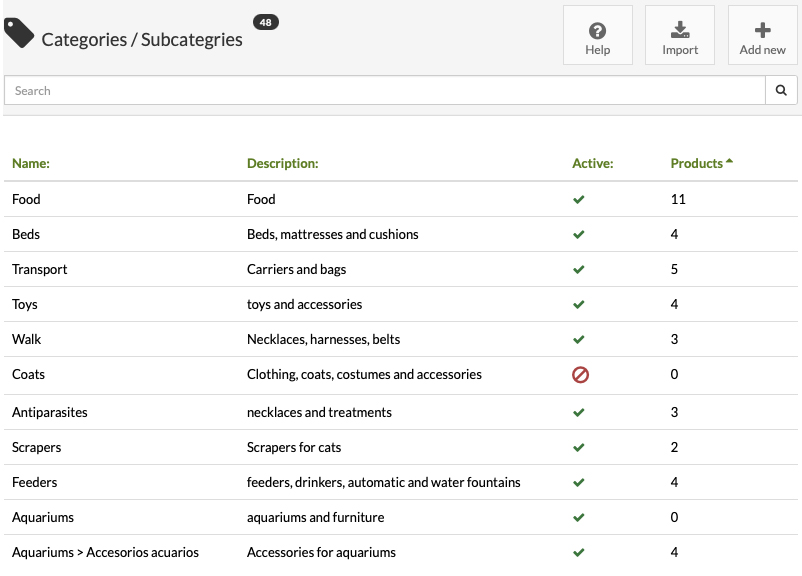
When making a sale (option New > Sale), categories that are
deactivated or inactive, and those that are empty (products = 0) will not appear.
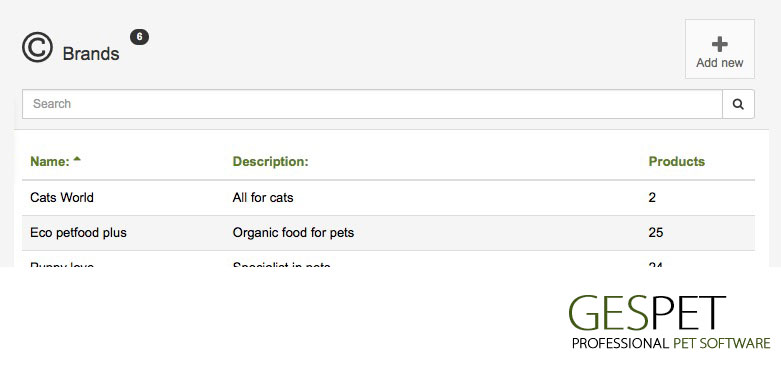
List with all the brands you have added. From this same screen, you can add new brands.
List of all customers. If you have multiple business areas, customer data is accessible from all of them, but customers are categorized by business area. You can consult them all or by business area (for example, only the Grooming customers).
A small indicator displays the total number of customers.

At the top of the screen, there is a search bar. If you enter customer information and press enter or click on the magnifying glass, all matches will be displayed
You can sort the list of customers as you need:

More information on ordering and search engines:
Clic hereYou can deactivate or mark a customer as "Inactive." When deactivated,
their data is not deleted, just hidden.
The Administrator can view the information of deactivated customers,
but those customers are not accessible to Users.
To add customers, you have two options:
Add them individually (one by one) using the Add option.
Or add multiple contacts at the same time using the Import option.
To add them, use the buttons at the top:
Click the Add Customer button, fill in the information, and click
Save.
(Refer to the New > Customer section for more
information)
Or click the Import button and follow the instructions.
How to import customers in bulk in the software
Clic here How to import customers in bulk in the softwareIf you click on a customer, all the information about them will appear. The Magic Desk is displayed, which is a summary screen or card with all the customer's information.
At the top, there are 2 buttons:
Show/hide the right sidebar menu to expand the workspace
Quick actions or "shortcuts" and Additional actions (varies depending on the software you are using)
Send Summary Sheet by Email
Print Summary Sheet
Add a new animal for this customer
HOTEL |
New Reservation and New check-in in the hotel |
GROOMING |
New Appointment and New grooming service |
DAYCARE |
New Reservation and New check-in in daycare |
BREEDING |
New Puppy Sale |
TRAINING |
New Appointment, New Training/Education Session, and Sell Course |
STORE |
New Sale |
VETERINARIAN |
New Appointment, New Veterinary Consultation |
Interactive graphs, which display a summary of the most important information (revenue, profitability, etc.). This information varies depending on the software you are using.

These intelligent statistics help you have a clear view of the activity, profitability, and loyalty of that customer "at a glance."
PET HOTEL APP
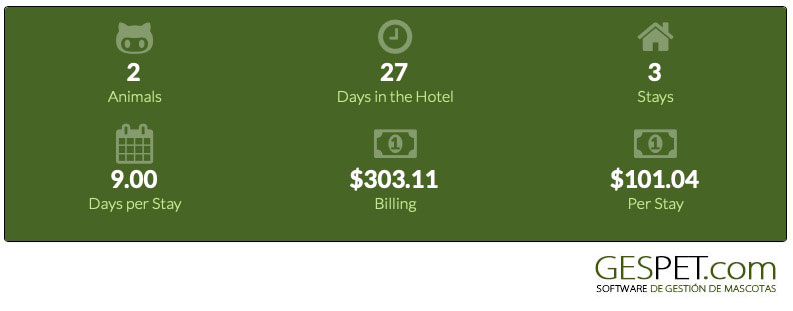
Number of days the animal has stayed in your hotel
Number of stays or accommodations in your hotel
Average days per stay
Total billing of those stays
Average billing per stay
PET GROOMING APP

Number of grooming services for that animal
Total invoicing of that animal in grooming services
Average price of the grooming services
PET TRAINING APP

Number of training/education services for that animal
Total invoicing of that animal in training/education services
Average price of the training/education services
PET NURSERY APP
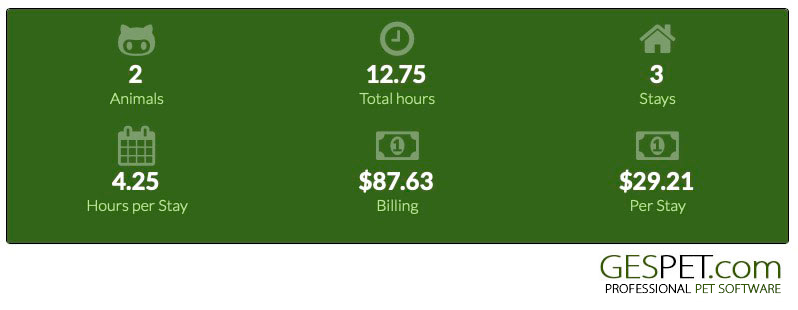
Number of hours the animal has stayed in your hotel
Number of stays or accommodations in your hotel
Average hours per stay
Total billing of those stays
Average billing per stay
PET SHOP APP
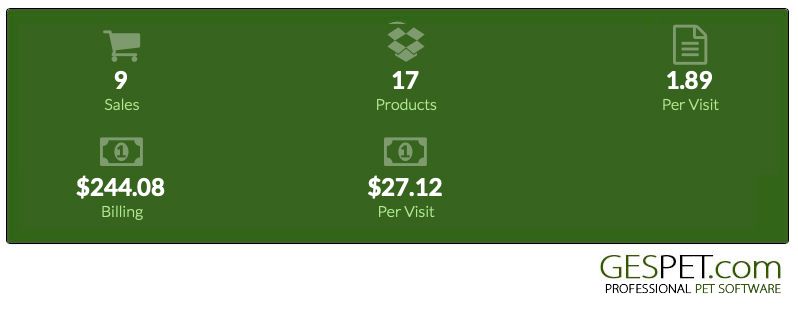
Number of sales
Total products sold
Average products sold per store visit (per purchase made)
Total revenue (total money spent)
Average revenue per visit (average money spent per purchase made)
VETERINARY APP

Number of veterinary consultations performed on their animals
Total revenue in veterinary services (total money spent)
Average price of the consultations performed
If the customer has any unpaid invoice, an alert box with the information will be displayed. Clicking on the icon will open the invoice for you to review.

This message about unpaid invoices will also appear before making a new reservation/ appointment/service....
In this option, you can both view and directly modify the information. Remember that if you make any changes, you need to click the Save button to save that new information.
Furthermore, by using the quick access buttons, you can call or open WhatsApp to chat with them; click on the corresponding icon (phone, WhatsApp, etc.).
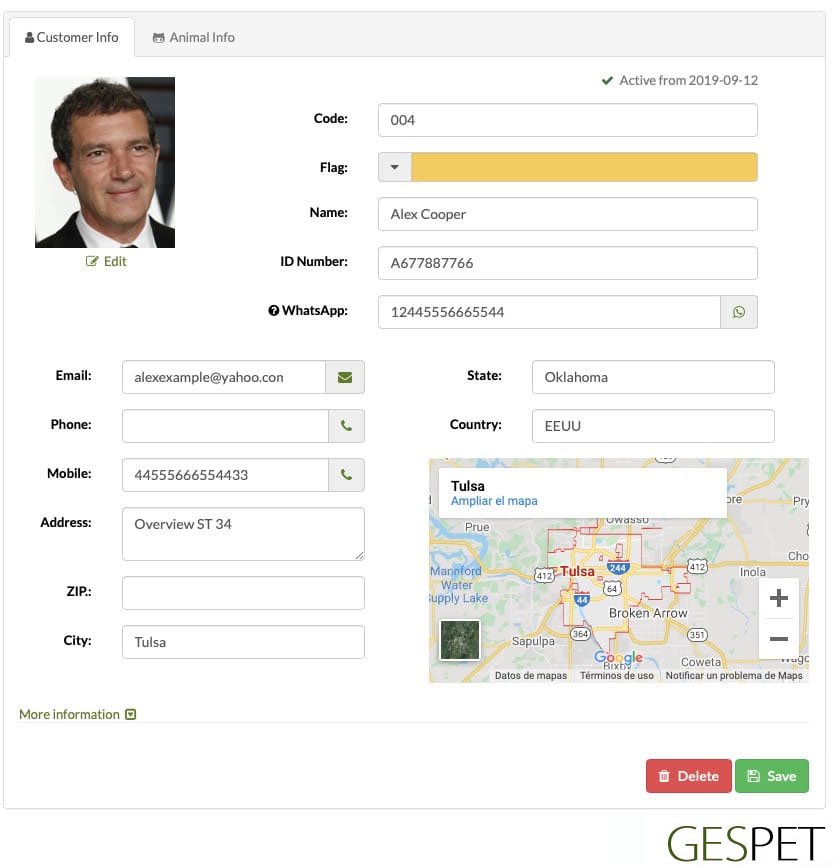
You can upload a photo or select an icon from the avatar database
This section involves critical actions. If your business has multiple users, we highly recommend restricting access to this area.
Delete a Customer:
This option is exclusively available to Administrators and is not accessible to Users.
By selecting the option to delete this customer, all associated information will be permanently removed, including but not limited to:
Personal and contact details. Data protection information.
Invoices. Check-ins, check-outs, consultations, training sessions, and grooming services.
Animals. Pedigrees. Breeding-related data: litters, puppies, weights, etc.
Bookings and appointments, including online reservations and appointments.
Documents and contracts. Veterinary prescriptions. Attachments. Images.
Communications.
And any other information related to this customer.
Before proceeding with the deletion, we strongly advise ensuring that there are no legal obligations to retain specific information for a set period due to tax or accounting regulations.
Additionally, please note that if necessary, you can download the required information BEFORE continuing, as this deletion process is PERMANENT and data cannot be recovered once deleted.
Clicking the Delete button will trigger immediate data removal.
If you’re unsure about legal retention requirements or have any other concerns, consult with a lawyer or a data protection expert to ensure compliance with all relevant regulations.
If your business involves multiple users, we recommend using the security and access control module to restrict this option for unauthorized personnel.
Deactivate:
You can deactivate or mark a customer as "Inactive." When deactivated,
their data is not deleted, just hidden.
The Administrator can view the information of deactivated customers,
but those customers are not accessible to Users.
Select customer > from the right-hand menu Privacy > Deactivation =
yes.
You can add a date and further details about the reason for deactivation.
If you mark a customer as inactive:
When you check the list of customers (View > Customers), you'll see that they have the symbol , while the rest have the icon .
In their file, you'll see "inactive since date x."
They will no longer appear when you search to make a new reservation/appointment, service/check-in, etc.
You can see the animals associated with the customer and access their animal profiles directly
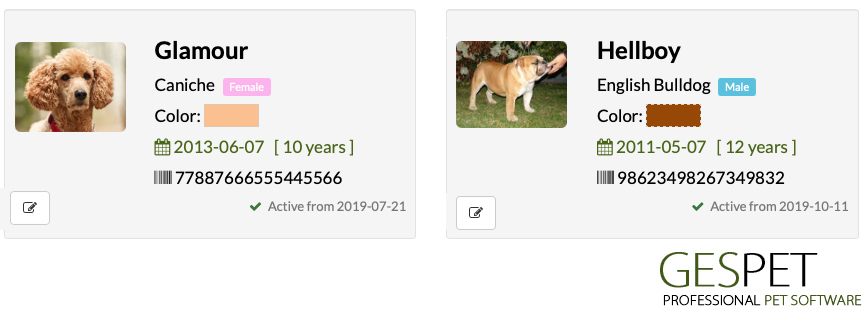
By clicking on the Animal Data tab, you will see the associated
animals, and by clicking on one of them, you can access their profile.
Highlighted Information
There are fields where you can add important or highlighted information about the customer and the animals:
Important Information
Pick-up and Delivery Information
Notes or Comments
This information will appear when you work with this customer/animal, for example, when you record a new reservation. This way, you can quickly access the relevant information.
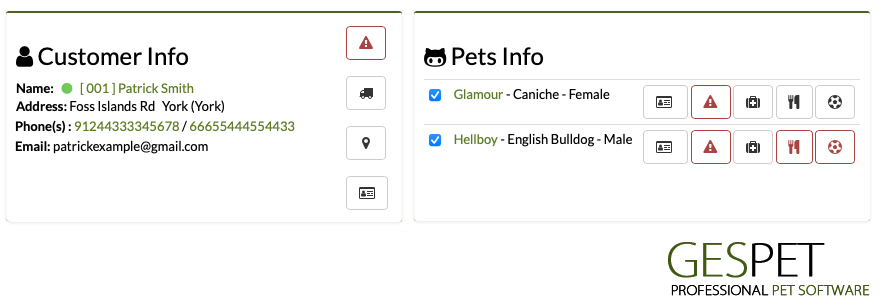
In the side menu, there are more options available depending on the software you are using:
Documents: You can store and access documents related to that customer, such as contracts, documentation, etc. Supported file types include:
.xls, .xlsx, .doc, .docx, .odt, .ods, .pdf, .rtf, .txt, GoogleDrive Document, and GoogleDrive spreadsheet
Maximum file size: 2 MB
Reminders: You can make and check important reminders for a customer, and the application will automatically remind you of them.
Privacy: Here, you can manage all information related to privacy/GDPR.

Training
Training Services: You can see the training/education services sold to that customer.
Sales: for training services made to that customer.
Grooming
Grooming Appointments: You can see all the appointments scheduled for that customer.
Grooming Services: A list of all grooming services performed on the animals of that customer.
Sales: for grooming services made to that customer.
Hotel
Bookings: You can see all the reservations scheduled for the animals of that customer.
Hotel Stays: A list of all the accommodations for the animals of that customer in your hotel.
Sales: for hotel services made to that customer.
Daycare
Bookings: You can see all the reservations scheduled for that customer.
Daycare Stays: A list of all the stays for the animals of that customer in your daycare.
Sales: for daycare services made to that customer.
PetShop
Sales: for store purchases made by that customer.
Breeding
Sales: for breeding services made to that customer.
Veterinarian
Appointments: You can see all the appointments scheduled for the animals of that customer.
Consultations: A list of all veterinary consultations made for the animals of that customer.
Sales or Invoices: for veterinary services made to that customer.
Customer Report
Customer Address Report
Profitable Customers Report
Customers
Customer Addresses
List of all suppliers. If you have multiple business areas, suppliers data is accessible from all of them, but suppliers are categorized by business area. You can consult them all or by business area (for example, only the Grooming suppliers).
A small indicator displays the total number of suppliers.

At the top of the screen, there is a search bar. If you enter supplier information and press enter or click on the magnifying glass, all matches will be displayed
You can sort the list of suppliers as you need:

More information on ordering and search engines:
Clic hereTo add suppliers, you have two options:
Add them individually (one by one) using the Add option.
Or add multiple contacts at the same time using the Import option.
To add them, use the buttons at the top:
Click the Add New button, fill in the information, and click Save.
(Refer to the New > Customer section for more
information)
Or click the Import button and follow the instructions.
How to import suppliers in bulk in the software
Clic here How to import suppliers in bulk in the softwareIf you click on a supplier, all the information about them will appear. The Magic Desk is displayed, which is a summary screen or card with all the supplier's information.
At the top, there are 2 buttons:
Show/hide the right sidebar menu to expand the workspace
Quick actions or "shortcuts" and Additional actions
Send Summary Sheet by Email
Print Summary Sheet
You can see statistics with the total number of purchases made to this supplier and the total amount of those purchases.
If the customer has any unpaid invoice, an alert box with the information will be displayed. Clicking on the icon will open the invoice for you to review.

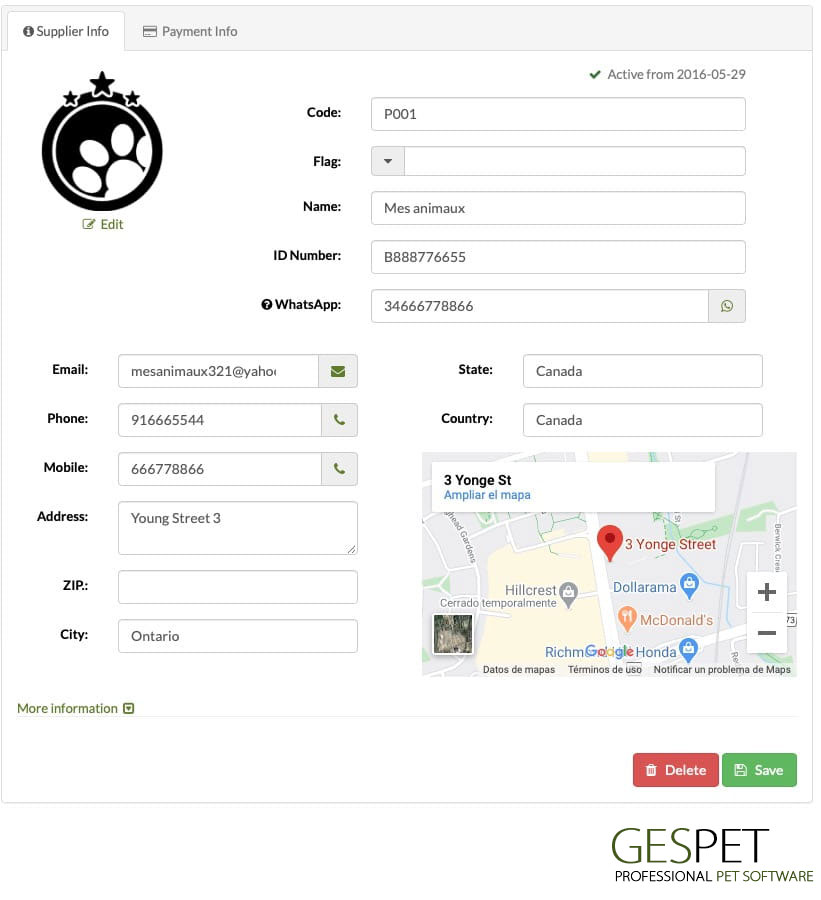
In this option, you can both view and directly modify the information. Remember that if you make any changes, you must click the Save button to save that new information.
Furthermore, using the quick access buttons, you can call or open WhatsApp to chat with them; click on the corresponding icon (phone, WhatsApp, etc.).
Delete: If the supplier has data referenced in other parts of the software, such as orders, purchases, etc., they cannot be deleted directly. Deleting them would cause errors in the rest of the software because those purchases, orders, etc., would no longer be associated with any supplier.
For this reason, if you want to delete them, you must first remove the data they have referenced before you can delete them.
If you've been testing the software and entering fictitious data, and now that you've finished the testing phase, you want to delete all the data to start working with the software using real data, we can do it. We can permanently delete all this data from the software. Contact us, and we will assist you.
Deactivate: Our recommendation is that, instead of deleting, you mark them as inactive or "Inactive." This way, you can continue to consult the records of that supplier and all their related information.
To mark a supplier as Inactive:
If you mark a supplier as inactive:
When you check the list of suppliers (View > Suppliers), you'll see that they have the symbol , while the rest have the icon .
In their profile, you'll see "Inactive since date x."
They will no longer appear when you search to make a new order, purchase, etc.
In the side menu, there are more options available depending on the app you are using:
Documents: You can store and access documents related to that supplier, such as contracts, documentation, etc. Supported file types include:
.xls, .xlsx, .doc, .docx, .odt, .ods, .pdf, .rtf, .txt, GoogleDrive Document, and GoogleDrive spreadsheet
Maximum file size: 2 MB
Reminders: You can make and check important reminders for a supplier, and the application will automatically remind you of them.
Privacy: Here, you can manage all information related to privacy/GDPR.
Suppliers
Suppliers
TAGS:
petshop orders managera | petshop suppliers manager | petshop online orders software | petshop products manager petshop products organize | petshop batches manager | petshop products caducity manager | petshop products caducity software
