
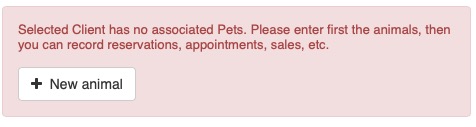
If the customer is new:
Click on the button
Fill in the basic and contact information
The software automatically checks if that email address or ID already exists and shows a warning to avoid duplicate contacts
If you want to include more information (address, state, etc.), click on More information
To write the information about Privacy/GDPR, click on Privacy
Add basic information about their animals
(Later, in the animal file, you can add more information)
Click on Save and continue to continue.
If the customer already exists:
Write the name and select from the drop-down
If he already has animals, they will appear on the right. If not, you can add his animals:
In both cases, if the customer has several animals configured, you can select which ones you want to booking/check-in/...
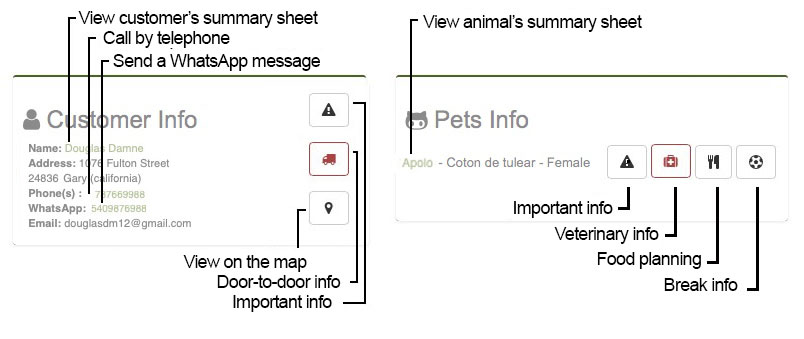
If there's information, the button is highlighted in red
Print customer or pet file |
|
Important information |
|
Pick-up and delivery information |
|
| View the address on GoogleMaps | |
Hotel and Daycare/Nursery |
|
Meal planning |
|
Break planning |
|
Training and Grooming |
|
Important veterinary information |
|
Veterinarian |
|
Information about Allergies and Intolerances |
|
Notice of Outstanding or pending Invoices
The system checks if the customer has any pending invoices and displays a notice. This way, before making a booking, you can find out if the customer has pending payments.

It also shows the customer's latest canceled appointments with the date and reason. You can view more information or see the history of all cancellations by clicking on one of them.

Select the approximate start and end dates and times of the service.
If you wish, you can choose the employee who will perform the service.
You can add more employees in the Settings >
Employees option.
Transportation Options ** : You can indicate if there is pick-up and/or home delivery service.

If you check the option, the pick-up/delivery will be automatically added to the schedule or "transport sheet" for that day. If you modify the date and click the Save button, the pick-up/delivery day will be automatically updated in the schedule.
You can also check the schedule directly from here. By clicking on
the Transport Schedule option, the schedule will open
in a new browser tab.
You can add notes or comments if desired.
You can assign a color tag to the appointment if you want to identify it more quickly.
You can assign a color label to the booking if you want to identify it more quickly.
Color Labels: 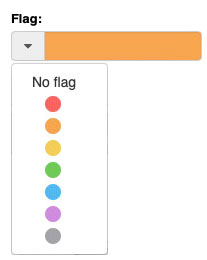
You can assign a color to quickly identify a
booking/check-in/service/etc. or a customer/animal/etc. For example:
|
**
This option corresponds to the Transport software. In case you do not have this software, the Transport option will appear inactive.
See more information about the Transport software:
Keep readingYou don't need to fill in more information to schedule an appointment.
But if you want, you can already fill in information regarding the services (Behavior correction, socialization, special training,...)
The price or rate is automatically filled in.
You can configure your prices or rates in the Settings
> Services
Include money discounts on different services. To do this, just type the amount and select whether it's a % or an amount of money. For example, 10% or $14 discount.
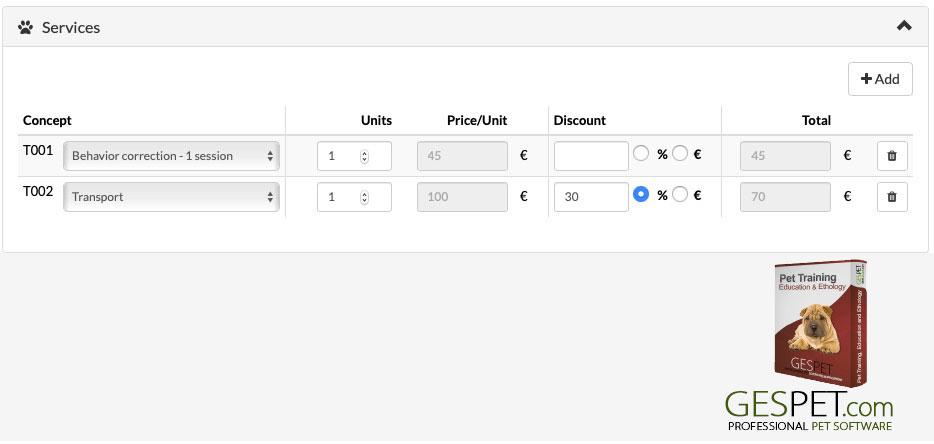
The discount is applied, and at the end of each line, you will see the price base (without taxes) with the applied discount.
How to configure your services efficiently:
Keep readingIf the client pays money, you can record it in the Advances section, and you'll see that at the bottom, the total amount, the amount paid, and the pending amount will be displayed.
All configured documents will appear here for you to print and/or deliver to
the customer.
For example, reservation or accommodation conditions,
legal terms, rates/prices, requirements, contracts, etc.

To add new Booking documents, go to the Tools > Documents
option and select the type Booking
Read more about documents and contracts with auto-completed data:
Keep readingYou can add automatic reminders so that, on the selected day, the customer receives an email reminder of their booking. These reminders are sent automatically; you don't have to send them manually.
You can add as many reminders as you want by clicking the ADD button.
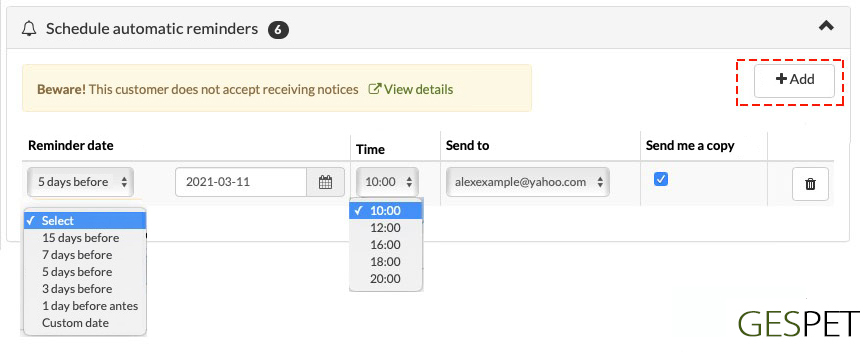
You can choose the day you want the notice to arrive by writing a custom
date or using the date calculator.
For example, if you select 15 days
before, the software calculates 15 days before the appointment date and
writes it in the date field.
If you select, for example, to send the automatic reminder 7 days before, but there are 5 days left for the booking, logically, it can only be scheduled to be sent 4 days before the booking.
You can also select the time you want it to be sent from the Time dropdown. If the customer has multiple email addresses, you can choose which one to send it to.
If you select the "Send me a copy" option, you will receive a copy in your email.
When you Save, these reminders will be scheduled to be sent on the selected
date/time. They will appear here and in the View > Automatic
Reminders.
Reminders cannot be modified, but you can cancel the reminder and create a new one.
If you modify the service date, the reminders will not be automatically deleted. You can keep the reminders you had scheduled or cancel them and create new reminders, as you see fit.
|
For example:
If you want, you can delete that reminder and schedule a new one. |
Read more about the automatic sending of reminders for upcoming booking:
How to configure your Hotel services efficiently?:
Keep readingAt the bottom, you will see the price, which updates as you add
additional services, discounts, advances, etc.
It is detailed as
follows:
The Base Price (excluding taxes)
The money corresponding to the tax you have configured, for example, VAT
The final price: base + taxes
The money paid (advances)
The money pending payment
If you click the button
the reservation or appointment is recorded in the software, and new buttons
appear for:
Send the quote confirmation by email to the client
Print the appointment summary document
Delete the appointment
Start working on that service
Cancel or exit this screen without saving changes
By clicking the button to the client, a pop-up window opens for you to preview the email that will be sent to the client, including the date/time and animals. Additionally, you can include a text if you wish.
If the client does not have an email address, a warning message
appears.
In the customers profile,
add their email address, and then you can send them emails.
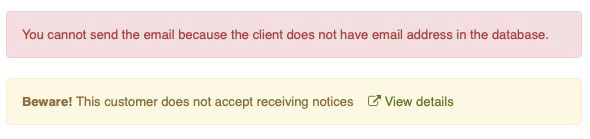
Similarly, it displays a warning if the customerdoes not accept receiving notifications from you. By clicking "View details," you can view/edit this information in the customers profile, which will open in a new tab.
If you have made changes, remember to SAVE before taking any other action (print, send the email, etc.) because otherwise, the information will not be updated in that .pdf, email, etc.
If the customer is new:
Click on the button
Fill in the basic and contact information
The software automatically checks if that email address or ID already exists and shows a warning to avoid duplicate contacts
If you want to include more information (address, state, etc.), click on More information
To write the information about Privacy/GDPR, click on Privacy
Add basic information about their animals
(Later, in the animal file, you can add more information)
Click on Save and continue to continue.
If the customer already exists:
Write the name and select from the drop-down
If he already has animals, they will appear on the right. If not, you can add his animals:
In both cases, if the customer has several animals configured, you can select which ones you want to booking/check-in/...
If there's information, the button is highlighted in red
Print customer or pet file |
|
Important information |
|
Pick-up and delivery information |
|
| View the address on GoogleMaps | |
Hotel and Daycare/Nursery |
|
Meal planning |
|
Break planning |
|
Training and Grooming |
|
Important veterinary information |
|
Veterinarian |
|
Information about Allergies and Intolerances |
|
Notice of Outstanding or pending Invoices
The system checks if the customer has any pending invoices and displays a notice. This way, before making a booking, you can find out if the customer has pending payments.
It also shows the customer's latest canceled appointments with the date and
reason. You can view more information or see the history of all
cancellations by clicking on one of them.
Select the approximate start and end dates and times for the service.
If you want, you can select the employee who will perform the service.
You can add more employees in the
Settings >
                                Employees
option.
Transportation Options ** : You can indicate if there is pick-up and/or home delivery service.
If you check the option, the pick-up/delivery will be automatically added to the schedule or "transport sheet" for that day. If you modify the date and click the Save button, the pick-up/delivery day will be automatically updated in the schedule.
You can also check the schedule directly from here. By clicking on
the Transport Schedule option, the schedule will open
in a new browser tab.
You can add notes or comments if desired.
You can assign a color tag to the appointment if you want to identify it more quickly.
You can assign a color label to the booking if you want to identify it more quickly.
Color Labels:
You can assign a color to quickly identify a
booking/check-in/service/etc. or a customer/animal/etc. For example:
|
**This option corresponds to the Transport software. In case you do not have this software, the Transport option will appear inactive.
See more information about the Transport software:
Keep readingSelect the rates or services (bath, haircut, beauty treatment, spa,
transportation...). They must be previously configured in the Settings
> Services option.
The price or rate is automatically filled.
Include money discounts on different services. To do this, just enter the amount and select whether it's a percentage or a specific amount. For example, 10% or $14 discount.
The discount is applied, and at the end of each line, you will see the base price (excluding taxes) with the discount already applied.
How to configure your services efficiently:
Click hereIf the client pays money, note it in the Advances section, and you will see at the bottom the total money, what has already been paid, and what is pending.
All documents that you have configured will appear for you to print and/or
deliver to the client.
For example, reservation or certain treatment
conditions, legal conditions, rates/prices, prerequisites for grooming
services, contracts, etc.
To add new documents, go to the Tools > Documents option and
select the
Service type.
Read more information about documents and contracts with data auto-completion:
Keep readingAt the bottom, you will see the price, which updates as you add
extras, discounts, advances, etc.
It appears detailed:
The Base Price (excluding taxes)
The amount corresponding to the tax you have configured, for example, VAT
The final price: base + taxes
The money paid (advances)
The money pending payment
If you click the
button, the reservation or appointment is recorded in the software, and new
buttons appear for:
Print the service summary document
Delete the service
Cancel or exit this screen without saving changes
- You can perform the service but leave it unpaid because the client comes later to pick up the animal, pays upon home delivery, pays later at the counter, etc.:
Click the Save button
The service is saved in "pending payment" status
- You can charge the service now:
Click the
You can select whether the invoice is tax-exempt and if you want to create a full or simplified invoice
Choose the payment method. If you click Other, other
payment
forms or methods that you have configured in the Settings > Payment
Methods option will appear.
If you enter the amount the customer pays, it will show the difference with the service amount, for example, you have to refund $10.
Documents and contracts configured as Sale will also
appear
in case you want to print and deliver them to the customer or send
them by email.
In the View > Sales option, you can see all sales or invoices issued and you can reprint the invoice or receipt and send them by email if necessary.
There may be some special situations, which we will explain with examples:
SITUATION 1. A training center that charges an amount of money when making a reservation
A training center decides to charge:
Always a fixed amount as a reservation fee, for example, $10.
Or for clients with previous unpaid amounts, they charge a part in advance, for example, 50% of the service cost.
Or the total service cost, 100% in advance.
... or any other case, it's your business, and you decide how to manage it.
How can this be managed?
When the customer makes the reservation and pays that amount, access their reservation
In the Advances option, note the payment, for example,
$10.
When you check that booking, you will see the paid and pending amount.
When you perform that service and complete it, you can choose if you want to:
Charge/Invoice later
Charge/Invoice now
You will see the amount the customer has already paid, for example, $10, and the remaining amount to pay, for example, €25.
If the customer pays the full amount, the invoice will have a Paid status. Total amount $35
If the total amount is not paid yet, for example, $5 is still pending, it will be Pending Payment. Continue reading the next case.
If the customer pays the pending amount, the service will be fully paid, and the invoice will have a Paid status.
If not, the invoice will be Pending Payment. Continue reading the next case.
SITUATION 2. A customer does not pay the full invoice
It can happen that only part of the total service amount is charged. For example, the training/education service amount is $45, but the customer only pays $30, meaning $15 is pending.
This can be because they will pay that amount later or with another payment method, etc.
If you have already completed the service, charged, and invoiced (as in the previous case) and after a few days, for example, the customer pays the pending amount:
In the View > Sales option. Select the invoice. You will see it has a Pending Payment status.
In the Advances option, note the amount the
client pays and click Save.
The invoice status:
If it's the total pending amount, the invoice now has a Paid status.
If there is still some amount pending, the invoice remains Pending Payment.
If you choose to complete the service but do not want to charge and invoice yet because you will do it later or when the client pays the full amount:
You can complete only the service (without charging/invoicing).
In the Advances option, note the amount the
client pays and click Save.
When you want to charge/invoice, in View > Services, select that Service and click on the Charge and Invoice option to generate the invoice.
You can choose the option to Charge in Pet Shop, which allows you to charge for the service in the retail software:
Independently. Only this service.
Jointly with other services, for example, hotel or grooming.
Jointly with products.
Jointly with products and other services.
Internally, for your statistics, Gespet will record the portion corresponding to each business area.
This way, you can know how much you have earned/invoiced for each business area and
for each product and service, even if you sell them jointly.
Issued invoices cannot be deleted or modified, as tax law strictly prohibits doing so.
What can you do if you’ve made a mistake?
If you issued an invoice and, for instance, selected the wrong customer, you can’t just delete it and create a new one, nor can you edit it to change the customer. But don’t worry — there’s a proper way to fix it.
To correct it, you simply need to issue a corrective invoice (also known as a credit note). This special type of invoice is used to rectify any errors made in a regular invoice.
The credit note (or corrective invoice) cancels the original one. Credit notes can have their own numbering sequence, separate from regular invoices. You can configure the numbering format you prefer for both invoices and credit notes, and Gespet will automatically increase the numbering by one each time a new one is created, ensuring all are consecutive.
Neither invoices nor credit notes can be deleted. Once an invoice has been canceled through a credit note, that credit note cannot be deleted or undone.
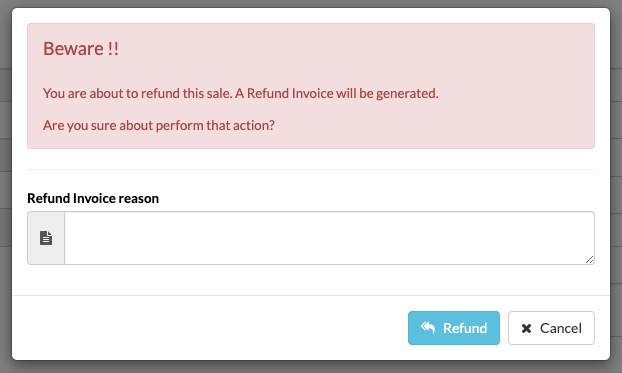
This process is irreversible. That’s why, when you click the Cancel button, the system doesn’t immediately proceed — instead, a red pop-up warning appears to confirm your action. You must confirm once again that you want to continue. In other words, there’s a double confirmation step to avoid issuing a credit note by mistake.
The correction (credit note or corrective invoice) is done in two steps:
Cancel the original invoice and generate the corrective invoice or credit note with negative amounts.
Create the new invoice, which now contains the correct information.
If the customer’s information is incorrect and you need to issue a corrective invoice to fix it, you can do it in two ways:
Option 1: If you need to correct the details before generating the corrective invoice:
First, go to the customer’s profile, update the information, and click Save.
Now you can issue the corrective invoice or credit note, which will include the new details you just updated in the customer’s profile. In the “reason for cancellation” field, if you wish, you can explain the reason — in this case, the correction of incorrect data.
When you generate the new invoice, it will include the updated information.
Option 2: If you don’t need to correct the details before generating the corrective invoice:
Generate the corrective invoice. It will contain the same customer information as the original. In the “reason for cancellation” field, if you wish, you can indicate the reason — in this case, the incorrect data.
Then go to the customer’s profile, update the necessary details, and click Save.
When you generate the new invoice, it will include the corrected details.
When a corrective invoice or credit note is issued, it automatically cancels the original invoice, payment, and the associated stay/service/sale. To register that stay/service/sale again, you’ll need to re-enter it and complete it. Once it’s finalized, you can issue the new payment/invoice.
Re-entering the stay/service/sale won’t create duplicates — the previous one was already canceled when the credit note was generated.
Let’s look at an example:
Let’s say you accidentally selected Michael Johnson as the customer, but the correct one was Michael Jackson, and you already issued the invoice. How can you fix it?
If you notice the mistake while invoicing, or later by going to View > Sales, select the invoice in question and click on it.
Click the Cancel button to issue a credit note.
You can write down the reason for the credit note — for example, “wrong customer information.”
In compliance with current legislation, this corrective invoice will include references to the original invoice being corrected (its number and date), and you can specify the reason for issuing it.
It will follow the numbering format you’ve configured.
You can print or email it if you wish.
Now you can register the stay/service/sale again, making sure you select the correct information. Once it’s completed, you can generate the payment/invoice with all the correct data.
An invoice will always show the date on which it was issued, as the issue date is legally fixed and cannot be altered.
This means it’s not legally allowed to issue an invoice with an earlier or later date, nor to change the date afterward. For example, if you create it today, it will show today’s date.
This option is perfect for selling a combination of multiple sessions (for example, a package of 5 classes) or a course composed of several sessions.
If, on the other hand, you are going to sell a single "class," education session, or
training, you have the option NEW > SERVICE.
Before selling a course, you must configure it in the Settings > Services
option. If you select Course: yes, upon saving, the option to Configure course will appear.
If the customer is new:
Click on the button
Fill in the basic and contact information
The software automatically checks if that email address or ID already exists and shows a warning to avoid duplicate contacts
If you want to include more information (address, state, etc.), click on More information
To write the information about Privacy/GDPR, click on Privacy
Add basic information about their animals
(Later, in the animal file, you can add more information)
Click on Save and continue to continue.
If the customer already exists:
Write the name and select from the drop-down
If he already has animals, they will appear on the right. If not, you can add his animals:
In both cases, if the customer has several animals configured, you can select which ones you want to booking/check-in/...
If there's information, the button is highlighted in red
Print customer or pet file |
|
Important information |
|
Pick-up and delivery information |
|
| View the address on GoogleMaps | |
Hotel and Daycare/Nursery |
|
Meal planning |
|
Break planning |
|
Training and Grooming |
|
Important veterinary information |
|
Veterinarian |
|
Information about Allergies and Intolerances |
|
Notice of Outstanding or pending Invoices
The system checks if the customer has any pending invoices and displays a notice. This way, before making a booking, you can find out if the customer has pending payments.
It also shows the customer's latest canceled appointments with the date and
reason. You can view more information or see the history of all
cancellations by clicking on one of them.
Select the animals that will participate in this course.
And select the course you want to sell.
The price or fee is filled in automatically.
Include money discounts on different services. To do this, simply enter the amount and select whether it's a % or a specific amount of money. For example, 10% or $14 discount.
The discount is applied, and at the end of each line, you will see the base price (excluding taxes) with the applied discount.
If the client pays money, note it in the Advances section, and you will see at the bottom the total money, what has already been paid, and what is pending.
All documents that you have configured will appear for you to print and/or
deliver to the client.
For example, reservation or certain treatment
conditions, legal conditions, rates/prices, prerequisites for grooming
services, contracts, etc.
To add new documents, go to the Tools > Documents option and
select the
Service type.
Read more information about documents and contracts with data auto-completion:
Keep readingAt the bottom, you will see the price, which updates as you add
extras, discounts, advances, etc.
It appears detailed:
The Base Price (excluding taxes)
The amount corresponding to the tax you have configured, for example, VAT
The final price: base + taxes
The money paid (advances)
The money pending payment
If you click the
button, the reservation or appointment is recorded in the software, and new
buttons appear for:
Print the service summary document
Delete the service
Cancel or exit this screen without saving changes
- You can perform the service but leave it unpaid because the client comes later to pick up the animal, pays upon home delivery, pays later at the counter, etc.:
Click the Save button
The service is saved in "pending payment" status
- You can charge the service now:
Click the
You can select whether the invoice is tax-exempt and
choose the payment method. If you click Other, other
payment
forms or methods that you have configured in the Settings > Payment
Methods option will appear.
If you enter the amount the customer pays, it will show the difference with the service amount, for example, you have to refund $10.
Documents and contracts configured as Sale will also
appear
in case you want to print and deliver them to the customer or send
them by email.
In the View > Sales option, you can see all sales or invoices
issued and
you can reprint the invoice or receipt and send them by email if
necessary.
When selling the course, as it has a series of configured classes or sessions, you can quickly schedule or plan those sessions and create automatic reminders for the client, so they don't forget their appointment.
Refer to the option View > Courses in this same help guide for more
information.
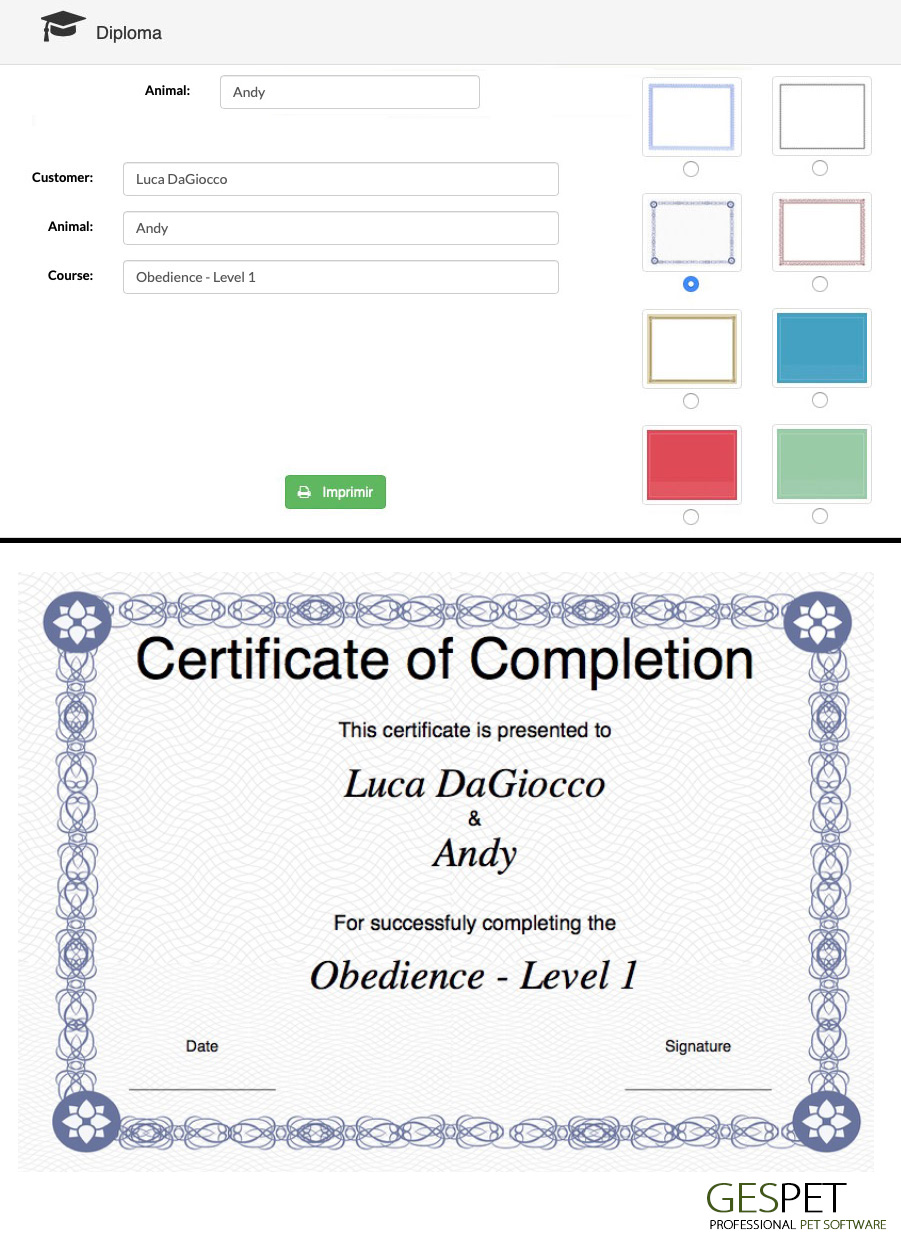
To motivate and reward the effort of your customers and animals, the software allows you to generate and print certificates. You can configure the client and animal, as well as the name of the course and choose the design of the diploma.
The software generates an elegant certificates that you can save, send or print comfortably and in full color.
note: the format is DINA4 (the size of a folio, supported by most printers)
tip: For a more professional finish, print the diploma on glossy, effect or thicker paper (such as cardstock). Your clients will be amazed!
More information about training courses:
Keep readingTo keep detailed track of each session, class, or therapy conducted with an animal, you can add sessions or "classes" and track the animal's progress in these sessions.
In each session/progress entry, you can specify the date, all details about the background, progress, notes, and comments.
Additionally, you can include a numerical rating to quickly indicate the advancement or setback within the therapy/training.
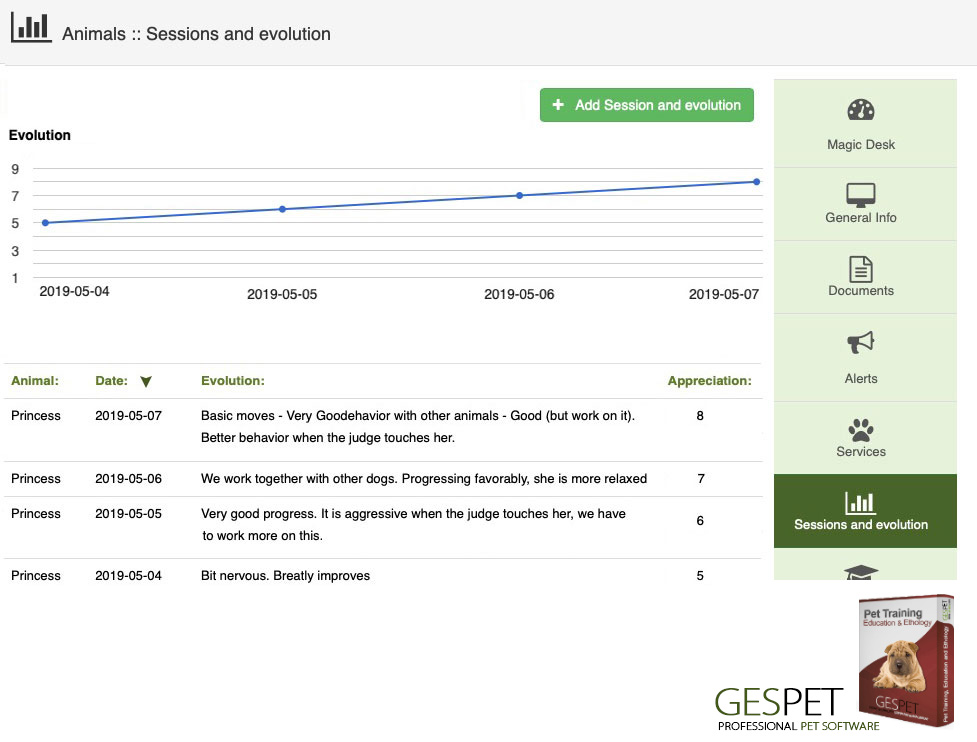
For example, if you consider 1 as the minimum and 10 as the maximum, if Roko has progressed significantly today, you might give a rating of 10, while if there is moderate progress, you could give a rating of 5, for instance, similar to grading an exam.
You can add new sessions/progress in:
the option New > Session and Progress by selecting the animal.
the animal's profile > right menu: Sessions and Progress
You can view the sessions/progress in:
the option View > Sessions and Progress to see all of them.
the animal's profile > right menu: Sessions and Progress
if it is a session/progress related to a course:
From the option View > Courses > Selecting the course
From the option View > Animals > Selecting the animal > Right menu: Courses
More information about training courses:
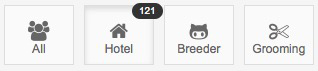
Keep readingList of all veterinary contacts. If you have multiple business areas, suppliers data is accessible from all of them, but contacts are categorized by business area. You can consult them all or by business area (for example, only the vet contacts for hotel).
A small indicator displays the total number of suppliers.
At the top of the screen, there is a search bar. If you enter customer information and press enter or click on the magnifying glass, all matches will be displayed
You can sort the list of customers as you need:
More information on ordering and search engines:
Click hereTo add customers, you have two options:
Add them individually (one by one) using the Add option.
Or add multiple contacts at the same time using the Import option.
To add them, use the buttons at the top:
Click the Add Customer button, fill in the information, and click Save.
(Refer to the New > Customer section for more information)
Or click the Import button and follow the instructions.
How to import customers in bulk in the software
Click here How to import customers in bulk in the softwareList of all suppliers. If you have multiple business areas, suppliers data is accessible from all of them, but suppliers are categorized by business area. You can consult them all or by business area (for example, only the Grooming suppliers).
A small indicator displays the total number of suppliers.
At the top of the screen, there is a search bar. If you enter supplier information and press enter or click on the magnifying glass, all matches will be displayed
You can sort the list of suppliers as you need:
More information on ordering and search engines:
Click hereTo add suppliers, you have two options:
Add them individually (one by one) using the Add option.
Or add multiple contacts at the same time using the Import option.
To add them, use the buttons at the top:
Click the Add New button, fill in the information, and click Save.
(Refer to the New > Customer section for more information)
Or click the Import button and follow the instructions.
How to import suppliers in bulk in the software
Click here How to import suppliers in bulk in the softwareList of all animals. If you have multiple business areas, customer data is accessible from all of them, but animals are categorized by business area. You can consult them all or by business area (for example, only the Grooming animals).
A small indicator displays the total number of animals.
At the top of the screen, there is a search bar. If you enter supplier information and press enter or click on the magnifying glass, all matches will be displayed
You can sort the list of suppliers as you need:
More information on ordering and search engines:
Click hereTo add animals, you have two options:
Add them individually (one by one) using the Add option.
Or add multiple animals at the same time using the Import option.
To add them, use the buttons at the top:
Click the Add New button, fill in the information, and click Save.
(Refer to the New > Customer section for more
information)
Or click the Import button and follow the instructions.
How to import animals in bulk in the software
Click hereTerminology used in the software
Breed and variety: Some breeds have varieties. For example Breed: Poodle | Variety: Miniature
Fur: Smooth coat, double coat, wire coat, long coat, curly coat, ...
Size: mini, small, medium, ...
Spayed: If the animal is Spayed or Sterilized
Microchip: It's a small device that provides your pet with permanent identification.
Veterinary book or pet passport: It's a document that officially records information about an animal and its vaccinations.
Breeder: select yourself (if you are the breeder) or select another breeder from the list. (You can add breeders in the New > breeder option)
Tattoo: in some countries,the tattoo is a valid ID for every dog with a pedigree
Book of origins: In some countries, the book of origins is used to track genealogy and preserve the breed purity by stimulating its conservation and genetic improvements. You can include the number, date and country of inscription in the book.
List of all veterinary contacts. If you have multiple business areas, suppliers data is accessible from all of them, but contacts are categorized by business area. You can consult them all or by business area (for example, only the vet contacts for hotel).
A small indicator displays the total number of suppliers.
At the top of the screen, there is a search bar. If you enter contact information and press enter or click on the magnifying glass, all matches will be displayed
You can sort the list of contacts as you need:
More information on ordering and search engines:
Click hereTo add contacts, you have two options:
Add them individually (one by one) using the Add option.
Or add multiple contacts at the same time using the Import option.
To add them, use the buttons at the top:
Click the Add New button, fill in the information, and click Save.
(Refer to the New > Customer section for more
information)
Or click the Import button and follow the instructions.
How to import contacts in bulk in the software
Click hereList of all expenses or purchases you have recorded. If you have multiple business areas, expenses or purchases are accessible from all of them, but you can view them collectively or independently (for example, only the Hotel expenses).
A small indicator with the total number of expenses is displayed.
At the top of the screen, there is a search bar. If you enter expense information and press enter or click on the magnifying glass, all matches will be displayed
You can sort the list of expenses as you need:
More information on ordering and search engines:
Clic hereTo add a new expense, click on the 'Add New' button icon, fill in the
details, and click 'Save'.
(Refer to the 'New > Expenses' section
if you want to see more information)
How to record expenses in the software:
Clic aquiTAGS:
dog training appointment | pet training appointment | mobile training booking | animal travel software | how to organize animals data | animal supplier software | animal software | pettraining software | pettrainer expenses program | dogtrainer expenses program | manage animal expenses