
You can configure the most important aspects of your country/region:
Select the country from the list
Select the time zone from the list
Check that you have correctly configured the time on your device (computer, mobile phone, tablet) because the software will use that time for appointments, agenda, etc.
Select the language in which the software will be displayed
Set the currency of your country: you can use symbols (for example €, $, ...) or the currency abbreviation (for example EUR, USD,. ..)
Set the applicable tax and percentage in your country to all your services
note: In countries where multiple taxes apply, you can set up a general tax name or a combined tax name and add both taxes together. For example, for Quebec, you can configure the tax with the name TPS-TVQ, TAX or similar and that the percentage is the sum of both taxes (The TPS and the TVQ)
It's very important that you first configure the general tax and then configure your services or rates, since they will all have the same tax that you have configured in this option.
If in this option you have the general tax configured as 0 %
Later, you configure a new grooming service, hotel, ... that service will also have the tax at 0 %
If in the future, you modify the general tax and change it for example by 7%, this will not be changed in the services or rates that you already had configured
The new services you add have a 7% tax
If you have mistakenly configured your services or rates, contact us so that we can help you modify it.
If until now the tax rate was, for example, 10% and now it has changed to 12%, keep reading and we will show you how you can do it.
Important:
Previous records will not be modified (the appointments/bookings you already had planned, the check-in, check-out, services, sales, ...). That is, sales or invoices that you had previously generated, for example, will not be modified.
It will not affect previous reports or sales, billing, etc., statistics either.
That is, you can be assured that previous data will not be modified, it will only affect new data that you enter from now on.
How to update the tax rate in my business:
Let's configure the new tax rate:
Go to the
Configuration option > Language and Currency > Enter the new tax
rate and click on the Save button.
Let's deactivate the old rates:
Go to the Configuration option > Services
Click on the services or rates you had configured
Click on inactive = yes and the Save button
Let's configure the new rates:
In the same Configuration option > Services
Click on the Add new button to configure your rates. Fill in
the data and click Save.
You will see that they already include the new tax
rate
In this option, you can configure your business details and contact information that will appear on documents, invoices, and messages you send.
In the Data section, you can configure the details of your business, and in the
Invoice data section, the information that will appear exclusively on invoices.
Logo. You can upload 2 different logos: a main one that will appear in the online booking request system, in the emails you send, etc., and a different logo for printed documents. (for example, you may use a black-and-white logo to save ink).
Supported image formats for the logo are: jpeg, jpg, gif, and png
The maximum allowed image size is: 1024 x 1024 pixels (width x height)
The maximum file size is 1 MB
If the software does not allow you to upload an image, you can use any image converter to meet these requirements and then upload it successfully.
Footer for printed documents. You can include text that will appear on invoices, on appointment/booking summary documents, check-in/service, check-out, etc. This is useful for adding legal information, additional details, etc.
To maintain the correct document layout, it is not possible to include more than
1,000 characters in the footer.
If you need to add a large amount of information, for example in the invoice footer
you hand to the client, and want to include extensive return policies or
legal/privacy information, you can:
Create a specific document with that information:
Go to Tools > Documents and contracts
Create the documents you need, for example “Return Policy” or “Privacy Policy”
Select the type Sale
When making a sale, these documents will appear so you can send or print them and deliver them to the client along with the invoice
Optionally, in the Invoice footer field you can reference
these documents. For example: “See all details in the attached document
‘Return Policy’.”
Text on tax-exempt invoices. If in your country/business activity there are situations where invoices are exempt from taxes, you can add an additional text that will only appear on tax-exempt invoices.
Logo. You can upload 2 different logos: a main one that will appear in the online booking request system, in the emails you send, etc., and a different logo for printed documents. (for example, you may use another one just for documents).
Supported image formats for the logo are: jpeg, jpg, gif, and png
The maximum allowed image size is: 1024 x 1024 pixels (width x height)
The maximum file size is 1 MB
If the software does not allow you to upload an image, you can use any image converter to meet these requirements and then upload it successfully.
Email footer: from the software you can send emails to confirm/cancel
an appointment/booking, an online booking, send a ticket/invoice, etc. In this section,
you can set up a text that will appear in those emails. For example,
you can include your business details or other useful information.
Limit: The maximum is 65,535 characters.
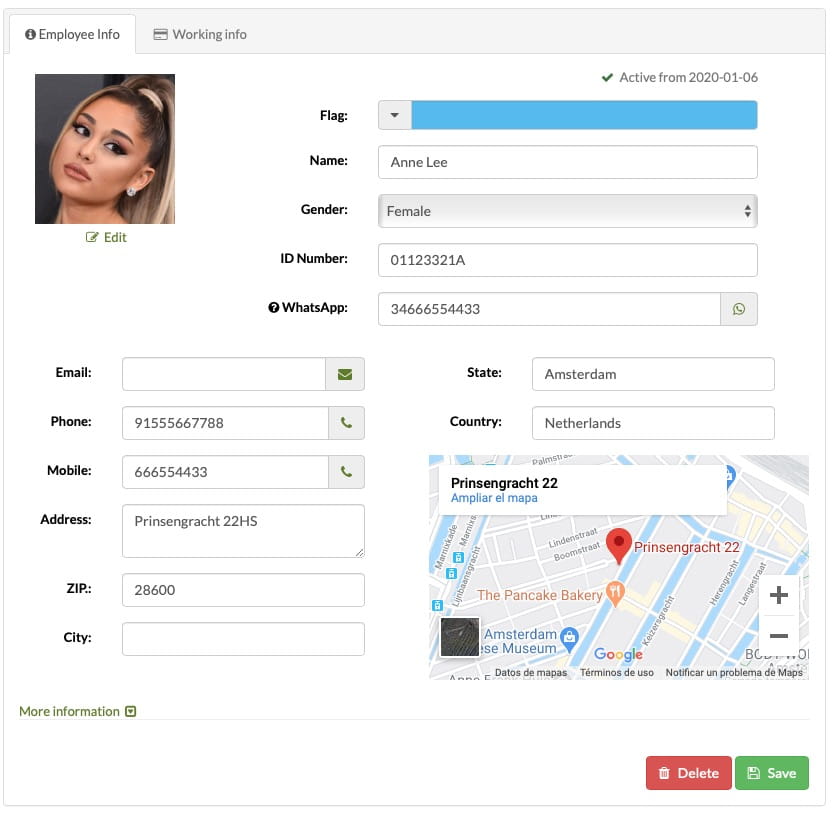
You can manage your employees, with all necessary contact info and working info.

You can deactivate employees who are no longer active. This way, they won't appear in the employee selectors when assigning a service, session, etc., but since they're not deleted, you'll retain the historical data with their information.
When you click on an employee in the list, all the information appears:
At the top there are 2 buttons:
Quick actions or "shortcuts": add a new animal for that client, make an appointment, print the information, ...
show / hide the right side menu to expand the workspace
Using the quick access buttons, it is possible: send an email, call or open whatsapp to talk to him/her; click on the corresponding icon (envelope, phone, Whatsapp ...)
You can write down more phones and more emails for a customer. By clicking on the "more information" icon, new fields appear to record these data.
When you write the address and click on the Save button, the GoogleMaps map that shows the address will appear. You can zoom using the map buttons.
In the Working information section, you can write down the information related to the employees's academic training, payment/salary conditions, information to make the payment, ...
If in your grooming or training business, you pay a percentage of the services doing to an employee, for example 30%, you can write down that percentage here and in this way, you will not have to remember it.
To see the services that an employee of your pet training pet grooming business has doing, you only have to access the Services and billing by employee report and by selecting that date range you will see the number of services and the amount of those services. In this way, it will be very easy for you to calculate the amount that corresponds to you for these services.
Additionally, you will be able to know the average time it took to perform them and when was the last service doing by that employee.
If you also have the Users Software, you can create more users, each user accesses an independent account and you can control:
You can specify the days and hours in which a user can access
You can indicate the visible options for a user
See when the users log-in and log-out session
You can control the access of your employees to improve the security of your business.
If you want to add, edit or delete races you can do it from this option. Then it is very comfortable, because when you add a new animal, just look for the race in the advanced selector, you do not have to write it every time.

For dogs "without breed" (mixed-breed, half-blood, mutt...), we have created the "comun" race but if you prefer to create another, you can do it from this option.
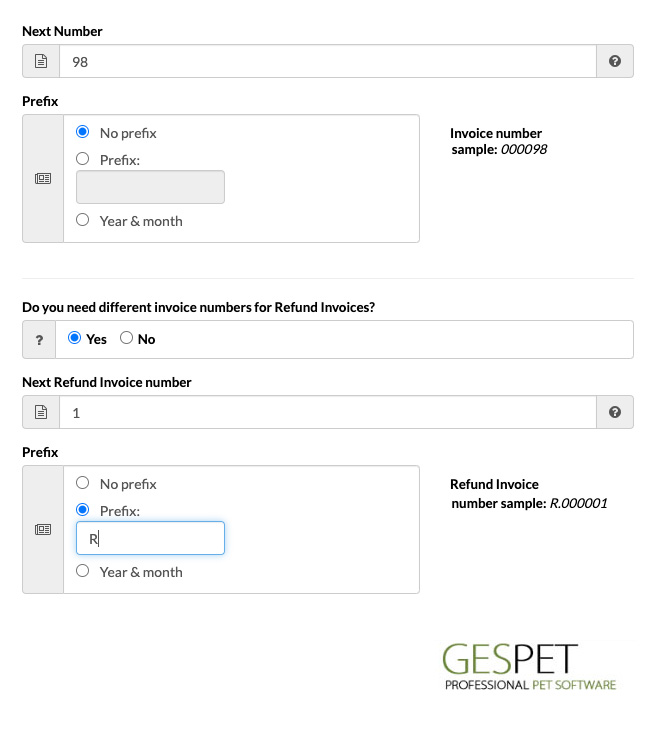
You can configure the next invoice number to be issued, and the software assigns that number to the following ones, this way the invoices are correctly numbered.
For example, if you start using the software now and this year you have already generated 25 invoices, if you want the next one to be number 26 (to be correlated), then write 26.
This numbering does not reset at the end of the month or the year. It will always continue with the numbering of the last invoice.
You can configure if you want to add a prefix before the numbers for Invoices and Refund Invoices, so you can choose if you want the invoice number:
Do not have prefix. For example, the invoice number will be 000042
Have the prefix that you want: For example the prefix INV . In this case, the invoice number will be INV.000042
* The maximum prefix size is 10 characters
Have the prefix Year.Month: In April (month 4) of 2021, the prefix will be 2021.04.000042
As you can see, on the right side of the screen, there is a previewer, which allows you to see how the next invoice number and nex refund invoice numer will look, depending on the configuration you choose.
You can configure different numbering sequences for the different types of invoices:
Invoice
This number will be used to issue full Invoices.
Credit Note
This number will be used to issue a Credit Note (Corrective Invoice).
If you don’t configure one, the number you have set for Invoice will be used.
Simplified Invoice
This number will be used to issue Simplified Invoices.
If you don’t configure one, the number you have set for Invoice (full) will be used.
Credit Note for a Simplified Invoice
A Credit Note for a Simplified Invoice (or Simplified Credit Note) is automatically generated whenever you select to create a Corrective Invoice (or Simplified Credit Note) from a Simplified Invoice.
This number will be used to issue Credit Note for a Simplified Invoices (or Simplified Credit Notes).
If you don’t configure one, the following will apply:
The number you have set in Credit Note, if configured.
If not, the number you have set in Invoice will be used.
This section includes important information/actions. If your business has multiple users, we recommend that you restrict access.
From this option, you can perform a complete export of the data in .xls (Excel) format. If you decide to stop using the software and want to export the information stored in your account, you can do it yourself using this option.
To proceed, simply click the Export button. An .xls file will be saved in the download folder configured in your web browser.
If your business has multiple users, we recommend using the security and access control module to restrict this option to unauthorized personnel. Otherwise, they could extract all the information from the system.
For performance and security reasons, a full data export can only be performed once a day. After 24 hours from the last download, if necessary, you can request a new complete export.
As you
know, it is not possible to delete records partially (for example, deleting all invoices).
However, most users use their accounts with fictional data for a while to test and
familiarize themselves with the system.
After the testing period, when they start
working with real data, they need to delete the fictional data to proceed with the
configuration of the real data, client and animal registration, invoice generation, etc.
This option is specifically designed for that. It allows you to wipe your account
completely (all data and configurations will be deleted, and your account will be restored
to the default settings).
The deletion is final, meaning that the data will be
completely erased and cannot be recovered.
To prevent accidental deletion, the system
will inform you of the total and permanent deletion process, and will require several
confirmations.
After these confirmations, the total data wipe will be executed, and
you will receive an informational email at the primary email address (this is the access
address of the administrator user).
If you have doubts, do not proceed. Contact
us first, and we will be happy to help you with any questions you may have.
Remember
that the process is irreversible, if the data is deleted, it cannot be recovered later.
This option will be available exclusively to the Administrator user, so if your
business has multiple users configured, only you, as the Administrator, will see this
option. The rest of the users, who access using their own login credentials (username and
password), will not be able to execute it.
We remind you again that if your business has multiple users, you should use the security and access control module to create individual user accounts, so that each person has their own login credentials.
Keep in mind that if everyone uses the Administrator's login credentials, they will all have administrator permissions, and therefore, anyone could execute this action and completely delete the data. The data will not be recoverable afterward.
If you have multiple users and need to limit their access, the security and access control module is available. Each user will have their own login credentials, and you will be able to control:
The days and times users can access the software.
The options they can use or view.
A log of all access attempts (time, IP address, operating system used).

You will control your employees' access for greater business security. See more information:
More informationIf you want to add it to your account, it's very simple:
You can request it from us, and we will add it to your current subscription.
Or if you prefer to do it yourself, you just need to:
Log in to your account (using your username and password).
On the first screen that appears, click to purchase the security and access control module for users.
Fill in the payment details, and it will be activated immediately on your account.
You can modify the passwords to access the software. You just have to type the current password and the new one.
Additionally, for security reasons:
You will have to type the new password twice. In this way, we avoid typing errors.
The software will show if that password has a low, medium or high security level. To make it easier, you can see it by red, orange or green colors.
New password: Type the new password you want to use
Old password: If you have used the "Remember password" option, write the password you received by email
Must be at least 10 characters
Must contain at least one UPPERCASE and one LOWERCASE character
Must include at least one number
Must include at least one symbol
For your security and the security of your data, it is very important that you have good habits with the passwords of the different accounts/services that you use:
Change passwords frequently
Never use the same password on multiple sites or services
Do not share passwords with others or write them down, especially near the device
Change default passwords for devices and online services.
We have collected different security tips and created a mini help guide with useful security tips. We recommend that you read it.
Security recommendations Security recommendationsFrom time to time, the password will expire. That is, you will have to
change it to a new password.
If the software displays the message that
the password has expired, you just have to change it to a new password and
you will be able to continue working normally.
We know that this can be
annoying, but our goal is to keep you and your data safe
Information about the storage capacity of external files (when you include a scanned document or a photo of a customer, animal, ...) in the software.

You can also view the number of emails sent and the number of emails still available to send.
This amount is limited monthly to contribute to the responsible sending of emails and avoid mass mailing or SPAM, so on the 1st of each month, this "counter" will be back to 0.
You will receive a notice when you are reaching the credit limit available to send more emails. You can buy extra credit that will allow you to send more emails. To do so, access the software by clicking on the icon to buy bad email credit.
Email consumption: Every time you send an email from the software (confirmation or cancellation of online reservations, booking confirmation, invoice/ticket, automatic recall, etc.), 1 unit will be added to the emails consumed.
If you also want to send an email to your email address (checking the option "send a copy"), an email will also be sent to this address and another unit will be added to the emails consumed.
As you know, all commercial communications must have been previously requested
or
expressly consented by the recipient (the user), unless there is a prior
commercial
relationship or has been obtained from public sources freely accessible.
Everything else, as well as the massive and systematic sending of emails, is
considered
SPAM and as such, is subject to sanctions.
Before sending emails to your
users
and/or customers, make sure you have their acceptance and still try to send
"responsible" emails.
It is not the same to send an email with a reminder
of an
appointment that the user and/or customer has requested, with an invoice or
with
information relevant to a service, to send monthly newsletters or advertising
mails.
Although a user has given his consent to send advertising emails, remember
not to send
too many emails or not relevant information to them. Try to make a responsible
or
reasonable mailing.
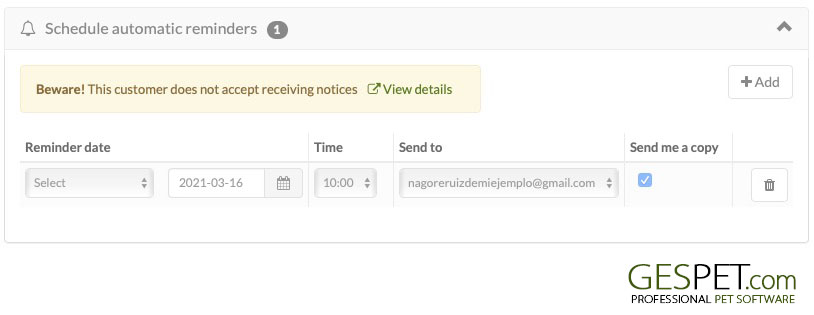
When you send an email from the software, the software will check in the GDPR section of your record, if the customer has accepted the reception of communications or notices and if not expressly accepted, it will show you a warning.
More info about Data Protection and GPRD:
Clic hereYou can configure the payment methods accepted in your business. This way, when a sale is made, you can select the payment method. By default, you will find:
Card Payment
Cash (money)
Mixed Payment: to choose at least 2 payment methods, for example, the customer pays part using a card and the rest using cash (money).
Also you can configure as many as you want: check, discount coupon, Paypal, ...
View Overdue: It allows you to select if you want the software to show you the booking, appointments, services, check-in and check-out "Overdue".
If you’d like, Gespet will send reminders to your customers automatically, so you don’t have
to do it yourself.
Some tasks are repetitive and eat up a lot of your time. To help
you out, you can schedule them, and Gespet will take care of them for you.
For instance, if you want a reminder for upcoming appointments to be sent 3 days before and 1 day before your customers’ appointments, all you need to do is schedule it, and when the time comes, Gespet will send it.
With this option, you can easily configure the look and feel, as well as the content of those automatic reminders.
If you have the Communication and Marketing module, in addition to the automatic reminders
that you schedule and that get sent automatically when the time arrives, you can also send
them reminders whenever you want. You can set them up under Marketing > Settings >
Reminders
GES-PET TIPS AND TRICKS
Sending reminders to your customers is a must-do strategy to ensure they don’t forget their appointments, which in turn optimizes your schedule and boosts your business efficiency.
Imagine the peace of mind your customers will feel when they receive a friendly and professional message reminding them of their next appointment, all with a design that reflects your brand’s identity.
Using templates for these reminders not only ensures consistency in your communication but also strengthens your company’s image as organized and thoughtful.
Each reminder becomes an opportunity to connect, showing that you value their time and are committed to providing the best experience.
Moreover, by automating this process, you save time and reduce the risk of errors, allowing you to focus on what truly matters: building long-lasting relationships with your customers and delivering exceptional service.
Don’t let your customers forget their appointments; make them feel valued and well taken care of with personalized and effective reminders!
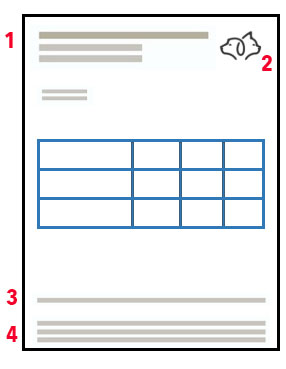
If you'd like any default text, additional information, etc., to appear, you can include it in the Template section (1). Once you hit Save, this change will be applied, and you’ll see it in the PREVIEW section.
There are different tabs to view the settings for the various reminders: Grooming, Training,...
Note: The character limit is 500. If you write more than 500 characters, when you click the button, the Template field will turn red to alert you.
Under the Settings > Business Data option, you can configure:
The logo (2)
The business name (3)
And the information that will appear at the bottom of the email. (4)
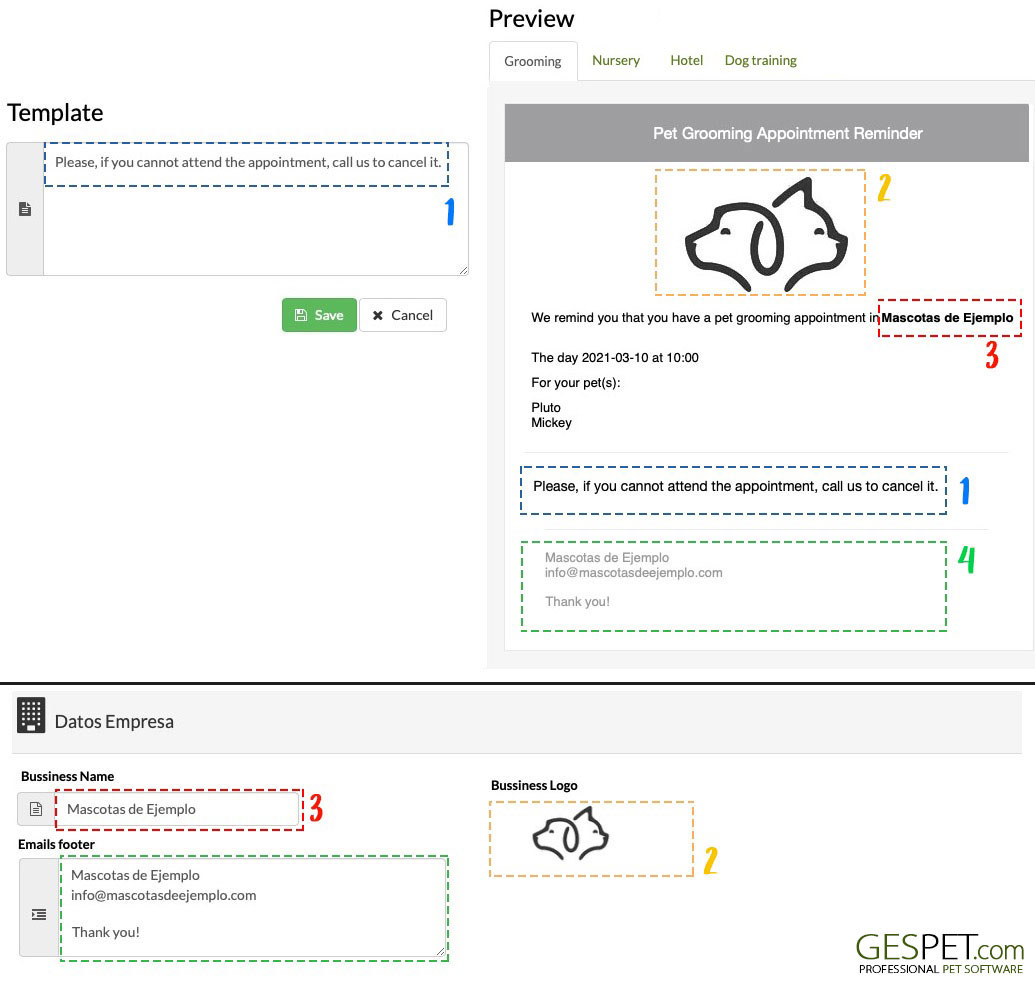
If you make a change and click the button , when you return to this screen, you’ll see the preview updated with the changes you just made.
Important: Any changes you make to the logo, business name, email footer, and template will apply to the next reminders you schedule, meaning it won’t affect those that are already scheduled.
Additional options are unlocked to improve and simplify communication. You can set up templates for your automatic reminders.
For example, imagine you want to include appointment/reservation details, an informational message about your cancellation policy, your business address with a link to Google Maps, your contact phone number, ...
You can set this up under the Settings > Automatic Reminders option and save
yourself a ton of time, as you won’t have to write this out each time you send a reminder
to a customer.
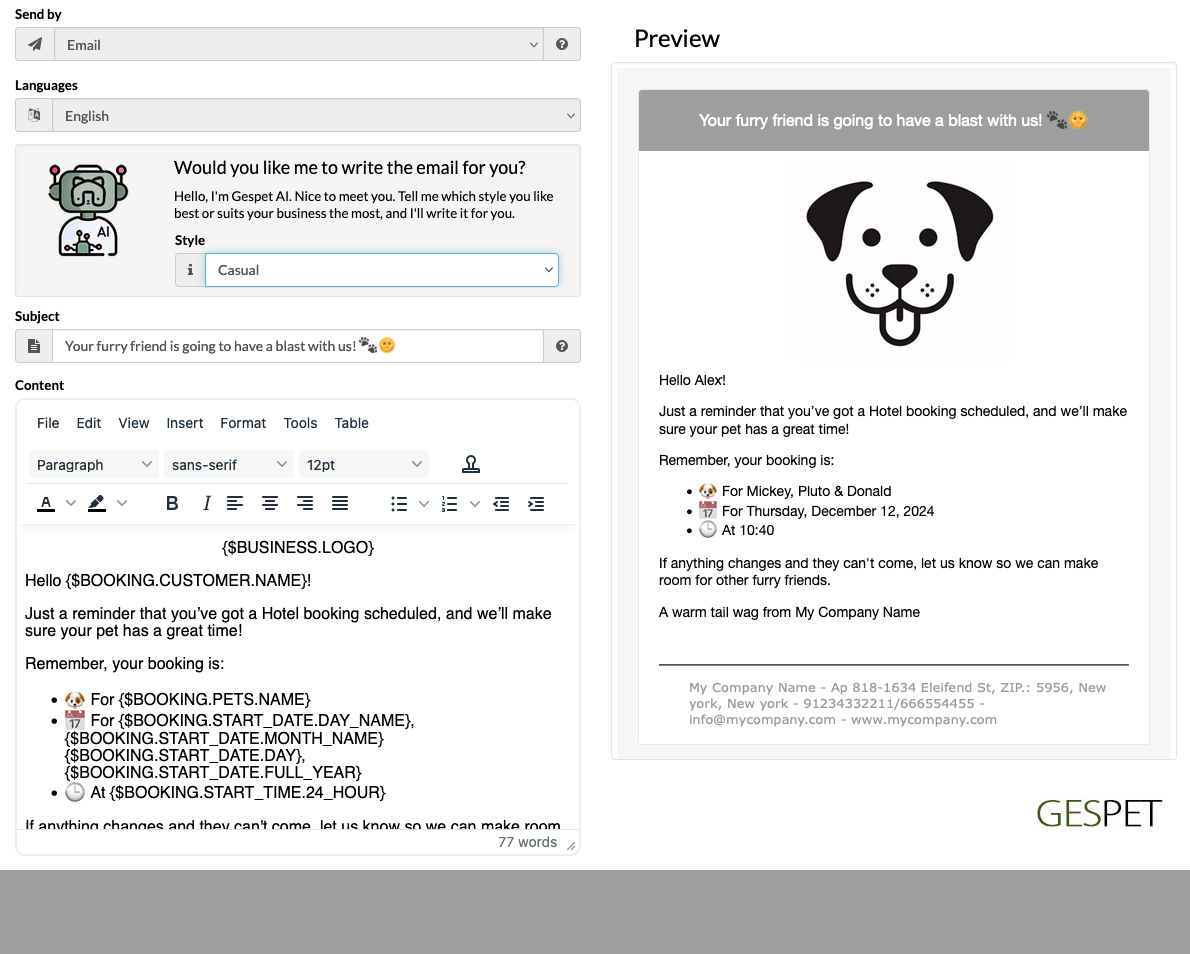
Some of your customers might speak different languages, and businesses often have customers from all corners of the world, so communication needs to be set up in multiple languages.
We've got it all covered, which is why our templates are multi-language. You can configure a different one for each language you wish.
No need to remember each customer’s preferred language—just select it in their profile. That way, you can send them the template in their language without a hitch.
In the option Settings > Automatic Reminders, select the
type you want to edit, and a list of templates will appear. There's a
search function and a language selector.
You can filter by language to see, for example, only the templates in Spanish.
There are different templates for each area of your business. Just choose the one you want to edit.
You can set up the text however you like, and for emails, you can also configure the subject.
We've included an editor that will help you make your messages look
more attractive. You can even add emojis or icons using the Insert
> Emojis option, and add links (for example, to your
website, social media, etc.) using the Insert > Link
option.
On the right, you'll see a preview, and it will update as you make changes, so you can keep track of how it's turning out.
If you'd like, you can replace the customer's name, their pets, the date/time, etc. Just set it up where you want it to appear, and when the message is sent, it will be replaced with the customer’s details automatically.
For example, if you want to include the pet names or appointment time in a message, you don’t have to type them manually each time.
It's a breeze! If you use the placeholder text RESERVATION
> PETS > NAME, when you send the message, the
software will replace it with the pet names for that
appointment.
Just position it where you want this text to appear.
Click on the TEMPLATE TEXT icon.

Select the template you want to include, such as Reservation
or Appointment > Pets > Name, and click
We’ve included Gespet AI, your very own AI assistant, to save you tons of time.
Setting up eye-catching emails is great for improving understanding, building trust, and fostering customer loyalty, but it can be tricky. That’s why we want to lend you a helping hand.

Select the style you prefer or one that suits your business, and GespetAI will write it for you.
You can use it as is, or tweak it to your liking. Remove a section or add more content—whatever you like.
When you're done, just click
On the right, you can preview what the email or WhatsApp message will look like. But if you want to send a test email/WhatsApp to do a specific check, just click on the button
If you want the software to warn you when you're about to schedule an automatic reminder for a customer who hasn't agreed to receive notifications from you, just check the Privacy box.
The acceptance of terms and the information related to
the customer’s Data Protection/Privacy is available in their
profile, under the Privacy option: View > Customers > Select
the customer > Right Menu > Privacy).
The system is free and available for Pet Hotel, Pet Daycare, Training, Veterinary, and Pet Grooming software.
You can use it in different ways:
Link or URL: Share it with your customers, as if you were sharing your website or phone number with them.
QR Code: You can share it with your customers, as if you were sharing your website or phone number with them. You can send it by email, print it, and place it in your business, ... your customers will love it.
You can include it in your social media, for example, on your Instagram profile.
You can also include it on your website or blog.
You can choose the languages you want and the format that best suits your needs.
1. Just copy the code you want and share it with your customers or include it on your website/blog/social media.
2. Your customers can request appointments, and you decide whether to accept or reject them.
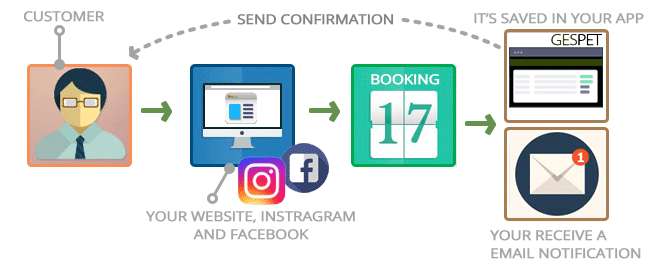
3. You receive an email with all the information
4. The request is automatically recorded in the software
5. Easily, from that same screen, you can:
Check the occupancy
See if the customer has unpaid bills
Call the customer by phone
Contact the customer by WhatsApp
Send the confirmation email
Or send the rejection email
The system uses responsive design, meaning the form adjusts to the size of the device (computer, mobile, or cell phone, ...) so that it always displays correctly.
How to Set Up and Use Online Bookings on Instagram, WordPress, and More:
You can configure de nursery services and prices. You can create different prices and services: high / low tourist season, special offers for multiple animals, offers for weekend, long stays etc.
IMPORTANT: Before setting all your rates or prices, make sure that you have configured the tax correctly in the Settings > Language/currency/tax option, because they will all have the same tax that you have configured in this option.
For example:
If in this option you have configured the general tax as 0%
After you configure a new nursery service, .. that service will also have the tax at 0%
If in the future you modify the general tax and change it, for example, to 7%, this will not be changed in the services or rates that you already had configured.
In the new services or rates that you add, if the 7% tax will appear
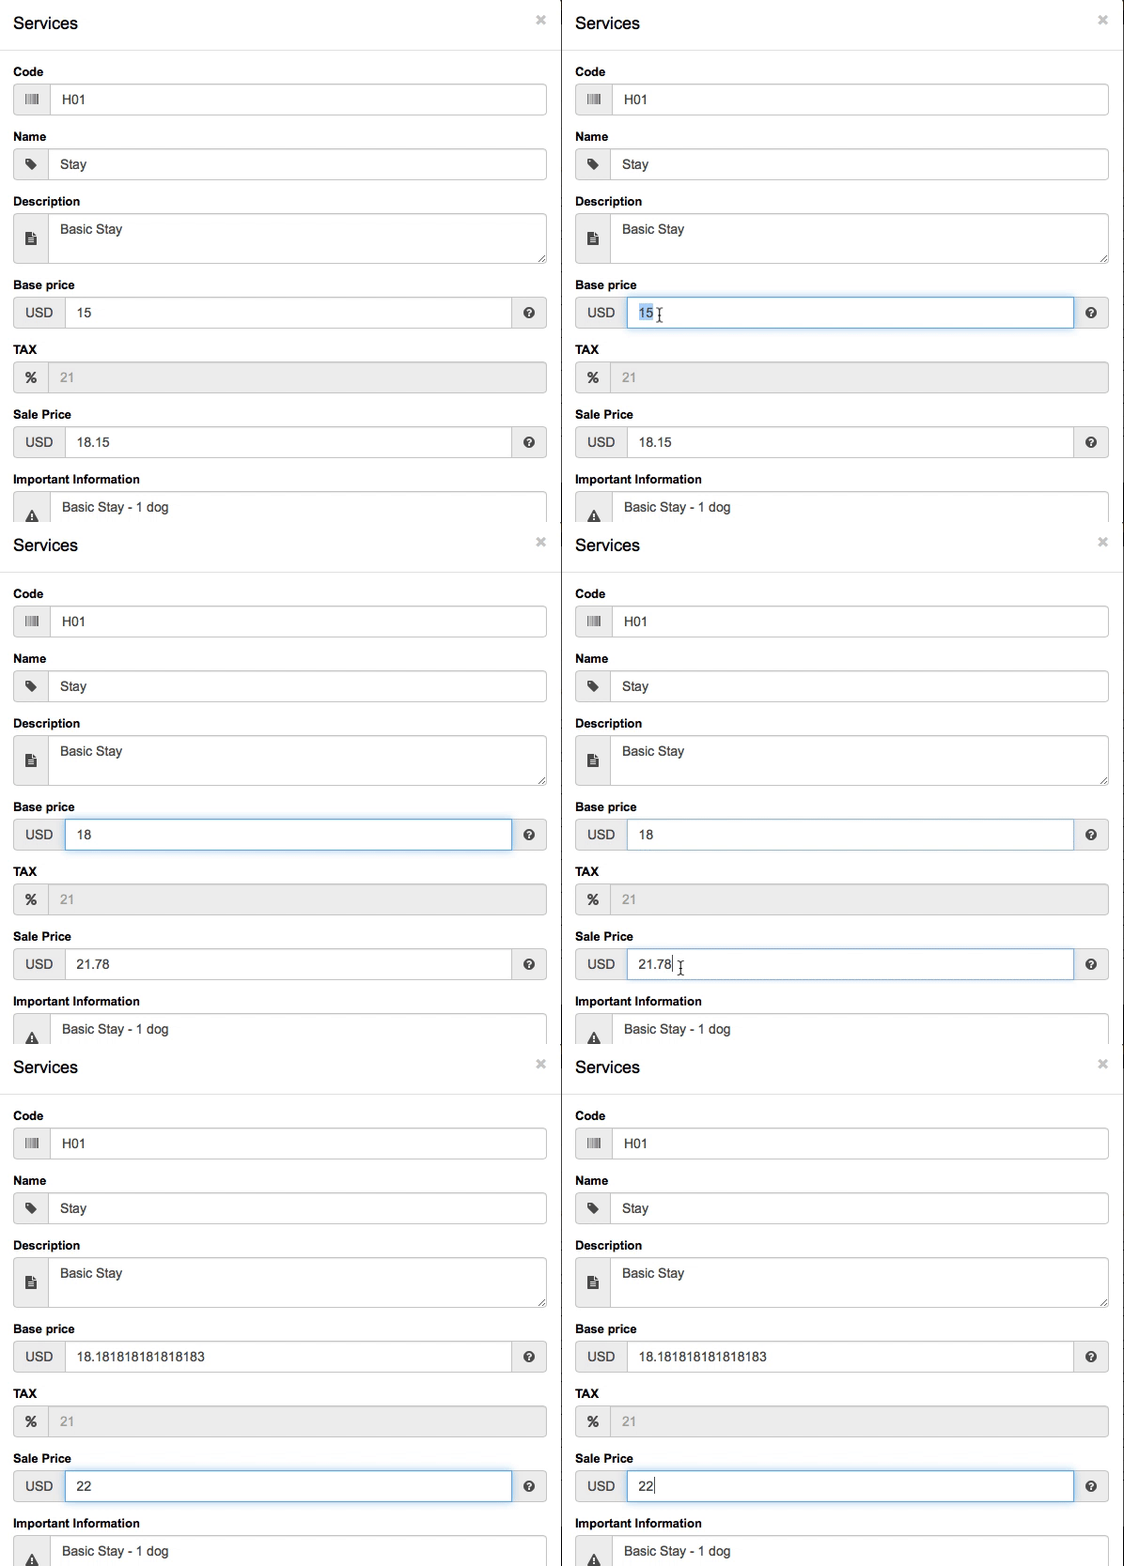
The CODE is not automatic or corrective, it is a free code, that is, you can use the code or reference that you want, (like a barcode but for your services). You can simply be a number (1, 2,3, ...) or a special code by categories, what you consider best, for example:
H01 Single room
H02 VIP Room
T01 Trasport
E01 Extra: camera service in the room
A01: Special food supplement
The PRICES:
If you type the base price (or price without tax), it automatically calculates the sale price (or final price including taxes) based on the percentage configured tax.
If you type the sale price (or final price including taxes), it automatically calculates the base price (or price without taxes) based on the tax percentage configured.
The % TAX is the same as you have configured in the Configuration > Language/Currency
The services can be deleted, except the services "you are using". If you have booking/check-in/check-outs .. that include the service for example "Basic stay", you can not delete that service from the list, because it would also be deleted from those booking/check-in ...
In this case, this message will appear informing you of the reason why it is not possible to delete the service. Remember: You CAN modify it, but you CAN NOT delete it.

To modify a service:
Click on that service
Change the name, price, ...
Click on the Save button
If the % of taxes has changed? What I can do?How can I modify it in the software ?:
For example, the new % TAX is the 8%, to change it:
Access to the Settings > Language/Currency/Taxes option
Write the new VAT, for example 8%
Access to the Settings > Nursery services option
In the services that you had configured before and that you have already billed, you cannot change the %VAT.
You can change the name, or de price but cannot change the %VAT, because this would affect the invoices and the reports.
If you are no longer going to use them, you can mark them as Inactive.
If it's marked as "inactive", will not be available when making a new booking or check-in, for example, but since it hasn't been removed, you'll keep all your previous sales history and reports.
Add the services, now the %TAX for this services is 8%.
In this option you can configure the planning parameters:
You can configure the planning to match your opening hours business, indicating the start and end time.
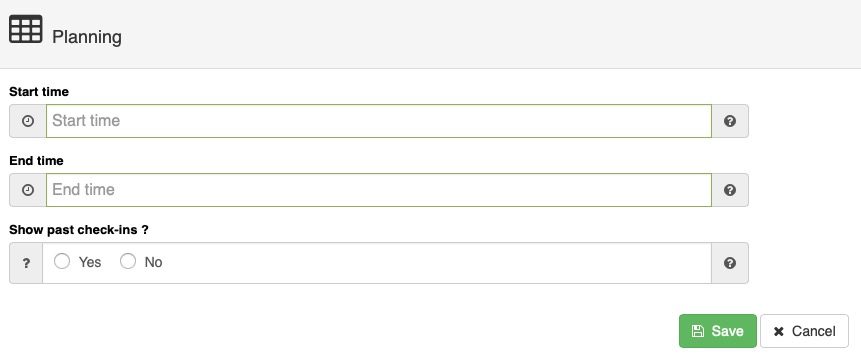
Appointments and services appear in the planning. When you finish the service, that service would no longer appear in the planning, but if you want it to continue showing, you can configure it in this option and it will appear in gray color.
Configure the rooms of your nursery. If you do not want a room to appear, you can deactivate it, in this way the program will not show it when you make a booking or an check-in.
You can assign them a color to identify them quickly and configure the names you want for the rooms.
See more information about names and colors of rooms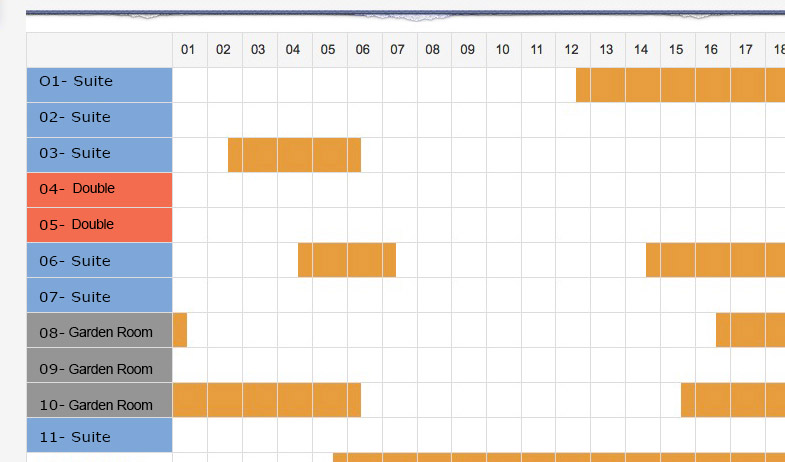
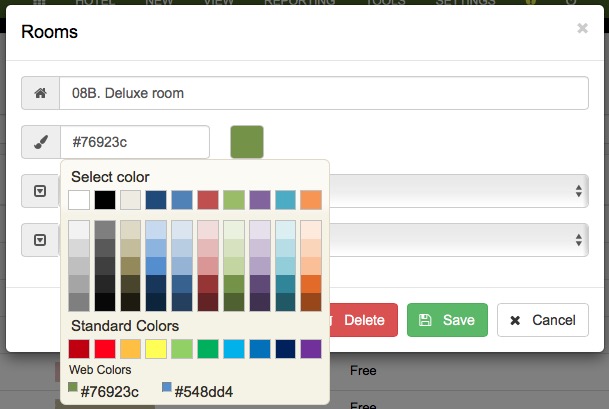
Does each type of room have a different price?
Read more informationIn each room you can host one or several animals of the same customer in a stay (for example 5 dogs of John). That is, in a range of dates, you can not select a room to make an check-in for the 3 dogs of John and 1 dog of Mary.
How to set up rooms for multiple animals?When a room is occupied or is not available because you have disabled it, you can not select it to make a new booking/check-in.
If the rooms are not listed alphabetically because you have used numbers, you can fix it like this:
For example, they appear ordered like this:
1
10.A
10.B
11
12
2
The way to solve it is by placing a "0" in front of it, this way they will appear correctly numbered:
01
02
...
10.A
10.B
11
12
...
20
TAGS:
Taxes pet hotel | taxes pet kennel | employees pet business | employees animal business | dog hotel send invoice | pet hotel send invoice | animal invoice template | online booking pet hotel | online booking dog hotel | online booking dog boarding | Prices pet hotel | prices kennel | prices dog boarding
