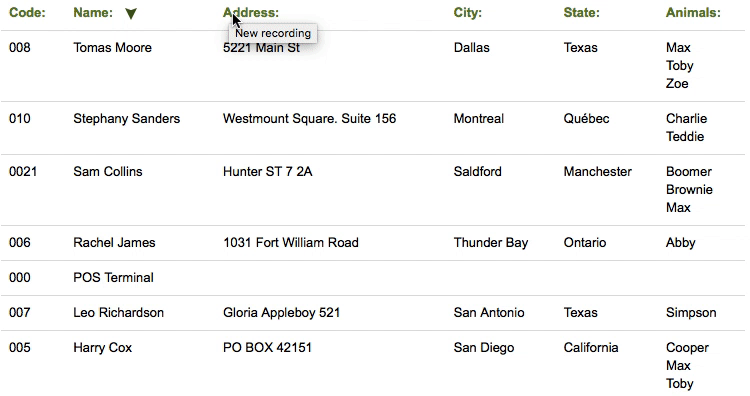
In this option, you will see all the breeding animals and can add new ones.
At the top of the screen, there is a search bar. If you enter information about an animal and press enter or click the magnifying glass, all matches will appear.
You can sort the list of breeding animals as you need:
More information about search and sorting:
Keep readingTo add breeding animals, you have two options:
Add them individually (one by one) using the Add option
Or add multiple animals at the same time using the Import option.
To add them, use the buttons at the top:
Click the Add new button, fill in the details, and click
Save.
(Refer to the section New > Animal for more
information)
Or click the Import button and follow the instructions.
How to import breeders massively into the software
How to import animals in bulk in the software
Click hereIf you click on an animal, you can see all its information and edit it, and check its statistics and much more.
Terminology used in the software
Breed and variety: Some breeds have varieties. For example, Breed: Poodle | Variety: Miniature.
Hair or Coat: Smooth coat, double coat, hard coat, long coat, curly coat, ...
Size: Mini, small, medium, giant...
Microchip or Chip: It is a small device that provides permanent identification for your pet.
Veterinary book or pet passport: It is a document that officially records information about an animal and its vaccines.
Breeder: Select yourself (if you are the breeder) or select another breeder from the list. (You can add breeders in the New > Breeder option).
Tattoo: In some countries, a tattoo is a valid identification for pedigree dogs.
Origins book: In some countries, the origins book is used to track genealogy and preserve the purity of the breed, encouraging its conservation and genetic improvements. You can include the number, date, and country of registration in the book.
You can assign a color label to the booking if you want to identify it more quickly.
Color Labels: 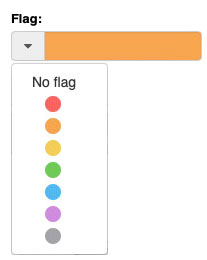
You can assign a color to quickly identify a
booking/check-in/service/etc. or a customer/animal/etc. For example:
|
When you click Save, the animal is added, and you can:
Go directly to its profile or "Magic Desk" by clicking "View
details"

Or continue adding more animals if you prefer
All the animals you have added can be viewed in the View
>
Breeding Animals option. If you select one, its Profile or
"Magic Desk" will appear, where all the information about that animal is stored: profitability, additional information,
heats (females),
crosses, litters, pedigree,
documents, notices,
important information, and much more.
If you want to add new breeds, you can do so in the
Settings > Breeds option. For animals without a breed or
mixed breeds, you can select the
Common breed that is already created in the list or create a new breed.
How to set up Breeds?
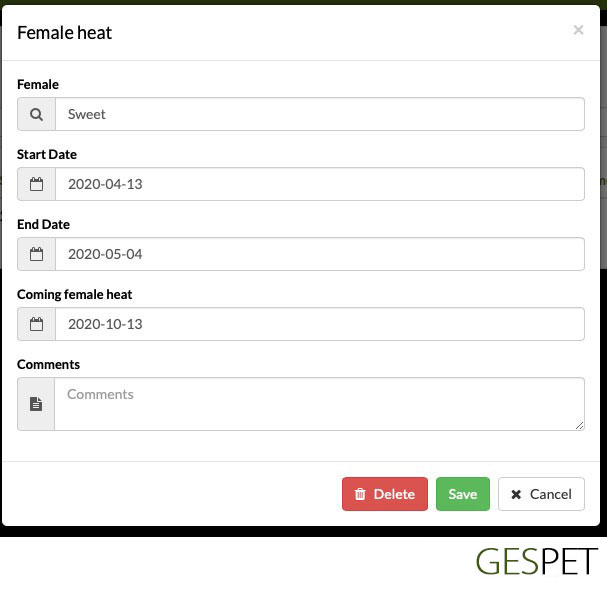
Click hereYou can record the periods in which a female reproductive animal is in heat.
First, add the reproductive female in the New > Breeder option, and then you
can add her heat cycles.
To add a new heat cycle, enter the initial date, and the software will automatically calculate the expected end date and the date of the next expected heat cycle based on the initial date.
If necessary, you can modify these dates.
In the View > Heat Cycles option, you can see all the recorded
heat cycles and
search for those of a specific female, if desired. In the animal's profile,
you can also see all its
heat cycles by clicking on the Heat Cycles option in the right menu.
To add the mating between two breeding animals, it is only necessary to select them using the search feature. Both must be of the same species and breed.
When selecting a female, her heat cycles appear. Choose the corresponding heat cycle to associate that during that heat cycle, a mating has occurred.

Select the result of the mating: "covered" (pregnant) or "not covered" (not pregnant).
You can also specify if the mating was done through artificial insemination or if it was a "natural" mating, and you can add more notes or comments.
You can add as many matings as have occurred during a heat cycle. For example, if there were 3 matings during that heat cycle, and the results were:
Attempt 1: not covered (not pregnant)
Attempt 2: not covered (not pregnant)
Attempt 3: covered (pregnant)
We can plan litters that have not yet been born. That is, they are planned or expected, and the female may or may not be pregnant, but we have already planned the litter, and we can even start accepting bookings for the puppies we expect to be born but are not yet born.
Before adding a new planned litter, add:
The breeder. In the New > Breeder option. If you are the breeder, you
can
add yourself.
The breeding animals (The parents). In the New > Breeding animal option
Now that we have all the data, we are ready to add the planned litter.
We just have to select:
Male and female
The breed is auto-filled with the breed of the parents
Assign any name to the litter. It can be a number or the names of the breeders and the date (for example, Brownie and Cookie May 2023), or any name you prefer.
You can indicate the expected birth date if you know and add some notes or comments.
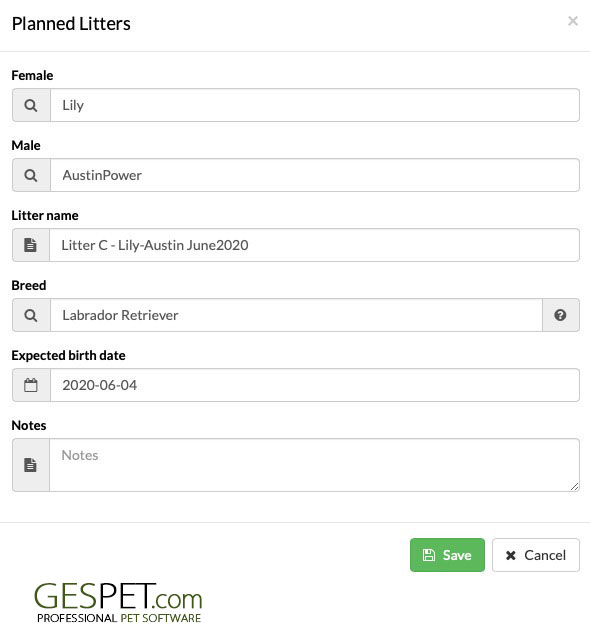
At the moment, we have no more information about the birth because the puppies have not been born yet.
You can cancel or void a planned litter by clicking on the
In the View > Planned Litters option, select a
planned litter.
There are two tabs:
Information: Where its basic information is and you can modify it.
Puppy Booking, where you can view/modify booking and add new ones.
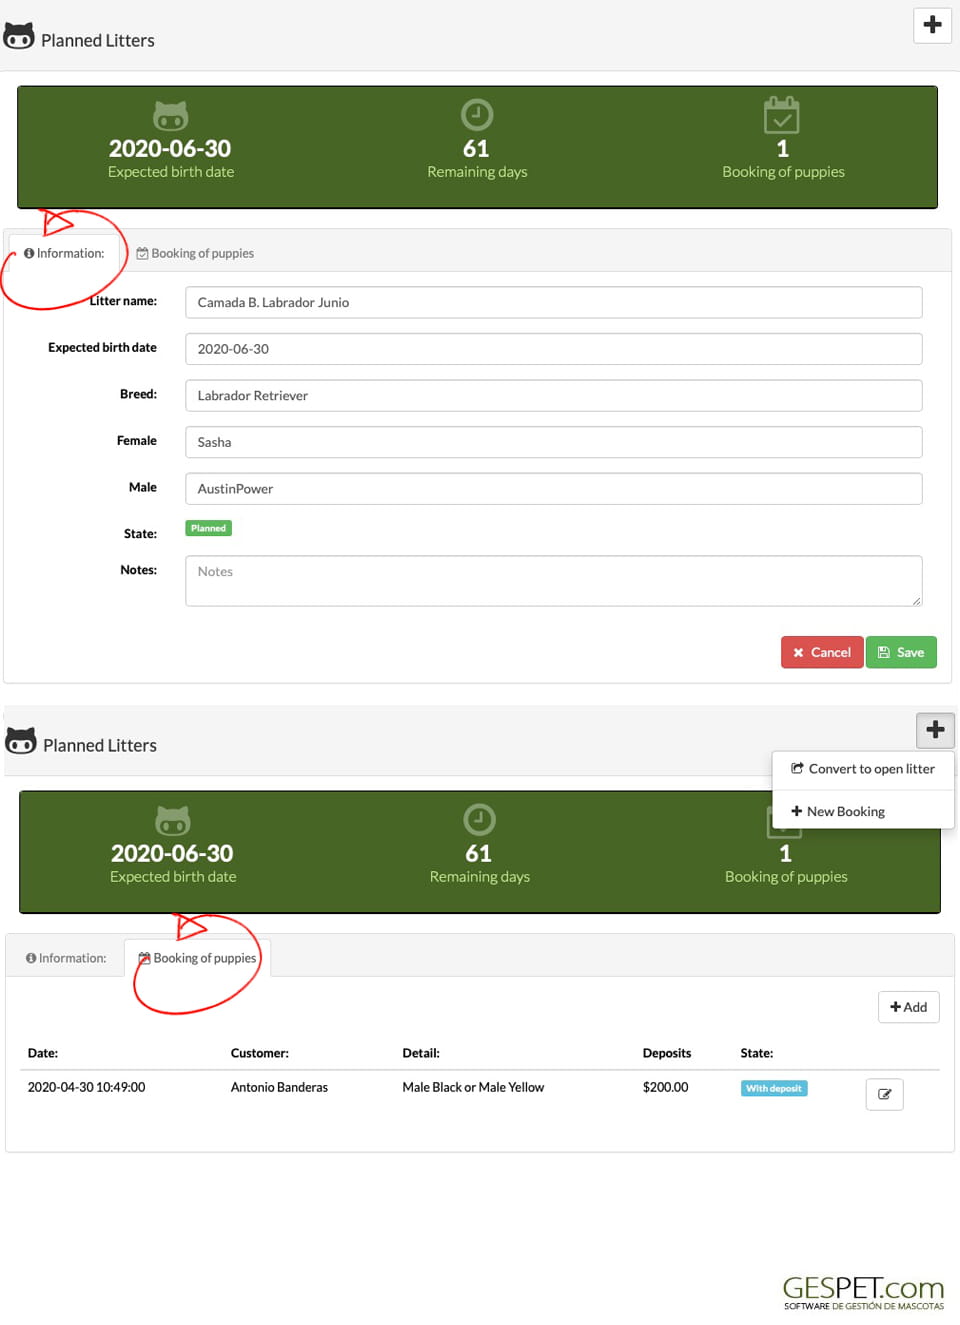
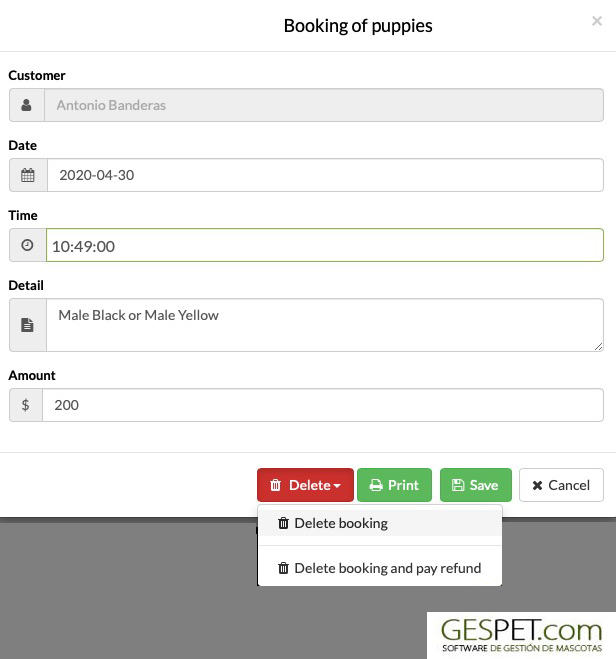
By clicking on a booking, you can view the details and modify it. They can have different statuses:
: if the customer has paid a certain amount of money as a booking or deposit.
: if there is no associated payment.
To add new booking, click on the button in the upper right corner and
You can select an existing customer or add a new one directly from this screen.
The date and time are automatically filled, and you can include a detail or comments for that booking and if they pay an amount of money to reserve.
Click the Save button to record that booking.
More information about planned litters and puppy booking:
Click hereIt is possible to EDIT A BOOKING or DELETE IT. If the client also provided money as a deposit, you can:
Delete that booking and refund the money (Delete booking and make a refund)
Or only delete the booking but not refund the money.
The money not refunded remains associated with that customer and with it, you can:
Reserve an already born puppy in another litter
Make a booking for another planned litter
Do nothing, wait without associating that money with any puppy or litter
When the litter is born, we will turn this planned or expected litter into a real litter with the puppies born.
We keep those booking that customers had made, and now we can associate them with a puppy that has been born.
To convert this litter, click on the button in the upper right corner and
Read the next section for more information about litters
If the female has been covered during mating (she is pregnant), the birth will occur, and the puppies that make up the litter will be born.
There are two types of litters:
Planned Litters. The litter is planned, and the female may or may not be pregnant, but the puppies have not yet been born.
Litter. The puppies have already been born
To read more information about planned litters, see the previous section.
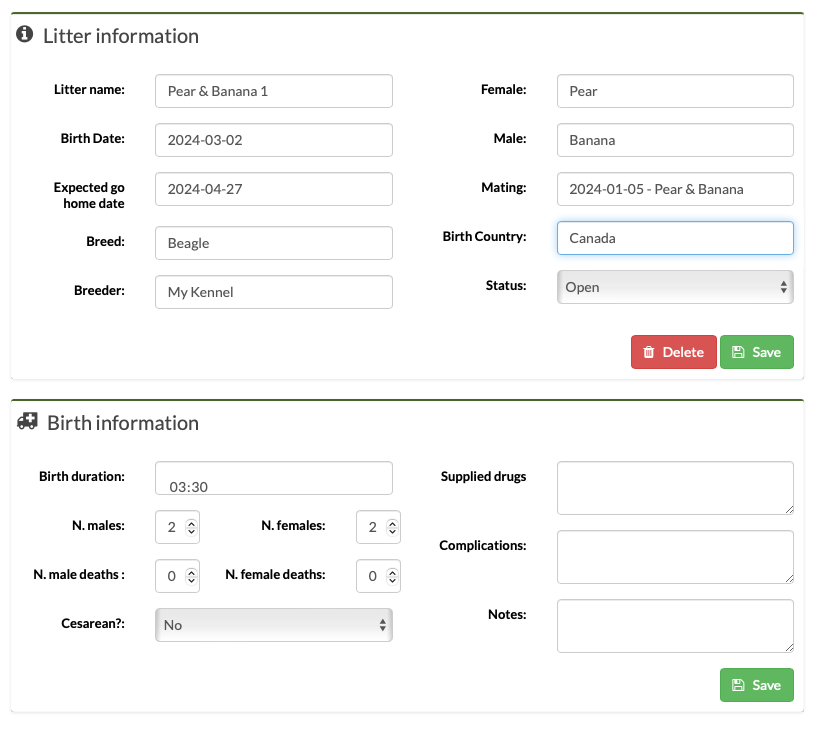
If you had already added the planned litter and the birth has occurred, you can convert it to a Litter.
We keep those booking that customers had made, and now we can associate them with a puppy that has been born.
To convert this planned litter:
In the option View > planned litters, select the
planned litter.
Click on the button in the upper right corner and
Now it no longer appears in the list of planned litters but in the list of litters.
Before adding a new litter, add:
The breeder. In the option New > breeder. If you
are the
breeder, you can
add yourself.
The breeders. In the option New > breeder
The female's heat. In the option New > heat or in
her
profile
The mating between the two animals. In the option New >
mating
Now that we have all the data, we are ready to add the litter.
Select:
Breeder
Male and female
The breed is automatically filled with the breed of the parents
Assign the name you want to the litter. It can be a number, or
the name of the
breeders and the date (for example, Brownie and Cookie May
2023),
or whatever you
want.
(if you converted it from a planned litter, this data will
already be filled, but you can modify whatever you
want)
Now select the country and birth date of the litter. You can also include the expected delivery date of the puppies.
Birth details:
The duration of labor
The number of puppies born and the number of deaths
More information related to birth: medications, complications... and if you want to add notes or comments.
You can see all the litters you have added in the option VIEW > LITTERS.
If you click on a litter, you can see/edit the information of the parents, birth, puppies, genetic line (or pedigree of the puppies), the evolution of weights and measurements of the puppies, the expenses of that litter, and the income it has generated, and much more.
The litters can be:
. If all the puppies have already been sold
. If NOT all the puppies have been sold
To see all the details of the litters, refer to this help guide in the
option View > Litters
You can add booking for puppies from your breeding program. Bookings can:
Have an associated payment, and the customer has paid an amount of money to make the reservation or deposit.
Or not have an associated payment.
And they can also:
Be associated with a puppy. If the customer has reserved a specific puppy
Or be associated with a litter. If the customer has made a booking for a specific litter
Or not be associated with any specific litter or puppy. For example, they want to reserve a puppy but you don't have litters or planned litters yet. You accept the booking, but it is not associated with any litter or puppy yet; you will associate it later.
If the customer is new, we can add them directly, and if
they already exist, we only need to select them.
All their information appears, a notice if they have outstanding invoices
and
if they have money deposits (i.e., they have paid some amount to reserve a
puppy that has not yet been sold to them).
You can select a previous money deposit or add a new one if the customer pays for it.
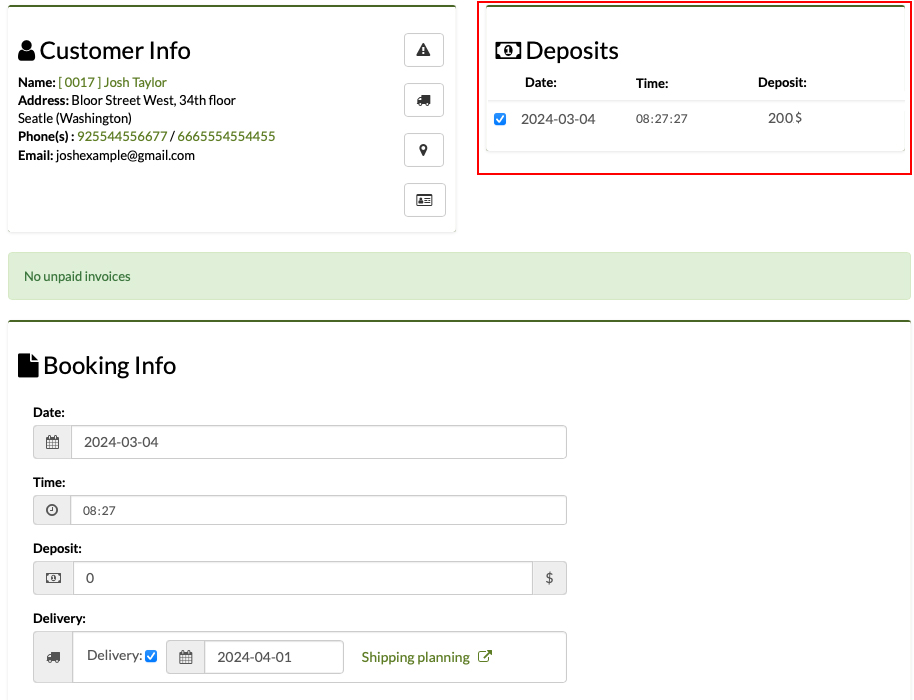
If you offer the home delivery service for puppies **, you can select the delivery day, and a notice will appear on the dashboard for that day, reminding you of the appointment. Also, in the Transport schedule, the delivery for that day will be noted.
Select whether you want to make the booking for a specific puppy, or for a litter, or without associating it at the moment to any litter or puppy. Later, you can modify it.

You can print the documents and contracts you have configured. For
example, the booking or booking conditions. These are configured in the
Tools > Documents and Contracts option under the type
Booking/Appointment.
You can also print the booking summary by clicking the button
**This option corresponds to the Gespet Transport solution. If you do not have this software, the Transport option will appear inactive.
See more information about the transport software:
Keep readingYou can modify booking, for example:
Ana wants a yellow female Labrador puppy, and we will have a litter born next month. In this case, we make a booking for that litter, indicating that Ana wants a yellow female puppy.
We haven't assigned any puppy to her because they have not been born yet.
When the litter is born, and no puppies with those characteristics have been born, and Ana wants to wait for the next litter. In this case:
If you already have the next litter planned, you can modify Ana's booking and associate it with the next planned litter.
Or if you don't have a planned litter yet, simply disassociate the booking from that litter. This way, Ana's booking will remain pending, and you can associate it with that new litter when you plan it later.
If a puppy is associated with a booking, and you modify it to be unassociated, that puppy will become "available" to be reserved/sold to another customer.
In addition to modifying a booking, you can also cancel it to void the booking but have a record of canceled booking. You can:
Cancel it and make a refund (or credit) of the money paid as a deposit/booking.
Cancel it and NOT refund the money. That money will remain associated with the customer. If you allow them to use that money for a new booking, when you go to make a new booking for that customer, you can select that previously paid amount.

Instead of canceling, you can also completely delete the record by clicking the button . (This cannot be undone, and there will be no record of deleted bookings)
More information about litters and puppy bookings:
Keep readingIf you have puppies from a litter to sell, you can do so from the option NEW > SALE.
There are two ways to do it:
From a previous booking. If the customer had already made a booking, make the sale by selecting that option.
In View > booking, you can see all the booking.
Without a previous booking.
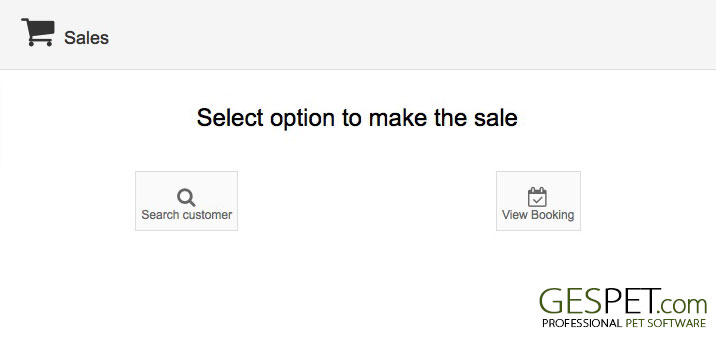
Click on the button
If the customer is new, click on the button
Fill in the basic and contact information.
The software automatically checks if that email address or that ID/NIF/Identification already exists and displays a warning to avoid duplicate contacts.
If you want to include more information (address, state, etc.), click on More information
To fill in the Privacy/RGPD-related information, click on Privacy
Click Save
If the customer already exists:
Type their name, and all matching results will appear for you to select the appropriate one.
If the customer already exists and has unpaid invoices, a warning will appear on the screen.
A list appears with all the puppies that have not been sold yet, with different color labels identifying those that are Available and Reserved .
Select the puppy you want to sell and click the button
Important: If you made a booking for a puppy/customer, you must make the sale from that reservation. Otherwise, when making the sale:
The deposit or advance payment the customer already paid will not be applied.
That reservation/deposit will not be automatically removed (although you can remove it manually if you want).
Therefore, if the puppy has been reserved, it is recommended to sell it as explained in the next section.
Fill in the sales details and click the button again to finalize the sale.
At the end of the sale, an invoice is generated, and additionally:
In the View > Sales option, you can see this new sale you just
made
The puppy has been marked as Sold and is no longer available.
The puppy has been associated with that customer, so, when checking the profile of that customer > Animals > You will see this information
If you have made a previous booking (with or without deposits/advance payments):
Select the option
All booking with their deposit payments appear for you to select the one that corresponds
Click the button
You will see that in the "Advances" section, the deposit that the customer paid for the booking already appears
Click to finalize the sale
At the end of the sale, an invoice is generated, and additionally:
In the View > Sales option, you can see this new sale you just
made
This booking and/or deposit has been removed
The puppy has been marked as Sold and is no longer available.
The puppy has been associated with that customer, so, when checking the profile of that customer > Animals > You will see this information
More information about litters and puppy booking:
Keep readingList with all breeders'contacts. A small indicator appears with the total number of contacts.
At the top of the screen, there is a search bar. If you enter expense information and press enter or click on the magnifying glass, all matches will be displayed
You can sort the list of expenses as you need:
More information on ordering and search engines:
Keep readingTo add contacts, you have two options:
Add them individually (one by one) using the Add option.
Or add multiple contacts at the same time using the Import option.
To add them, use the buttons at the top:
Click the Add new button, fill in the details, and click Save.
(Refer
to the section New > Breeder for more information)
Or click the Import button and follow the instructions.
Learn how to import contacts massively into the software:
Click hereIf you click on a breeder contact, you can view all their information, edit it, contact them directly, and much more.
List of all veterinary contacts. If you have multiple business areas, suppliers data is accessible from all of them, but contacts are categorized by business area. You can consult them all or by business area (for example, only the vet contacts for hotel).
A small indicator displays the total number of suppliers.
At the top of the screen, there is a search bar. If you enter customer information and press enter or click on the magnifying glass, all matches will be displayed
You can sort the list of customers as you need:
More information on ordering and search engines:
Click hereTo add customers, you have two options:
Add them individually (one by one) using the Add option.
Or add multiple contacts at the same time using the Import option.
To add them, use the buttons at the top:
Click the Add Customer button, fill in the information, and click Save.
(Refer to the New > Customer section for more information)
Or click the Import button and follow the instructions.
How to import customers in bulk in the software
Click here How to import customers in bulk in the softwareList of all suppliers. If you have multiple business areas, suppliers data is accessible from all of them, but suppliers are categorized by business area. You can consult them all or by business area (for example, only the Grooming suppliers).
A small indicator displays the total number of suppliers.
At the top of the screen, there is a search bar. If you enter supplier information and press enter or click on the magnifying glass, all matches will be displayed
You can sort the list of suppliers as you need:
More information on ordering and search engines:
Click hereTo add suppliers, you have two options:
Add them individually (one by one) using the Add option.
Or add multiple contacts at the same time using the Import option.
To add them, use the buttons at the top:
Click the Add New button, fill in the information, and click Save.
(Refer to the New > Customer section for more information)
Or click the Import button and follow the instructions.
How to import suppliers in bulk in the software
Click here How to import suppliers in bulk in the softwareList of all veterinary contacts. If you have multiple business areas, suppliers data is accessible from all of them, but contacts are categorized by business area. You can consult them all or by business area (for example, only the vet contacts for hotel).
A small indicator displays the total number of suppliers.
At the top of the screen, there is a search bar. If you enter contact information and press enter or click on the magnifying glass, all matches will be displayed
You can sort the list of contacts as you need:
More information on ordering and search engines:
Click hereTo add contacts, you have two options:
Add them individually (one by one) using the Add option.
Or add multiple contacts at the same time using the Import option.
To add them, use the buttons at the top:
Click the Add New button, fill in the information, and click Save.
(Refer to the New > Customer section for more
information)
Or click the Import button and follow the instructions.
How to import contacts in bulk in the software
Click hereList of all expenses or purchases you have recorded. If you have multiple business areas, expenses or purchases are accessible from all of them, but you can view them collectively or independently (for example, only the Hotel expenses).
A small indicator with the total number of expenses is displayed.
At the top of the screen, there is a search bar. If you enter expense information and press enter or click on the magnifying glass, all matches will be displayed
You can sort the list of expenses as you need:
More information on ordering and search engines:
Clic hereTo add a new expense, click on the 'Add New' button icon, fill in the
details, and click 'Save'.
(Refer to the 'New > Expenses' section
if you want to see more information)
How to record expenses in the software:
Clic aquiTAGS:
dog hotel reservation | canine hotel booking | kennel reservations | dog kindergarten reservations | animal travel software | how to organize animals data | animal supplier software | animal software | veterinary software | hotel expenses program | manage animal expenses